Interchangeagble magnetic build platform
prusaprinters
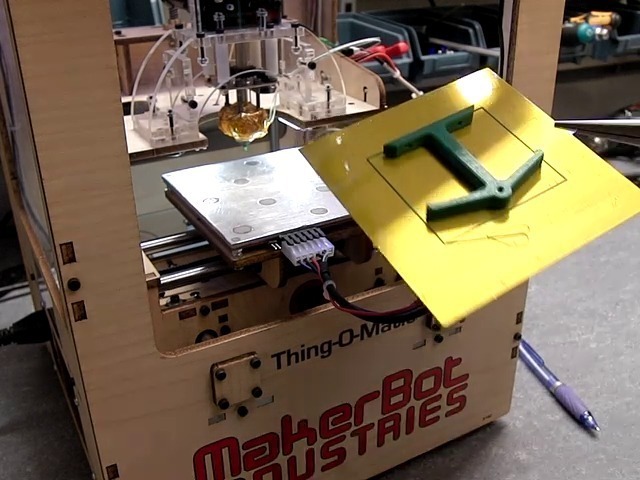
<ul> <li> <figure class="media"> <oembed url="http://youtu.be/2RIBSVsIbjE"></oembed> </figure> </li> <li><a href="http://flickr.com/photos/geekubator/sets/72157629825289523/">http://flickr.com/photos/geekubator/sets/72157629825289523/</a></li> </ul> <p>Some of you may remember how practical the removable build platform of the Cupcake CNC was! The aim of the project is to make a build platform (here demonstrated on a MakerBot Thing-O-Matic) which is easy to remove from the 3D printer and facilitates the removal of the 3D printed part by the pealing principle.</p> <p>The base of the platform is made out of a 3 mm thick aluminium plate. It has twelve 10 mm holes in which 2.5 mm thick high-strength neodymium magnets are placed. The plate is screwed onto the heated build platform of the 3D printer.</p> <p>The removable part of the build platform is made out of 0.6 mm flexible steel sheet. It is strong enough to resist any warping from the stress of the 3D printed plastic model, but flexible enough to be held down firmly by the magnets and to bend and be peeled of from the printed plastic model.</p> <p>Normally 3D printed models with large bottom surfaces are difficult to be removed from a stiff build plate, resulting in high stress on the 3D printers build plate structure when one tries to bend it off. In other cases one tends to use sharp blades wedged between the model and the build plate, which tends to damage the heat resistant Kapton tape.</p> <p>The flexibility of this thin, removable build plate makes it much easier to remove the 3D printed plastic model without damaging the Kapton surface.</p> <p>This prototype was developed and made with the good help of MakerBot operator <a href="/barspin">http://www.thingiverse.com/barspin</a></p> <h3>Instructions</h3> <p>Cut a 3 mm aluminium plate to the size of your 3D printer's build platform</p> <p>Drill some holes through it</p> <p>Press/glue some high-strength neodymium magnets into the holes</p> <p>Cut a thin magnetic steel sheet to the same size as the build plate</p> <p>Cover it with Kapton tape</p> <p>Mount the aluminium plate to your heated build platform</p> <p>Place the steel sheet on the alu plate with magnets</p> <p>3D print anything you want</p> <p>Easily remove the thin plate and insert a new empty one into the 3D printer to print new stuff right away!</p> <p>Wait some moments for the removed 3D print to cool down</p> <p>Easily peel off the steel sheet from your plastic 3D print</p> <p>Enjoy! :)</p> <p>Check out video and images as follows:</p> <ul> <li> <figure class="media"> <oembed url="http://youtu.be/2RIBSVsIbjE"></oembed> </figure> </li> <li><a href="http://www.flickr.com/photos/geekubator/sets/72157629825289523/">http://www.flickr.com/photos/geekubator/sets/72157629825289523/</a></li> </ul> Category: 3D Printer Parts
With this file you will be able to print Interchangeagble magnetic build platform with your 3D printer. Click on the button and save the file on your computer to work, edit or customize your design. You can also find more 3D designs for printers on Interchangeagble magnetic build platform.
