Iron Battle Axe (Destiny)
pinshape
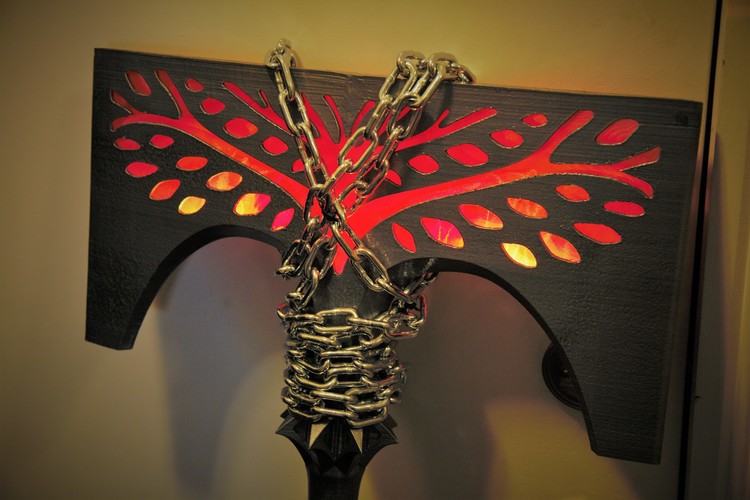
This thing is a work in progress, but not for much longer! This is a replica of the Iron Lord Axe from Destiny: Rise of Iron. Print four of the axe quarters, you can use small dowels or rods to hold the left and right halves together, while the front and back was meant to be held on with magnets. You'll need to get twelve 1/4 inch and twelve 3/8 inch rare earth magnets that are 1/10 of an inch thick. The interface will hold the quarters, and can be friction fit (though I would use E6000 or epoxy) on to a, 1 1/4" aluminum tube One thing I would like to mention, when I started on this, I used the Iron Emblem that serves as the cover image for the Rise of Iron. The axe depicted there has a different height to width ratio than the in game model, at this point, I have changed the aspect ratio of the axe to follow that of the in game model The Grip file is optional, I am wrapping my grip in a leather braid, but I felt that not everyone would want to or even be able to do this, so I made a facsimile that you can print and use in place of real leather, it will slip right over the grip base, and will couple with the grip trim, you'll likely need to glue these parts together Print settings for success: Axe Heads: Print using a brim, 3 layers (1.2mm) and an infill of 30%. Support material is crucial and I recommend using a grid structure instead of lines, %20 fill. The heads are tall and fairly thin, you can make use of minimal layer cooling time to slow down the printing process at the upper section. I have my printer set to 40mm/sec for outer shell, 60mm/sec for inner shells, and 80mm/sec for the infill. I set my layer cooling time to 60 seconds and printed two quarters (axe head half stl) at the same time, this will take about 32 hours with these settings. If you are having issues with the tops wiggling too much or don't want to deal with magnets, try using the Fused Axe Half instead Pommel: 10-15% infill, three shells. Support should be lines, and your slicer should only generate support for the middle hole (this hole is meant to hold a battery pack). No brim or raft is needed, nor are any special settings (such as an extended layer cooling time) Pole interface: Like the pommel, this needs no special settings, with the exception of infill. As this is mounting onto a pole and holding the axe head, it needs to be strong, use 60%-80% infill for this part, support can be lines to simplify removal, but I recommend having a fill density of 30% Grip base: Nothing special here, if it's too tall (was for me) just halve the height and print it twice Grip Trim: Nothing special here, print how you like Grip: Shouldn't need anything special, but if you are having a hard time with bed adhesion, use a brim. This part is optional, and can be replaced with leather Axe head rib: This part fits inside a left/right half to help prevent flexing, nothing too special on this, use a minimum of 30% infill. Should only be needed if you are printing separate head quarters Trinket Cart: This part is meant to hold an Adafruit Pro Trinket inside the pole, your preferred settings will be fine POST PRINT Due to character limitations, you'll find the post print attached as a word doc
With this file you will be able to print Iron Battle Axe (Destiny) with your 3D printer. Click on the button and save the file on your computer to work, edit or customize your design. You can also find more 3D designs for printers on Iron Battle Axe (Destiny).