Iron Man MK6 MK 6 Suit
thingiverse
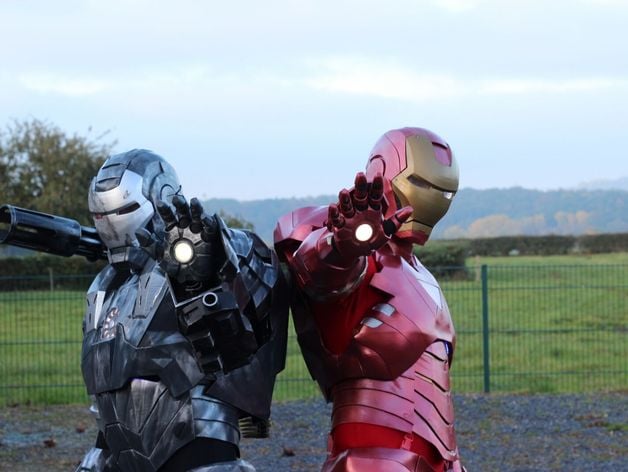
update 07.01.2018: uploaded sketch for back and helmet. Here are my files for a complete Iron Man MK6 suit. It looks great, but it is NOT comfortable. And because it is halloweentime I added a battledamaged mask for the helmet. Here is a video of the moving faceplate. Special thanks to "redeathray" for checking my code and helping me. https://youtu.be/Wdb1UWU4UAYhttps://youtu.be/P-KLNkn2KAAhttps://youtu.be/ZY1E9p6GItU The pictures show me trying out all parts.The electronics are not yet completed, but I think you are more interrested in the files. One picture shows a small version of the MK6 helmet as battledamaged. I gonne use it as decoration for Halloween. I prefere the MK3 helmet to wear. I like the look more. You can download it from "jhon De Sousa" on the following link:http://www.thingiverse.com/thing:260152 Most parts are founded on the following 24cm high Iron Man MK6 shell figure from "RohitVen". I asked him to rework and publish his files as a costume and he agreed to.http://www.thingiverse.com/thing:1026995 The gloves are made of a Papakura file. The glove is originaly made by "zabana" and remixed by "darkside501st". Below the original link for the glove:http://www.therpf.com/showthread.php?t=139470&highlight=hand+zabana As arc reactor I used this Modell from "Thaurus":http://www.thingiverse.com/thing:1377484 All parts were made for a Prusa I3 with a 220x220x240mm buildplate. If you have any problems or find parts which are to big please contact me and I will do my best to change it. Except of the printed parts, some buckles (printed or bought), elastic strap and a lot of soft foam for a little comfort you will need the following parts: Helm: 4x M4 Bush, MG995 Servo, any arduinoor other micro controller, at least 8x LED white, 4x M4x10, 4x M3x20, 4x M3 nut, acrylglass, 2x contactor , (or 1x, depending on the sketch you use) Neck: EVA foam for a comfortable and flexible neck (if you want to make a neck) Chest: acrylglass 2x M4x40, 2x M4 nut, ABS: EVA foam for a comfortable and flexible sideparts Lower arm (each): some springs for a backflipping handplate, M4x20, M4 nut Gloves (each): 4x LED White, 1x G4 COB LED spot, 1x contactor (to enable G4 COB as repulsor) Hips: M4x25, M4 nut Thigh: if you want the knee moving / flapping you will need four springs. I used a blow-dryer to make it a Little more comfortable, because they are really to narrow for my legs. But I could not resize them, because then they wont fit to the rest of the costume and it won't look good . Shoe: a lot of foam to make it suitable. Clipmount: it is made to attach the elastc strap. you will need a M4x25 and a M4 nut for each, you can connect the different parts by using a clips It might be that some parts to not fit to your body. please check it bevor you print all. I am about 1.8 meters high and I have a weight of 80kg. The following measures may help you: head: 58cm shoulders 53cm (from side to side) chest: 105cm waist: 90cm hips: 104cm If you got any questions feel free to ask and massage me. I hope you enjoy it. Print Settings Printer: CL-260, Prusa I3 Rafts: Yes Supports: Yes Resolution: 0.2 Infill: 15 Notes: You will need to mirror many parts with your slicer. The chest, back, hips are just half models. I added a "L", "R" or "half" to mark them you will need to print a second, mirrored one for the full suit. I tried to set a good Position for printing the parts, but you know your brinter better than I do. For example a PRusa with a moving buildplate is not he best Printer to print pretty high objects. All made of PLA at 195°C, 60°C heatbed and 45mm/s speed. Walls at least 0.8 mm if you really want to wear it. I used 1.2mm walls. You will need really much time to print this suit. It took me more than 3 month (24/7) and more than 20kg of filament to print the whole suit. Post-Printing Finishing I conected the parts with a soldering Iron. You might glue it but I do not believe that it will last long if you really wear it. Than I used a 3D-Pen to make the connection points thicker. If you want a real good costume you will need to sand and paint everything. This might be the most work. For the hole suit you will need serveral weeks. Otherwise you can print it in a better resultation. But that would need much time or many many printers. How I Designed This Well... First I found the figure of the Iron Man MK6 suit on thingiverse. As I already made an Iron Man suit of foam I was really sattisfied to find such a good model. I used Meshmixer to make the things thicker, enlarge, resize, connect them and try to delete failures. Hinges and things like that were made with Inventor. Custom Section Aching and braking It might look pretty good, but because of the tough fittings and sometimes narrow parts it hurts a little at many positions. Espacially the knee and the elbow are complicated. Here it hurts most. To drink something while I wear the suit a straw is necesary. some parts might breakoff if they are not printed well or you move to heavy. So test everything before you paint it. this will save you a lot of work.
With this file you will be able to print Iron Man MK6 MK 6 Suit with your 3D printer. Click on the button and save the file on your computer to work, edit or customize your design. You can also find more 3D designs for printers on Iron Man MK6 MK 6 Suit.