Ironing Board Rack (for t-frame ironing board)
thingiverse
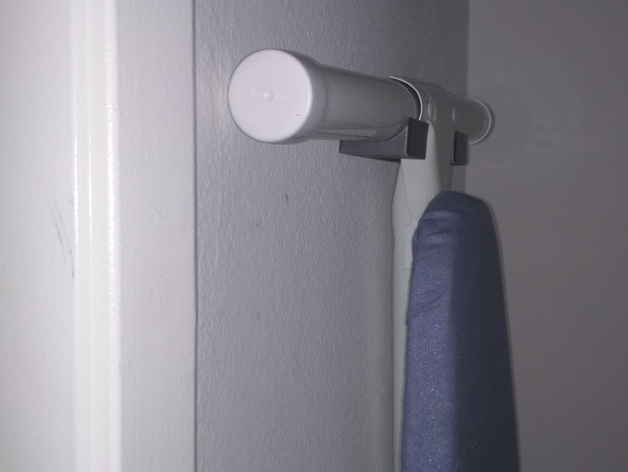
Our ironing board folds nice and neat where it would fit snug against the wall - except that with nothing to hold it, it tends to un-click one notch and flop around in the way. Our closet is very narrow with shelves about 20" across from the space the board is stored in. I needed something to keep this stored neatly, and also raised up off of the floor so the wheels for our all-purpose cart would have room. Moving either of these items tends to start an entangled battle where both have to be removed every time either one is needed. I designed this because in addition to learning DesignSpark Mechanical and 3d printing, it was time to stop the madness. DesignSpark document file included as reference example Print Settings Printer Brand: Printrbot Printer: Simple Black Rafts: No Supports: No Resolution: .30 Infill: 20% Notes: I wanted a quick prototype so I printed at .30 layer height in Cura. I would recommend at least 20% infill. Turn it up 90 degrees (installed position) for best printing results. Probably would get better results with support for the screw holes but it worked okay, no major drooping. Post-Printing Installation guide Hold your ironing board up to the wall with the top bracket in place. Underline the bottom edge on the wall. Mine happened to fit best 9" from the wall, which centers it in a hide-away just inside the door. If you aren't mounting this to solid surface (i.e. wallboard, no stud backing) then use wallboard screw anchors. First mount the top bracket: Install the top bracket using the top screw hole first. I kept the screw holes small for marking accuracy, but had to drill a little bigger to get the screw started. after the top screw is in, hang your board to check the position. Remove the board after the fit-test and use a level to straighten the bracket, then mark the bottom mounting hole. Fasten the bottom screw. Once the top bracket has been secured, mount the bottom support bracket: Hang the iron again for another test fit and hold the bottom bracket in place centered to align with the top bracket position (screw holes should align). The bottom bracket should fit snug against the bottom (back?) ironing board stand brace. Mark the position with a pencil. Remove the board, and re-position the bottom brace to mark the screw holes. Use the same method in the previous step (fasten top screw, confirm position with fit check, level, and fasten bottom screw). be sure the iron is completely folded shut - you should be able to hold it against the wall just above the top rack and drop it into both holders, snug against the wall. How I Designed This I noticed that the frame of the ironing board feet are t-shaped, not a "y" style arrangement as some are, and thought it may be easy to make a holder for it. This top and bottom rack arrangement keeps the board neatly folded, stored where it's not touching the floor, and flat against the wall. I got my calipers out and noted that the diameter of my ironing board legs is about 30 mm. I did notice that the top (front when standing) legs have a Y brace in the middle that spreads out to about 60 mm, so I adjusted the center to make room for clearance. The same is true of the bottom end, but it's facing inward, so I narrowed the gap for compact and stable support. My first top-bracket design proved too narrow in testing due to the internal y-brace. After some design changes, I copied the top bracket and edited it to make the bottom. This was printed in PLA and should stand up to normal use, but this will be updated if a re-design or heavier infill print is needed after live testing. Note: there is a small flaw in one of the top braces, i.e. it's not perfectly symmetrical due to an edge-rounding one one corner that changed somehow. Due to learning-curve (no pun intended) and the minor difference, I may try to resolve this later. If you are new to designing, it may be best to prove-out your dimensions and usability, then take your time when applying finishing touches.
With this file you will be able to print Ironing Board Rack (for t-frame ironing board) with your 3D printer. Click on the button and save the file on your computer to work, edit or customize your design. You can also find more 3D designs for printers on Ironing Board Rack (for t-frame ironing board).