Isobaric Subwoofer V1.0
thingiverse
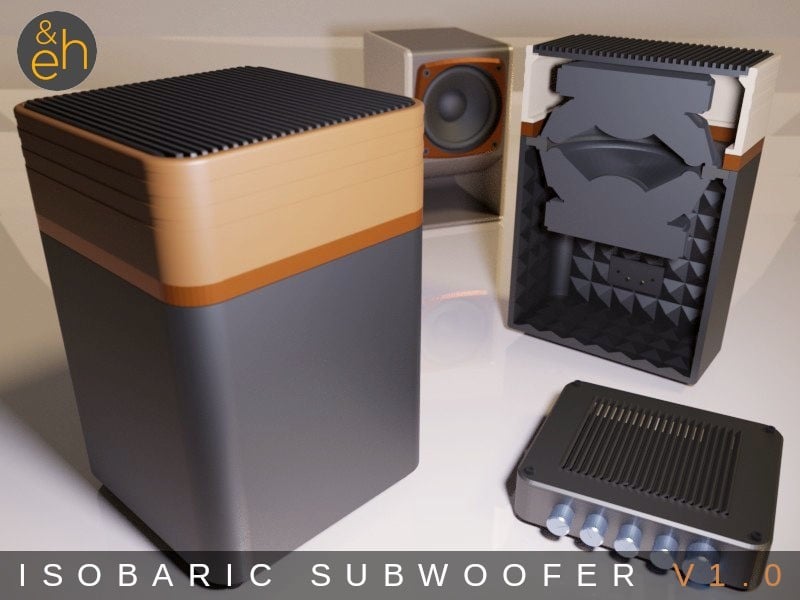
<img src="http://www.alpinehiking.eu/imgs/Speaker_Banner_640.jpg" alt=""> Check out the full set of stereo components (and plenty of other stuff): <b>https://www.thingiverse.com/guppyk/collections/my-stuff</b> <h3>Isobaric Subwoofer</h3> This is a small, fully printable subwoofer <b>to be used in a 2.1 setup. e.g. with https://www.thingiverse.com/thing:4743037 </b> and is mainly intended to help overcome some of the limitations of printed full-range designs. In essence this is a 3 liter enclosure, which, thanks to the isobaric design, performs like a 6 liter enclosure. Printed designs have a few <b>inherent limitations</b>. One is simply the size of what can be printed on a standard 3D printer (e.g. most back horn speakers you will find are rather room-filling, both in terms of sound as well as size), so all my horn speaker designs are very much down scaled versions of the "real" thing. Second is the material. Printed surfaces are very reflective (so add some damping) and although at high infill (approx. 60%+) their properties are similar to MDF you may not be keen on printing a large piece with 18 mm walls at 60%+ infill (this design has much thinner walls and I print at 20% infill / 3 wall lines). So yes, printed speaker enclosures are always a compromise and are best suited for use in 2.1 setups, which really helps with bass performance. Then again it is possible to print such beautiful designs (like folded horns), that would otherwise be extremely hard to implement. So enjoy the beauty and sound of what you have printed - and add a small printed subwoofer... xD So <b>what is an "isobaric" subwoofer</b> and why would you want to print one? Isobaric speaker design is basically a simple trick to reduce the volume requirements for a speaker enclosure (by approx 50%, so helps overcome the no. 1 limitation of printed speaker designs). What you do is you line up 2 drivers one behind the other to double their ability to compress the air in the enclosure behind. This way the outer driver "thinks" that it has a much greater volume to work with. Isobaric only applies to the space between the two speakers, in which the pressure remains moderately (but not 100%) constant, very much unlike the air in the chamber behind the second driver. If the drivers both point in the same direction they are simply connected in parallel (which reduces their impedance to half), which makes their membranes move in parallel. However, you can also have the membranes point at each other (as I did in this design). This may look a little awkward but works great and helps save additional space. However, in this case you have to invert the phase of one of the drivers, which is simply done by connecting the "+" connector of one of the drivers with the "-" of the second (see wiring diagram). This way you can print a 3 liter enclosure, which to the driver "looks" like a 6 liter enclosure. <b>Material</b>. Once again this is an ultra economical design (I know that's a little strange but I just love to see what can be done with such basic components and there is always plenty of room for improving by simply upgrading components). The drivers I used were € 5.5/piece for the 4" option and €6.5/piece for the 5" variety! However, even the 5" variety I used is only 25W RMS (which isn't exactly much for a woofer - plus a Qts of 1.15), so they sound good at lower volumes but won't be any good for your next rave party. As usual, the more you are willing to spend on your drivers the more sound you are likely to get. <b>Here is what you will need:</b> - The drivers I used are ultra cheap Dynavox 30W, 8 Ohm, 10 cm (4") woofers (around € 5.5/piece). Remember, you will need two of these. - OR Dynavox 50W, 8 Ohm, 13 cm (5") woofers (around € 6.5/piece). I have included driver mounts for each of them (and a step file for you to adapt to your own drivers). - If you are willing to spend a little more, e.g. <a href="https://s.click.aliexpress.com/e/_AnG3jI">Aiyima has a few 5.25" woofers (that should fit) to choose from</a>. - I use these <a href="https://s.click.aliexpress.com/e/_AWLfG0">speaker terminal connectors (around € 0.5/5 pieces)</a> but they are basically optional. - Plus <a href="https://s.click.aliexpress.com/e/_ATmoe4">a few M3 screws</a> - You can find a somewhat more detailed list of supplies in my Instructible at https://www.instructables.com/21-Bluetooth-Sound-System-Fully-Printable/ Remember, you can use pretty much any woofers as long as they have roughly the same diameter (up to 5.25" should be OK - see image above for diameters and I have included the .step file for you to adapt to your needs). The better the driver, the better the sound you will get. <b>PRINTING and ASSEMBLY.</b> This should be a simple (although slightly longish) print. No supports or attachments needed. Print in PLA (or ABS, PETG...) at 0.28 mm resolution and 20%+ infill. - I print the main body in <a href="https://s.click.aliexpress.com/e/_99SlSf">some ultra cheap, easy to print carbon fiber PLA</a>, which gives this beautiful surface, but of course any PLA, ABS, PETG/color will do. - The <a href="https://s.click.aliexpress.com/e/_9yPyik">upper section is printed in wood PLA</a> - looks great (much better than in the pictures) together with the carbon and silk copper, - and the connecting ring in <a href="https://s.click.aliexpress.com/e/_9v7OHg">silk copper/bronze PLA. </a> Print one part each of the main body, the speaker mount, the 10 mm connecting ring (which is mainly there to make it easy to adjust to the size of the driver - see below) and the 55 mm top section, plus the grille as well as 4 pieces of the feet (these preferably in TPU but PLA will do). I have included the speaker mount plate for 100 mm, 130 mm, and (UPDATE 06Mar21) for 5.25". I have also included a step file for you to be able to <b>adjust to the exact size of your drivers</b>. In case your driver is higher than the 60 mm (10+55-5 mm) top section (which is not unlikely), simply scale the z-axis (only) of the 10 mm ring to whatever size you need (e.g. in Cura). <b>Wiring and Assembly</b>. Wiring is really simple. However, you have to invert the phase of one of the drivers, which is simply done by connecting the "+" connector of one of the drivers with the "-" of the second (see wiring diagram). Mount the 2 drivers (membranes pointing at each other) with 4 M3 screws/nuts to the speaker mount. Connect the lower driver to the terminal connector. Connect and test with your favorite 2.1 amp (e.g. https://www.thingiverse.com/thing:4743037 ). Add some damping to the main chamber and insert the drivers into the main body, add the 10 mm ring (or whatever you scale it to) and the 55 mm upper section on top and connect all this with 4 M3 screws (or 3-3.5 mm wood screws). Insert the grille. Enjoy! <h3><b>I REALLY HOPE YOU LIKE IT AND IF YOU LIKE IT, PLEASE LIKE IT! Thanks!</b></h3> <h3>Enjoy!</h3>
With this file you will be able to print Isobaric Subwoofer V1.0 with your 3D printer. Click on the button and save the file on your computer to work, edit or customize your design. You can also find more 3D designs for printers on Isobaric Subwoofer V1.0.