Isosceles Barn Door Star Tracker Mount
thingiverse
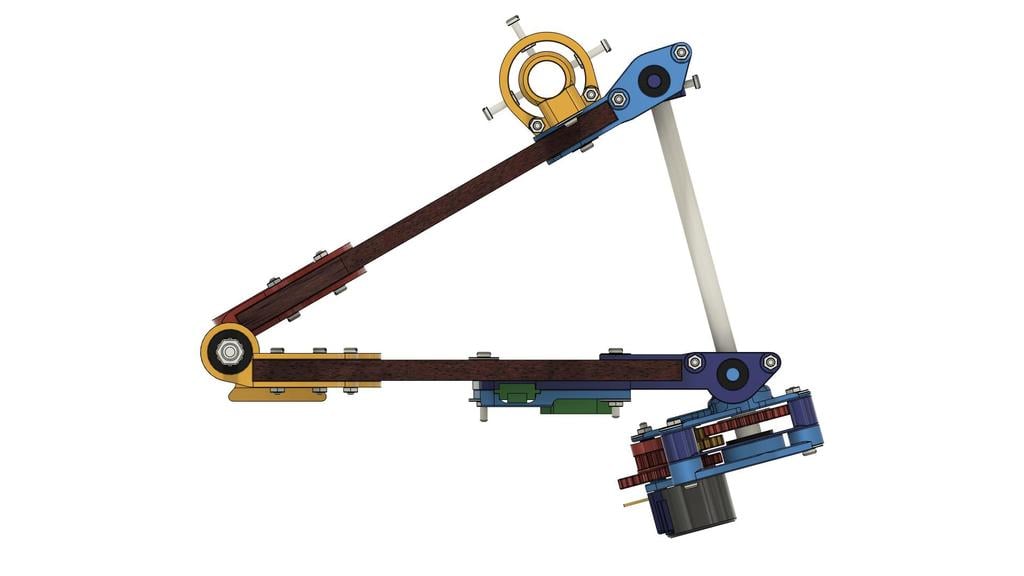
This is an attempt to design a (mostly) 3d-printed star tracker that is accurate even at long focal lengths. After many, many iterations, this overengineered design seems to work good enough!  For an example, the uploaded Milky Way [photo](https://cdn.thingiverse.com/assets/cc/cc/ff/aa/c5/large_display_DSC08182-1.jpg) ( was a 94 sec exposure at a 315mm focal length equivalent (shot at f9 with SEL55210 on A6400). It's not perfect by any means, but a much better result than any 3d printed design I have found online. Bearings are used everywhere so that printing errors don't introduce any wobbliness; Cheap nuts and bolts can also be badly machined, so a lead screw has substituted the common curved rod. Thankfully, all these parts are quite cheap! The tangent error (that occurs in any non-curved rod barn door design) is fixed in code, by varying the time between stepper steps. It is documented in detail within the Github repo: Code: https://github.com/trabladorr/Isosceles-barn-door-tracker-arduino Using a green laser for polar alignment is also quite advantageous, it's easy to check if its parallel by rotating the hinge and seeing if the laser is pointing in the same spot. It's also much easier to point at true North, no kneeling or bending required! A generic <5mw 2*AAA Green Laser Pointer was used, with a uniform OD of 14mm. The main structure of the mount is 8mm plywood, as it's more rigid than ABS or PLA. PDF plans are provided (Top Plate and Bottom Plate), should be 1:1 if printed on an A4. The electronic components are an Arduino Nano, a ULN2003 Stepper Driver, and a 28-BYJ48 Stepper Motor. Connection: ========= Arduino Nano <-> Uln2003 ------------------------------ D2 <--------------------------> IN1 D3 <--------------------------> IN2 D4 <--------------------------> IN3 D5 <--------------------------> IN4 VIN <--------------------------> + GND <-------------------------> - Part List: ========= + 1 x 160mm M6 Threaded Rod + 2 x M6 Washers (OD <14mm) + 6 x M6 Nuts + 4 x M3 10mm Bolts + 13 x M3 16mm Bolts + 2 x M3 20mm Bolts + 7 x M3 25mm Bolts + 4 x M3 44mm Threaded Rods (or Bolts) + 34 x M3 Washers (OD <12mm) + 34 x M3 Nuts + 4 x 3mm x 10mm x 4mm Bearings + 6 x 6mm x 17mm x 6mm Bearings + 2 x 8mm x 19mm x 6mm Bearings + 1 x 150mm Lead Screw (with Bolt), OD 8mm, Pitch 2mm, Lead 2mm + 1 x 1/4-20 UNC Camera Screw + 1 x Green Laser Pointer, <5mw, 2AAA, OD 14mm + 1 x Ball Head Mount (using Neewer Low-Profile Ball Head) + 1 x Arduino Nano + 1 x ULN2003 Stepper Driver + 1 x 28-BYJ48 Stepper Motor Assembly Instructions: =================      One part that is not in the design is the mounting screw for the ball head mount, as I reused an old one. It shouldn't be too hard to mount whatever you have access to!
With this file you will be able to print Isosceles Barn Door Star Tracker Mount with your 3D printer. Click on the button and save the file on your computer to work, edit or customize your design. You can also find more 3D designs for printers on Isosceles Barn Door Star Tracker Mount.