Itty Bitty Belted Extruder
thingiverse
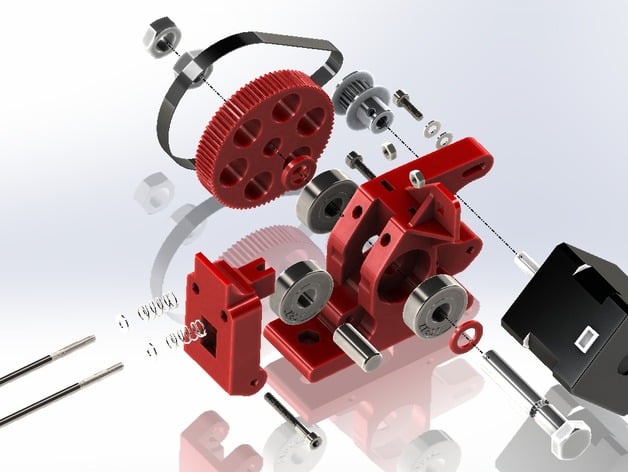
Update: A hardware kit is available here This is a lightweight belted extruder derived from the geometry of Greg Frost's excellent hinged accessible extruder. Design elements: NEMA 14 motor. This reduces the moving mass to about half that of a standard NEMA 17-based extruder. GT2 (2mm pitch) belt drive. The belt is efficient and quiet. It eliminates the clicking noises that printed gears make (the real reason I started this project). The belt should also have a longer wear life than printed gears. This means that it requires a small GT2 pulley and belt, but the large pulley can be printed. Standard Greg's Accessible Extruder geometry. The overall frame is shorter than the GAE, but I elected to retain the 608 bearings, 8mm bolt and Greg Frost's excellent guidler. Additional frame structures to completely capture the hobbed bolt bearings. This allows the frame to hold the thrust loads generated by the belt, which are the opposite of those in a gear driven extruder. Standard 8mm or 5/6" hobbed bolt. Hobbed bolts are available here: http://clough42.com/go/product/hobbed-extruder-bolt/ Uses all metric hardware. The motor is mounted with M3x10 bolts, the guidler pivot is M3x25, the spring tension bolts are M3x50 or M3x60 and the nut traps for mounting the extruder are M4. Compatible with groove mount hot ends. My initial testing is with a 3mm/.4mm Hexagon. Self-supporting for printing on single-extruder printers. The STL file includes additional structures and bridging that can be broken off after printing. Your printer will need to be able to bridge about 17mm to print this successfully. A version of the STL without the support structures is also provided. See the instructions for details about the vitamins I used. A video of the extruder in action is here: https://www.youtube.com/watch?v=0NzpV7vTFIg Instructions To complete this, you will need: Three 608 bearings An 8mm diameter 18-20mm pin for the guidler bearing Three 50-60mm M3 screws Three 10mm M3 screws Eight M3 washers Two M3 nuts Two extruder springs A hobbed bolt with two jam nuts: http://clough42.com/go/product/hobbed-extruder-bolt/ A NEMA 14 motor: http://clough42.com/go/product/nema-14-stepper-motor A drive kit: http://clough42.com/go/product/itty-bitty-belted-extruder-drive-kit/ -- A 20-tooth GT2 pulley for the motor -- A 188-2GT belt (GT2, 2mm pitch, 6mm width, 188mm/94 tooth closed loop) Instructions: After printing, snap off the support structures and clean out the bridging from the screw and hobbed bolt holes. Press in the hobbed bolt bearings and make sure they turn freely. Install the motor with three M3x10 screws (two washers on each bolt). Leave the screws loose for now. Install the hobbed bolt with the 1mm spacer under the head and the 2mm spacer behind the large pulley. Adjust the tension and lock with a jam nut. Assemble and install the guidler. Install the motor pulley and belt, adjust the belt tension and lock down the motor screws. You can reach the third motor screw through one of the pulley holes using a ball-end driver. I'm using the Clough42 custom milled bolt with 1/16 microstepping and a steps-per-unit value of 644.2 configured in Marlin. With this configuration, I'm having no trouble with 25mm/s retraction.
With this file you will be able to print Itty Bitty Belted Extruder with your 3D printer. Click on the button and save the file on your computer to work, edit or customize your design. You can also find more 3D designs for printers on Itty Bitty Belted Extruder.