J-Head Lite V1.0 Hot End
thingiverse
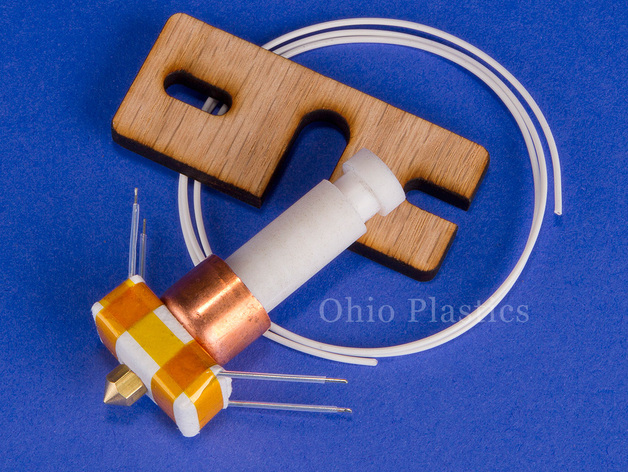
The V1 is obsolete. This post is for product support and legacy. No sugar added! It basically combines the holder of the J-Head, the heat sink of the Budaschnozzle, and the hot end of the MK7. The J-Head Lite uses a 1/2" reprocessed PTFE holder with a 6mm stainless steal tube whereas a traditional J-head uses a 5/8 PEEK holder with an 8mm PTFE lined brass tube. The heat sink is actually just a simple plumbing cap with a hole through it and mounted with a brass nut: simple, low tech, effective. The hot end is based off of the MK7, except it uses a 3w resistor and a thermistor instead of a 40W heater and a thermocouple. I tried to take the best parts of "the big 3" hot end designs and make something that's an economical alternative for ABS/PLA printing. Did I mention it's only 1.5oz? After probing around the hot end at 240C with a thermistor, I found the brass nut on the heat sink gets to 170C, the middle of the stainless steal tube gets to 110C and the top gets to 80C. To be on the safe side, I'll call the max temp 250C. Made out of: 1/2" PTFE rod (McMaster-Carr # 8803K14) Laser cut oak mounting plate (Lowes 1/4" Oak) M6x1 stainless steal barrel (McMaster-Carr # 90024A461) Aluminum heater block (Clinton Aluminum .3750X.5000 FLT 6061) Vishay 6.8ohm resistor (Digikey # RWMA-6.8CT-ND) Honeywell 100k thermistor (Digikey # 480-3135-ND) Brass nozzle (McMaster-Carr # 8952K33) Ceramic insulation (Mcmaster-Carr # 87575K85) Heat Resistant Wiring (skygeek.com # M22759/16-22-0) Copper Heat Sink (McMaster-Carr # 5520K44) Instead of using a brass barrel, I use a stainless steal barrel, much like what is used in the current Makerbot extruder design. I, and they, did this because stainless steal has less thermal conductivity than brass. This means less heat travels up the barrel. I also added a heat sink which mounts to the top of the heater block, separated by ceramic insulation. The brass nut, which clamps the heat sink down, absorbs heat as it travels up the barrel and dissipates it through the heat sink. The PTFE is separated from the heat sink by air, which is actually a great insulator. Simply by not touching the PTFE, the heat sink is unable to transmit its thermal energy through conduction. This thermal management helps resists thermal expansion in the PTFE. Thermal expansion is the cause of PTFE loosening during extrusion. As the amount of force required to push the filament down the barrel and through the nozzle is much less with 1.75mm filament vs. 3mm filament (2-3 times less I think), less force is ultimately required to keep the barrel in place. So, with the right thermal management and the smaller filament size, PTFE is a pretty effective and economical alternative to PEEK. Although It doesn't look like a very complex design, it's sometimes easier to do more with less and there's quite a lot of interesting thermodynamics going on here. With this minimalist design, a respectable hot end can be made at a fraction of the cost vs. a traditional J-Head. Hence, I deemed it the J-Head Lite. PLA USERS: Soak a cotton ball with vegetable oil and feed the filament through it in order to stop it from sticking.http://www.makerbot.com/blog/2010/02/06/oil-helps-pla-yes/ Some of the earlier batches of heater blocks were machined a little tight. If it's too tight for the heater, either ream out the hole a little, or contact me for a replacement on ebay. The .stl file is for reference only. Do not attempt to print your own J-Head lite. For 1.75mm filament only. Please note, the J-head Lite has not been tested on nylon or polycarbonate. Thanks to http://alexcphoto.com for the printable mount. Buy one: http://stores.ebay.com/ohpakron See it in action: http://youtu.be/oHNYAnzMJ2A Atribution! Atribution! Atribution! Hotends.com, the original J-Head developers. a bit pricey for my taste, but without their dedication to open source tech, my business would not be possible. Thanks bros. Instructions Things needed: Kapton tape PTFE tape Permatex anti-seize lubricant -optional Heat sink compound -optional Vice grip Wrench Wire stripper Scissors Solder Soldering iron 2mm drill bit 6mm drill bit 10mm socket wrench bit, reamed to at least 6mm All are available at your local hardware store or Radio Shack, except Kapton tape, which can be found from various online sources: Grainger, McMaster-Carr, Ebay, etc. This process may take an hour or longer. These instructions are highly complicated. The risk of burning and/or electrocuting yourself is very high. Wear appropriate safety gloves while handling hot metal and live wires. I encourage novice users to not attempt this assembly. Prep: Soak the heater block, the steel tube, and the nozzle in acetone or laquer thinner to remove residual cutting oil and/or particulates, which may jam the nozzle. -optional Put some anti-seize lubricant on the nozzle threads and screw it into the block. Make sure it's tight. Take the small PTFE tubing and cut it into 4 parts. Put it on the leads of the thermistor and resistor. Coat the resistor with heat sink compound and insert the thermistor and resistor into the heater block. Cut the "Tefzel" wire into 4 equal parts and strip them. Solder the leads of the resistor and thermistor to the wires and insulate the joint with Kapton tape. Wrap the block with the ceramic insulation and secure with Kapton tape. Coat about 1/3 from the bottom of the steel barrel with a 1/4" worth of heat sink compound. Screw the brass nut onto the middle of the steel barrel. Wrap both ends of the barrel with PTFE tape; 1/4" at the bottom, 1/2" on the top. Put the heat sink onto the barrel. Screw the barrel into the heater block. Note: The end of the barrel that's countersunk is the top. Screw in the flat side. Attach the wires of the hot end to your controller board. Heat the hot end to 255C (smoke is normal). Take a pair of vice grips and clamp it to the top of the barrel. Take a wrench and screw the nozzle and the barrel together. Take a 10mm socket wrench bit and tighten the brass nut down onto the heat sink. Thread the PTFE holder onto the barrel hand tight. Wait 2 minutes Note: This part is delicate. It's very easy to strip the threads on the PTFE, because it's soft material. Slowly tighten the PTFE holder onto the barrel hand tight. Do not over tighten. Do not under tighten. Let cool. Take a 2mm drill bit and ream out the PTFE holder. Note: I find it's best to use vice grips and clamp the drill bit to hand ream the hole. I'm looking for alternatives to this step, but that's the best I've got for know. Take the wood mount and carefully insert it into the groove mount. The wood can break. These PID settings are a good place to start: define PID_INTEGRAL_DRIVE_MAX 10 define PID_PGAIN 2560 define PID_IGAIN 64 define PID_DGAIN 4096
With this file you will be able to print J-Head Lite V1.0 Hot End with your 3D printer. Click on the button and save the file on your computer to work, edit or customize your design. You can also find more 3D designs for printers on J-Head Lite V1.0 Hot End.