Jabba's Palace and Rancor Pit Playset - scaled for Playskool Galactic Heroes
thingiverse
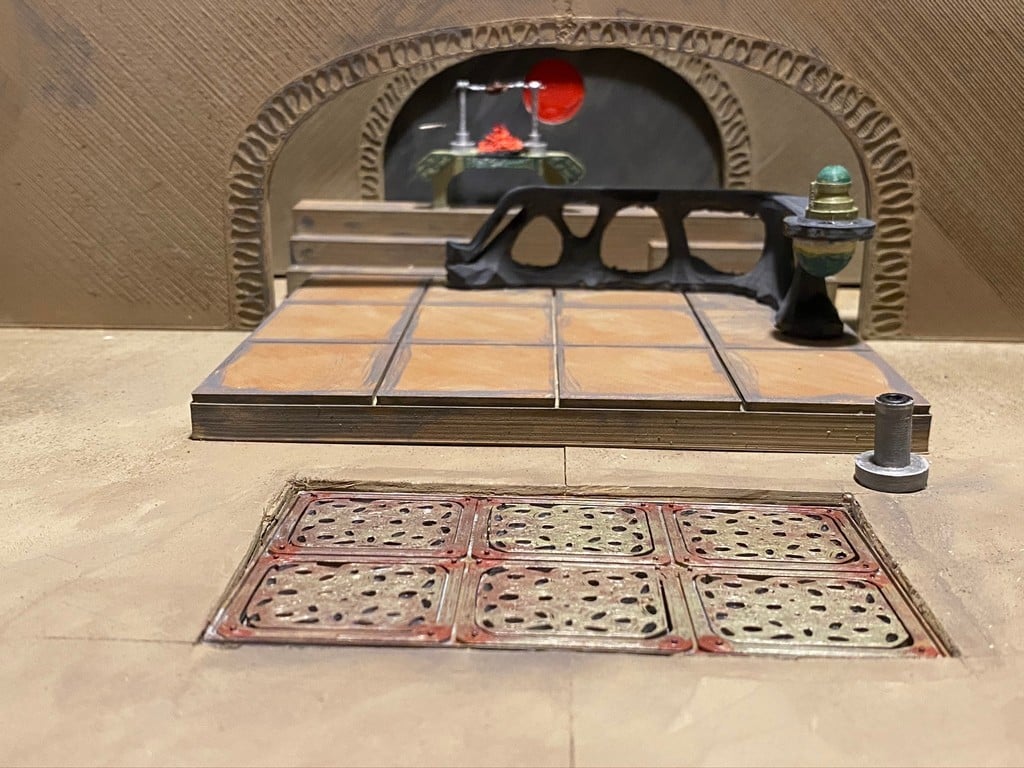
My son got a used set of Star Wars Galactic Heroes figures on eBay featuring the Jabba's Palace characters. He wanted a playset to use with them and we took that as an opportunity to learn a bunch of new modeling and printing skills. The complete playset is made of a combination of plywood, bass wood, and 3d printed parts. Most of the detailed parts are 3d printed. I have included a model of all of the parts assembled so it should be relatively easy to see where things go but I also will include some detailed notes on the construction here. There are likely a few things that I would improve if I were starting from scratch now and I'll note that below as well. <h1> The build </h1> <h2> Building the box/Rancor pit </h2> The first basic step is to build the box for the Rancor pit and base of the model. I designed this to be built from a single 24"x24" piece of plywood with little waste. The box itself is 16"x12" and 8" high with no front or top. I've included a cut list that shows how you can do this without waste. The remaining 8"x8" piece will be used in a later step. None of the tolerances are so tight that you need to worry too much about blade width. For the top of the box, I used some scrap 1x2 wood to line the top on all four sides leaving a gap in the middle for the trap door. I assembled the box with glue and temporary shims and clamped it without much trouble. It helps to sand and paint it at this stage. <h2> Building the main floor </h2> To make the main floor of Jabba's Palace, I used 4 2mm thick basswood sheets (20cm x 30 cm) that I had lying around. I glued the sheets together and clamped them using wood glue and clamps to create a single surface that was 40x30cm and two sheets (4mm) thick. I then cut a 10x6cm hole for the trap door (see full model for specific location). This piece will eventually be set on the box built in the last step on top of the 1x2" boards so do a test fit here and trim as necessary. <h2>3D printed parts</h2> To make the model exactly has I have it you will need to print all of the parts I have above along with a couple of parts from other Thingiverse projects. You will need to print six of the 90 degree angle pieces, two of the "Jabba spit cooker" pieces and will need to print two of the "Jabba side wall - reversible" pieces with one mirrored in the horizontal dimension. All of these parts except the Jabba table, the Jabba Palace floor switch, and the Rancor door switch and hinge print fine with no supports. I would suggest printing the small parts at 0.12 resolution. Depending on the size of your printer bed, you may need to print the pieces labelled Jabba back wall and Jabba middle wall in two pieces and then glue them together (I ended up doing this and gluing them with super glue). Other parts you will need are the [Throne Rail by LukeSkyPilot](https://www.thingiverse.com/thing:3420029), the [Jabba's Rancor posable figure by Geoffro](https://www.thingiverse.com/thing:340416), and the face from the [Resculpted Rancor by Daylightinventor](https://www.thingiverse.com/thing:4056051). The Throne Rail will need to be resized a bit but the others should be printed at 100% and will be fine. Most of these 3D parts were designed by me from scratch but a few used elements of other projects. Specifically, the trap door used the OpenForge 2.0 grate along with the reversible hinge by andyosier together, the Rancor door hinge is based on a design by Braunbaer, and the fire on the roasting table is simply the wall of fire by Talismancer resized. <h2>Detail work and Assembly</h2> There are a few very detailed things that need to be done to finish specific pieces described here. The trap door: To complete the trap door, test fit it into the hole you cut in the main floor and widen the hole if necessary so the trap door fits snugly but doesn't get caught on the edges of the hole. Fit the "Jabba's Palace Floor Cover" on top of this and make sure all clearances are good. Once you are satisfied, use superglue to attach the Floor Cover to the trap door (you will want to paint the trap door first). Here is the trap door in action: <iframe width="560" height="315" src="https://www.youtube.com/embed/3FDAu_4Eb0c" frameborder="0" allow="accelerometer; autoplay; clipboard-write; encrypted-media; gyroscope; picture-in-picture" allowfullscreen></iframe> The roasting table: In ROTJ there is a doner spit roast thingy behind Jabba's throne. To make this, take the 3d printed table and attach the two printed spit roast parts with the holes aligned with the long dimension of the table at least 15 mm apart (again, I would paint all of these pieces first). For the spit roast turning thing I used a nozzle cleaner wire that comes with an Ender 3 and stuck it through the holes in the roaster, bent it, and cut it to size using flush cutters. Once I was happy with this, I put some putty around the wire to simulate whatever alien meat was cooking and then painted it once it was dry. Finally, I glued the painted fire in the middle and did some touch up and details on the painted table with a fine point marker. Jabba's throne: Once you have printed and painted the main throne, the throne railing, the hookah and base piece and painted all of those, you are ready to assemble them. I did this using super glue without too much trouble. The only thing to be careful on is that you have the throne railing sized so that the flat portion where the hookah and frog creature bowl thing goes are about 15mm across. I glued the throne in place but if you want to make it slide forward like it does in the movie, you could print a rail or something. This is probably what I would have done if I'd remembered that the real trap door is not the fancy grated floor but in front of that. Assembling the walls: Check the overall model for wall placement. The way I did this was to glue the back wall cover to the back wall and glue the assembled part to the Jabba's throne stairs piece. none of these really need to be painted first if you plan on using a spray primer or something. Next, I glued two 90 degree angle pieces to the middle wall and glued that to the main floor surface using super glue. I then glued the two side walls to the floor using two 90 degree angle pieces on each and then glued them to the corner of the middle wall all with super glue. Completing the main floor: Before doing the next steps, it makes sense to prime and paint the entire floor and wall assembly. After you're happy with that, glue the mounted rancor head to the desired side wall, glue the Han solo in carbonite stand in place, glue the throne in place if desired, and finally glue the trap door hinges to the underside of the main floor in the appropriate spot making sure you have a fit that allows the door to freely fall. After this, use a 1/4 drill bit to drill a hole for the "Jabba's Palace floor switch." Fit the bigger piece on the top of the floor and then use a M3x20 screw through that and attach the bottom piece using a M3 nut so that the entire assembly can be rotated and the arm on the underside can "latch" the trap door shut. I found it helpful to paint a line on the main floor and the rotating piece on the top that marks the position when the door is shut. Rancor pit and door: For the Rancor pit you need one Rancor and I've linked to the model I used above. It also helps to have a lot of bones. I just found some 3d models of a bunch of random Pleistocene megafauna and printed them at appropriate scales. The complicated part is the door. To assemble this door print the parts labled "Rancor pit door," "Rancor pit brace and slots," and "Rancor door switch and hinge". Also, cut the remaining bit of plywood to 13cm x about 20cm. Fit the rancor pit braces with the three slots into the base brace (the piece shaped roughly like a dumbbell with holes in each end with the side with one slot exposed fit into the hole. I found it necessary to glue a second brace to the top of the door to keep the side braces from moving (I did this by simply printing and gluing a second bottom brace to the back of the upright arms). Take the piece that will be the bottom of the door and drill holes for M3 hardware to go through (I used M3x10 but shorter would work too). Place screw through the holes and attach nuts on the back side. When you are doing this, attach the two small pieces that printed with the pit brace and slots to the outer screws with the arms facing outward on each side (these are handles to help you lift). Fit the doors through the slots in the upright arms and test the motion. If all looks good, paint them and then reassemble. Finally, once you've got all of this working, glue the whole thing to the piece of plywood you cut earlier. Fit this assembly in the plywood box on either the right or left side. Lift the doors as high as you would like them to go and then test fit the "Rancor pit hinge and button" on the corner as shown in the pictures above. Mark the holes for this hing and attach it to the plywood box using M2 nuts and bolts. Once you're happy with the position of everything, glue the entire door assembly into the box using wood glue and you're done. Here is a video of the door in action <iframe width="560" height="315" src="https://www.youtube.com/embed/0fj5fkrxk5c" frameborder="0" allow="accelerometer; autoplay; clipboard-write; encrypted-media; gyroscope; picture-in-picture" allowfullscreen></iframe> <h2>Final thoughts</h2> If I were doing this again, I probably wouldn't do it exactly the same way. I ended up modifying a few parts on the fly and tried to reflect that in the final models presented here but I didn't initially create this to be recreated by others (but some asked for this write-up). Have fun with it and make any modifications and let me know if you have any issues. This is perfectly sized to use with the Galactic Heroes Playskool figures but there are also plenty of models on Thingiverse that could be printed and used instead.
With this file you will be able to print Jabba's Palace and Rancor Pit Playset - scaled for Playskool Galactic Heroes with your 3D printer. Click on the button and save the file on your computer to work, edit or customize your design. You can also find more 3D designs for printers on Jabba's Palace and Rancor Pit Playset - scaled for Playskool Galactic Heroes.