Jabberwocky - 2.5 inch freestyle quadcopter frame
thingiverse
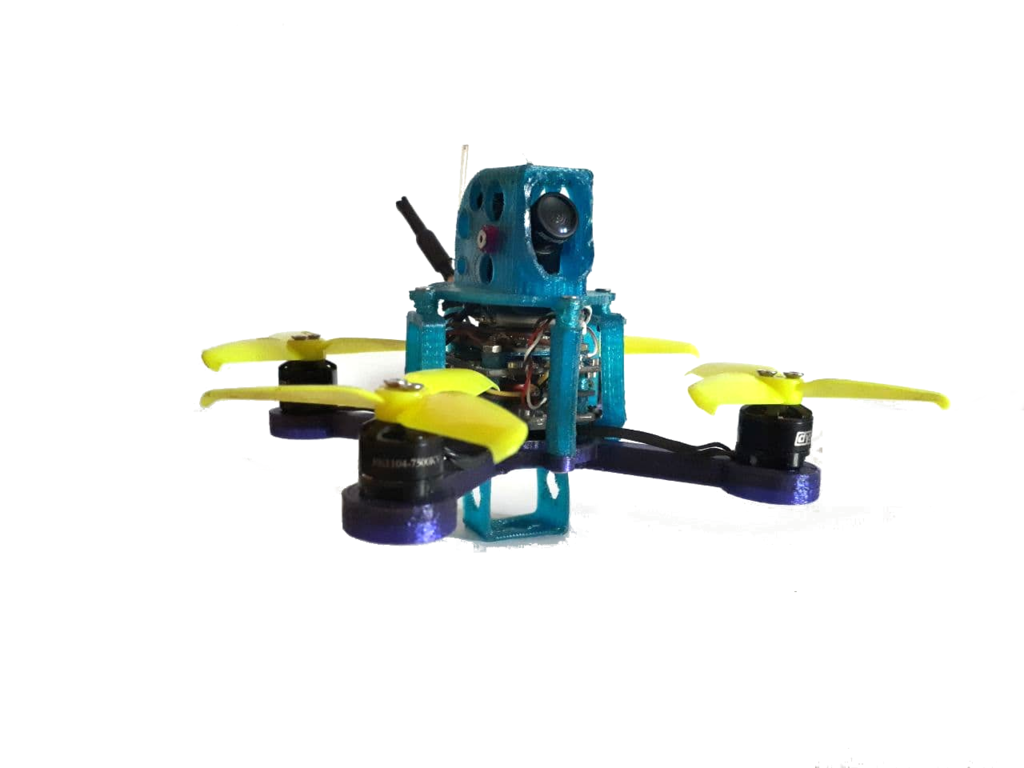
I designed this frame to do some freestyle with my Runcam Split Nano 3. This build goes with a 20x20 component stack, 2.5" props and 2S lipo. I have done quite some flight before releasing it here. The arms are hollow to reduce weight while they still have good rigidity. Weight with components installed: 86g Takeoff weight (including 500mah 2S Lipo): 114g What can it do? Some quite nice freestyle, it has some weight so you can throw it around. Still it maintains a quite nice power to weight ratio, not super skyrocket 6S 5" monster like, but for its size it feels really good to me. It protects your components well, the arms might break on a bad crash. But my cam, fc stack and motors did not take any damage for now. What can´t it do? It will not take forcefull impacts on walls, steel, streets etc. but you can crash it quite some times in trees and grass. It is not designed for racing, as the runcam split 3 nano in my opinion is not a good option for racing. Serious racing pilots will have a hard time accepting the latency. Videos: https://www.youtube.com/watch?v=XYkD33DJrBs https://youtu.be/cqnsznd7Bds https://youtu.be/AIMUUG2cw68 https://youtu.be/5rDzXQEpqpY https://youtu.be/VeaUdTk4Ep8 <b>Assembling:</b> I assume you know how to mount your flightcontroller stack. (I use 4 x 25mm M2 screws) For mountig my rx and vtx, i printed 1 x vtx_base.stl which fits onto the fc stack. For the rectangle standoffs you need 2 screws and 2 nuts to fix it. These standoffs are inteded to use at the left, right and rear side of the copter. For the front side i added standoff_cam_case_26mm.stl. (I flew without nuts for now and it did not tear apart, but this comes down to the offset of your printer.) The canopy screws into the outer standoffs. (I use standoff_fc_4mm.stl between standoffs and canopy in addition.) Inside the canopy is room for the runcam split 3 nano and a tiny 5V bec to power it. (I secured the BEC with some doublesided tape) The battery mount plops into the big center hole of the frame. (I might add more different sizes in future, feel free to send me a request for your favourite lipo.) If you have some feedback or any questions, i will be happy to read you in the comment section. I build this from stuff that I had lying around, you can use similar components or buy the following components if starting out freshly. <b>Components:</b> Screws & Nuts: <a href="https://www.banggood.com/Suleve-M2CH1-M2-Carbon-Steel-Allen-Bolt-3-20mm-Hex-Socket-Cap-Screw-Metric-Assortment-Kit-200Pcs-p-1041363.html?p=2004039272548201703T">M2 screw set</a> Motors: <a href="https://de.banggood.com/Racerstar-Racing-Edition-1104-BR1104-7000KV-1-2S-Brushless-Motor-for-100-120-150-Glass-RC-Multirotor-p-1120369.html?p=2004039272548201703T">Racestar - 1104 7000KV</a> Props: <a href="https://www.banggood.com/4-Pairs-Gemfan-Flash-2540-2_5x4-2_5-Inch-3-Blade-Propeller-with-1_5mm-Mounting-Hole-p-1221999.html?p=2004039272548201703T">Gemfan flash - 2540 - triblade</a> ESC: <a href="https://www.banggood.com/20x20mm-Racerstar-Mini-RS12Ax4-12A-Blheli_S-BB2-2-4S-4-in-1-Brushless-ESC-D-Shot-Ready-p-1132683.html?p=2004039272548201703T">Racestar 4 in 1 12A using DSHOT 600 </a> Flightcontroller: <a href="https://de.banggood.com/2020mm-MAMBA-F405-MINI-MK2-F4-Flight-Controller-2-4S-Integrated-Betaflight-OSD-5V-BEC-for-RC-Drone-FPV-Racing-p-1225446.html?p=2004039272548201703T">MAMBA-F405-MINI-MK2-F4</a> Battery - Lipo 2S <a href="https://www.banggood.com/GAONENG-GNB-7_4V-600mAh-2S-50C-Lipo-Battery-XT30-Plug-for-FPV-Racing-p-1171094.html?p=2004039272548201703T">2S Lipo 60C</a> -------------------- FPV cam: <a href="https://www.banggood.com/RunCam-Split-3-Nano-1080P-60fps-HD-Recording-WDR-Low-Latency-16943-NTSCPAL-Switchable-FPV-Camera-For-RC-Drone-p-1528561.html?p=2004039272548201703T">Runcam Split 3 Nano</a> 5V BEC for Runcam Split 3 Nano <a href="https://www.banggood.com/JHEMCU-MINI-DC-DC-BEC-2-6S-5V-2_5A-Step-Down-Module-for-RC-Drone-FPV-Racing-p-1449252.html?p=2004039272548201703T"> 5V BEC</a> FPV transmitter: <a href="https://www.banggood.com/Eachine-NANO-VTX-5_8GHz-48CH-25100200400mW-Switchable-FPV-Transmitter-Support-OSDPitmodeIRC-Tramp-for-RC-Drone-Tiny-whoop-p-1525228.html?p=2004039272548201703T">Eachine NANO VTX</a> -------------------- Radio: <a href="https://www.banggood.com/FlySky-i6-FS-i6-2_4G-6CH-AFHDS-RC-Transmitter-Mode-2-With-FS-A8S-8CH-Mini-Receiver-p-1157144.html?p=2004039272548201703T">Flysky I6 transmitter</a> <a href="https://de.banggood.com/IRangeX-Fli14+-Mini-Flysky-Receiver-w-or-RSSI-OSD-Double-Antenna-500m-Distance-for-FS-i6-FS-i6S-p-1304526.html?p=2004039272548201703T">IRangeX-Fli14+ receiver</a> Jabberwocky: <img src = "https://media.giphy.com/media/DkigOKEgzkfybSlheE/giphy.gif"></img> (These are affiliatelinks - if you like my design you may support me without extra costs. When using them to buy any hardware i get a small comission.)
With this file you will be able to print Jabberwocky - 2.5 inch freestyle quadcopter frame with your 3D printer. Click on the button and save the file on your computer to work, edit or customize your design. You can also find more 3D designs for printers on Jabberwocky - 2.5 inch freestyle quadcopter frame.