Japanese Folding Fan
myminifactory
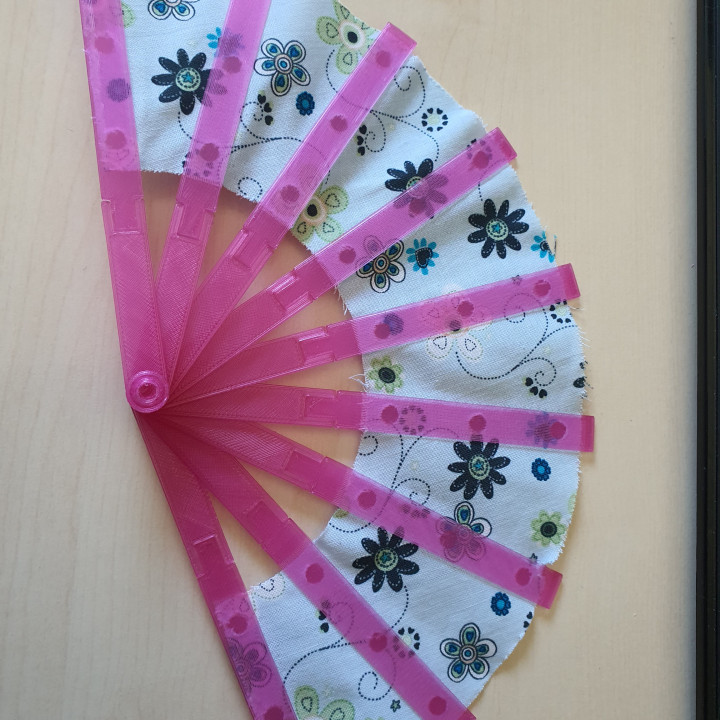
Create your own Japanese Folding Fan! You are getting two versions:One for printing with a paper inlayOne for printing with a fabric inlay. The fabric one has a 0.4 mm spacing, so best to use a fabric thinner than that (0.3 mm fabric worked great for me) The paper one has a 0.2 mm spacing, suitable for generic paper. A PDF pattern for the fabric/paper inlay is included as well. Instructions: 1. Prepare your fabric or paper Print out the PDF pattern on paper, cut along the outline and cut out the circles (a generic paper puncher works a charme). For the paper version, fold your prepared paper along the lines, if you like you can color it on the other side. For the fabric version, use the prepared paper as a template for your fabric, mark the outlines and the holes and cut your fabric in the same way as the paper. I used my Silhouette Cameo to cut the fabric, unfortunately I can't upload the file here. If you'd like to use the cutting file, please send me a PM and I will send it to you. 2. Print the parts This Fan was designed to print all parts at once on the Prusa MK3. You will need a printer with at least 210 mm x 210 mm on the bed, if it's smaller than 250 mm on one side, you have to rotate the blade part to make it fit. For one Fan you have to print: 1x blades 1x nut 1x screw 9x connector Make sure to print only fabricverson or only paperversion files, otherwise the parts won't fit. The Blades and the connectors are designed to be printed with 0.2 mm layer height, the screw and nut can be printed in 0.2 as well, however, they screw together a lot easier when printed with 0.1 mm height. The paper/fabric needs to be inserted mid-print! So make sure to set a pause or color change before layer 1.0 starts for the paper version, before layer 1.2 for fabric. (if you use PrusaSlicer: Set Color Change at 1.00 for paperversion, at 1.20 for fabricversion). Alternatively pause your print manually, before your printer moves to layer height 1.0 / 1.2 3. Insert the paper/fabric To make sure that your paper/fabric stays in place during the printing process I recommend to use some glue to attach it. Glue Stick works well for paper, for fabric I used some glue dots, which worked perfect. Don't use super glue or other flamable types of glue, of course. Place the prepared paper or fabric on your print, make sure the holes slide over the pins (see picture). As soon as your paper/fabric is placed and secured propperly, resume the print and watch the upcoming layer, just to make sure everything stays in place. 4. Assembling the fan Take your printed screw and slide it throug all 9 connector parts. Secure them with your printed nut, but not too tight. The connectors still need to be able to move. Now take the blades part and slide each blade end into one connector. The fan only opens in one direction, so make sure the side with your (self drawn) design will be orientated correctly. Use the upper connector for the left side of your fan if you are right handed, for the right side if you are left handed. You might want to glue the blades to the connectors to keep them together. Depending on your printer and slicer they can be a tight or a loose fit. But check the correct orientation first. ;-) Now you have your very own Japanese Folding Fan! Enjoy!
With this file you will be able to print Japanese Folding Fan with your 3D printer. Click on the button and save the file on your computer to work, edit or customize your design. You can also find more 3D designs for printers on Japanese Folding Fan.