Japanese Lamp Inspired Standing Desk
thingiverse
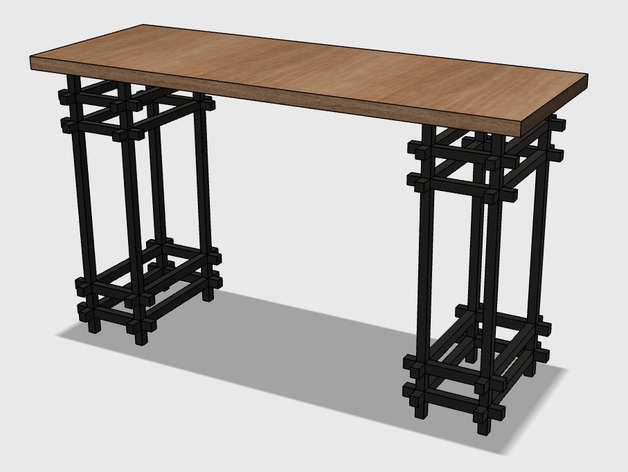
Inspiration to build this standing desk came from the shape of Japanese traditional lamps. As a top I used stained and varnished pine 70cm x 25cm x 2cm (27" x 10" x 0.75"). You will also need 8 pieces of all-threaded M5 rods, 16 self-locking M5 nuts and 32 2cm (0.75") wood screws. I had to enforce the build with metal rods to make sure the desk does not collapse if I lean on it. There are 9 different types of pieces in this design. One of the posted drawings shows how to put them together. Here are the item numbers from the drawing with corresponding .STL file names and required numbers of copies of each piece: 1 - z_12x12x24_bottom.stl - 8 copies 2 - x_12x12x130.stl - 12 copies 3 - y_12x12x220.stl - 16 copies 4 - z_12x12x27.stl - 16 copies 5 - z_12x12x234.stl - 8 copies 6 - x_12x12x130_top.stl - 4 copies 7 - z_12x12x30_top.stl - 8 copies 8 - mount_42x120x8_left.stl - 2 copies and mount_42x120x8_right.stl - 2 copies, or 4 copies of any one of these files. Print Settings Printer Brand: RepRap Printer: K8400 VERTEX Rafts: No Supports: No Resolution: 0.2mm Infill: 100% Notes: Consider that the set contains 2 long things - 220mm x 12mm x 12mm and 234mm x 12mm x 12mm. Make sure your printer is big enough to fit them at least diagonally. If not, you may need to adjust the length of these items. The good news it - shortening any of these pieces will not break the design and will not require changing remaining items. Majority of long things were printed with 7mm wide brim. Post-Printing How to Assemble First of all make sure that threaded rod can pass through the holes in all pieces. Initially it may require a little bit of effort, especially with the longer things. Try to put all pieces together and make sure they fit easily. Depending on the quality of your prints you may need to sand the joints. Cut 8 pieces of threaded rod. Each should be couple of millimeters shorter than the height of assembled leg of the desk. Place locking nut on one end of the rod and screw it in until the end of the rod is aligned with the outer edge of the nut. Glue them together in that position with metal glue. This side of the rod will be at the bottom of the leg. Repeat this step with other 7 rods. Now you can assemble the legs of the desk. Once all pieces are in place, insert locking nuts into opening of z_12x12x30_top.stl (item 7) and tighten the assembly by rotating item 7 with the nut clockwise. Keep turning until you start feeling resistance and until the item is aligned with the rest of the assembly by X and Y axis. If you see that the rod came out of item 7 - remove it and cut it shorter. Finally place the desk top upside down and position assembled legs on top of it (also upside down). Find the place where you want to attach the legs to the top. Place mounts (items 8) over items 7 and mark the locations of the screws. Then remove the legs and attach items 8 to the desk top with 32 wood screws. Make sure each end of the desk has identical mounts (both facing left or right), otherwise you won't be able to complete assembly. Slide in the legs under the mounts. You may want to stick pieces of rubber or silicon to the lower end of the legs to protect the surface it will be standing on from scratching. After about a week or two of using the desk you may need to detach the legs, tighten pieces #7 and then put legs back in place.
With this file you will be able to print Japanese Lamp Inspired Standing Desk with your 3D printer. Click on the button and save the file on your computer to work, edit or customize your design. You can also find more 3D designs for printers on Japanese Lamp Inspired Standing Desk.