Japanese Style Shop Diorama (Initial D Theme)
thingiverse
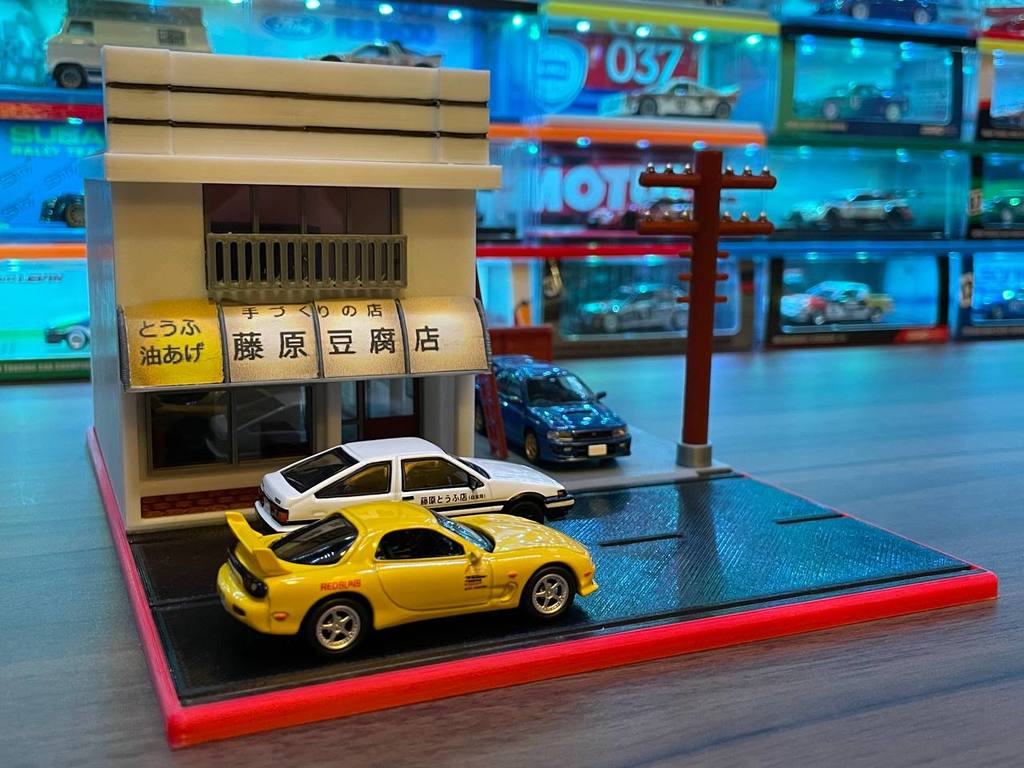
###Any suggestion is welcomed! Feel free to join my Facebook group to let me know what you want: https://www.facebook.com/groups/1115757609295068 ###Custom display base are also available from $5! Contact me to discuss what you want! ###If you like my work, consider support me through Patreon: https://www.patreon.com/gigapenguin3dprints/posts Description ==================== The display is based on Initial D tofu shop. Since there aren't any detailed photos/screenshot of the shop, I based the design on multiple different Intiail D media, the Cada Brick Tofu Shop set, clips from the anime and some from the manga. The display base is separated into multiple parts for easy printing and colour swap. All files are packed into a zip files and arranged in folder as follow: ###1) Base Folder - Base - Giant.STL - FlatBase.STL - OutsideWall.STL ###2) House Folder, below are the details in each subfolders: ###2a) Walls - Back.STL - BrickFront.STL - DoorArea.STL - Front.STL - Side-Left.STL - Side-RightV2.STL ###2b) Floor & Interior Walls - GroundFloor - Floor Only.STL - GroundFloorWalls.STL - OutsideFloor.STL - UpstairsFloor - Floor Only.STL - UpstairsFloor - Walls.STL ###2c) Initial D Roof & Signs - Roof - Front.STL - Roof.STL - ShopSign.STL - InitialDSign - Print on A4.PDF ###2d) Door & Frames - DoorArea - Door.STL - DoorArea -SideWindow.STL - MainWindowFrame + Balcony.STL - MainWindowFrame2.STL - SideDoorFrame.STL - SideWindowFrame - Small.STL - SideWindowFrame+Balcony.STL ###2e) Alternate Roof & Sign (Optional) - Roof - Alternate.STL - ShopSign - Flat.STL - ShopSignDetails - Emperor Penguin Tofu.STL ###3) Interior Prop (Optional): - Table1.STL - Table2.STL - Shelf.STL - TofuTank.STL ###4) Exterior Prop (Optional): - ElectricPole.STL - ElectricPoleBase.STL - Ladder.STL - OilBarrel.STL Print Settings ==================== Nozzle size = 0.3 mm (0.4 will be printable and smaller better) Layer height = 0.2 mm Filament change layer for colours on "ShopSignDetails - Emperor Penguin Tofu.STL": 1) Start (Overall background colour around the lettering, mine is in blue) 2) Layer 7 (Overall sign colour, mine is in yellow) 3) Layer 12 (Lettering colour and penguin tummy colours, mine is in white) 4) Layer 17 (Penguin details colour, mine is in black) Nozzle size = 0.5 mm (0.4 will be printable and smaller better) Layer height = 0.2 mm Filament change layer for colours on "Roof.STL": 1) Start (Lower half of the roof, mine is in white) 2) Layer 28 (Roof top colours, mine is in brown) Filament change layer for colours on "FlatBase.STL": 1) Start (Road lines colour, mine is in white) 2) Layer 3 (Main road colour, mine is in black) 3) Layer 8 (Kerb and side parking ground colour, mine is in grey) Assembly (Based on my photos build) ==================== The car is just placed on top of the display. Check out my assembly video to give you a better idea on how the build suppose to go: https://youtu.be/FOUDgsap1z4 ###Step 1: Base Build Print the following base and flat base: - Base - Giant.STL - FlatBase.STL - OutsideWall.STL The flat base should fit nicely on top of the base, aligned it so that the base support for the base can still be seen. It is recommended to use tape or glue to hold it in place, the outside wall can be glue now too. ###Step 2: House Build There are multiple subfolders in the "House" folder, start with the "walls" folders first. Print the following walls: - Back.STL - BrickFront.STL - DoorArea.STL - Front.STL - Side-Left.STL - Side-RightV2.STL The general shape of the house can be build with these parts printed. Slide the walls into the gap provided at the flat base and base to make sure it fits. DO NOT GLUE THE WALLS AT THIS POINT! "BrickFront.STL" is a simple piece with some brick like details to fit into the gap provided under the main window at the front walls. Install all the window frames and door frames to the walls. All the files can be found at "Door & Frames" subfolder. Print the following parts: - DoorArea - Door.STL - DoorArea -SideWindow.STL - MainWindowFrame + Balcony.STL - MainWindowFrame2.STL - SideDoorFrame.STL - SideWindowFrame - Small.STL (x2) - SideWindowFrame+Balcony.STL (x2) All window and door fram should fit nicely to the gaps provided, if it falls off too easily use glue or tape to hold it in place. Next is print the interior walls and floor, the parts can be found at "Floor & Interior Floors" folder. Print the following parts: - GroundFloor - Floor Only.STL - GroundFloorWalls.STL - OutsideFloor.STL - UpstairsFloor - Floor Only.STL - UpstairsFloor - Walls.STL Remove one of the side walls then slide the "ground floor - floor" into the house and make sure it fits into the building. Put the side wall back then place the "Outside Floor" at the main door. "Ground Floor Walls" will fit into the groove provided on the flat base then place the "Upstairs Floor - Floor Only" on top of the walls and "Door Area" supports. "Upstairs Floor - Walls" will be place on top of the up stairs floor. ###Step 3: Roof & Shop Sign Build There are 2 variant of roofs and shop signs provided. One is fictional penguin theme and the other is based on Initial D. Pick whichever you prefer. Print the following roof parts for Initial D roofs: - Roof - Front.STL - Roof.STL - ShopSign.STL - InitialDSign - Print on A4.PDF Alternate Roof & Sign: - Roof - Alternate.STL - ShopSign - Flat.STL - ShopSignDetails - Emperor Penguin Tofu.STL Both roof variant will fit nicely on to the top of the building. The roof will slightly overlap the windows, this is by design. For the Initial D roof, it is split in 2. First is the main roof, "Roof.STL" and the second is the front detail "Roof - Front.STL". The front detail will need to be glue on separately. For the Initial D shop sign, print "ShopSign.STL" then print the PDF file provided on a A4 paper. Cut the sign on the paper then glue on the roof. The alternate roof is 2 separate 3D print, use the layer change details above to get correct colours. ###Step 4: Exterior & Interior Props (Optional) All the exterior and interior props are optional. The parts found in both folder are simple shelf, table, ladder, barrel and a electric pole. Print them put them wherever it fits best for you. Others ==================== Feel free to send me any feedback on how to improve the design. Suggestion on display base designs are welcomed too. I can be contacted through Instagram or Twitter too: Facebook: https://www.facebook.com/groups/1115757609295068 Twitter: https://twitter.com/Giga_Penguin Instagram: https://www.instagram.com/GigaPenguin3DPrinting/ ####Custom display base designs are available from $5! Contact me to discuss what you want!
With this file you will be able to print Japanese Style Shop Diorama (Initial D Theme) with your 3D printer. Click on the button and save the file on your computer to work, edit or customize your design. You can also find more 3D designs for printers on Japanese Style Shop Diorama (Initial D Theme).