Jet Engine Motorized Stand 60% size
thingiverse
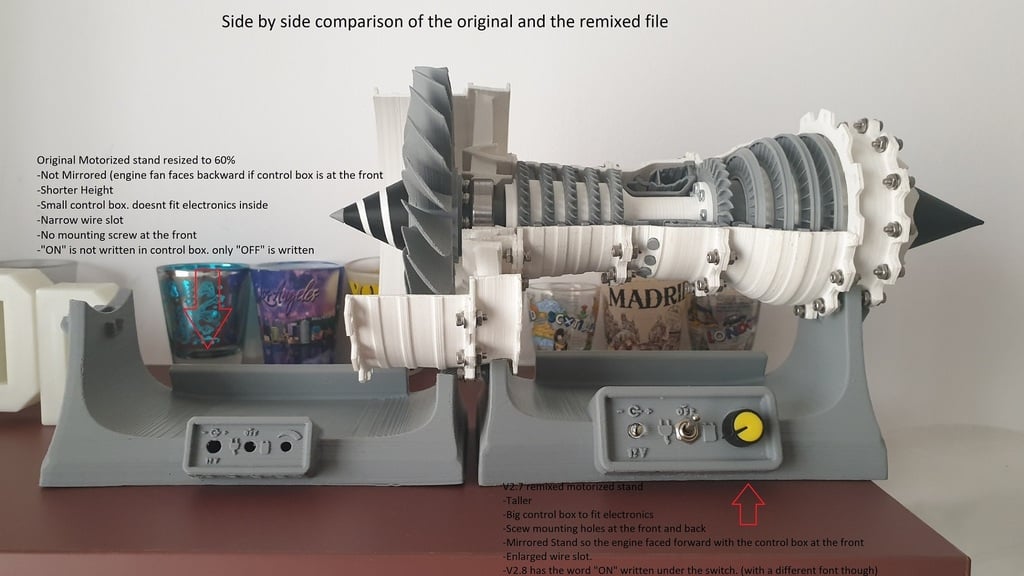
This is a remix of the motorized stand made by Rolumix. His design was made for the 100% version of the engine in order to be placed with the control box at the back for display. This remixed version of his stand is designed to be placed with the control box facing forward, for easy usage of the engine at home and it is made for the 60% size version of the engine. Downsizing his design to 60% wont work on its own because the control box is too small and cant fit the electronics inside. also the wire slot is too narrow and wiring the engine can be a pain. here you can find 6 files that go in pairs: stand V2.7 that goes with battery lid v2.7 stand V2.8a that goes with battery lid v2.8a stand V2.8b that goes with battery lid v2.8b Changes made : All versions: 1)the whole stand is mirrored in order for the control box to be in front of you and the engine to be placed with the fan facing forward. 2)the stand is resized to 60% to fit the 60% version of the jet engine. 3)the control box is resized and upscaled seperately from the rest of the stand and it is quite larger than the original size ratio in order to fit the controls inside it. 4)The holes in the control box are redesigned in order to fit a 5mm led on the left slot, a flip switch on the middle one (spdt/dpdt) and the potentiometer of a servo tester unit on the right slot (designed specifically for the potentiometer of this unit which is quite small in size https://images-na.ssl-images-amazon.com/images/I/51NFFyWkLGL._AC_SL1010_.jpg ) 5)A new slot and hole in the stand is designed at the back right side to house a standard DC jack like the one on this photo. ( https://cdn.sparkfun.com//assets/parts/1/0/8/00119-03-L.jpg ) ( the power adaptor is now connected at the back of the engine in order to not be visible from the front. the front dc jack hole is now fitted with a 5mm Led to indicate when the power is switched ON 6)The Wire slot of the stand is enlarged and widened a little bit for ease of wiring. 7)2 new mounting holes with a screw hole are added, (1 on the right side of the stand and 1 on the left side) to provide screw mounting points to hold the engine securely as the drone motor used is quite powerfull and can knock the engine out of the stand if not screwed in. 8)the stand doesnt have slots for standing feet anymore 9)The battery slot compartment lid was redisigned in order to be flash with the bottom of the stand because of point 8 10)battery/electronics hold compartment slots removed in order to have one big empty area to fit anything wanted inside. v2.7 The battery/electronics compartment lid has tiny holes for screws. only very thin laptop screws can be used to screw the lid on the stand. there is no space to use 2.5mm screws. v2.8a Battery/electronics compartment lid enlarged so larger screws can fit in (size 2.5*8mm screws) Stand's lid slot enlarged so the new larger lid fits the stand (the floor where the dc jack sits on was cut, because of the new lid, the dc jack is mostly supported by the lid) Word "ON" was added to the control box. it was missing from the original file. i dont have the original font used for the rest of the text so it was written with a common font v2.8b Same as 2.8a but reverted the floor that the dc jack sits on, to better support the dc jack in order for the jack to be fully supported even without the lid on. The lid is cut under the floor that the dc jack sits on, in order to fit Since this is a multi day print i have to inform you that the whole redesign was made in tinkercad and that i only test printed the version 2.7 all the photos i uploaded are for your reference to see what you are about to print and the photos are from the file v2.7 Based on my v2.7 print i noticed that i had forgotten to enlarged the holes for the battery compartment lid screws and that the "ON" text was missing under the on off switch so i made some changes in the battery/electronics lid design and at the slot for the lid in the stand as well as the dc jack floor and produced the v2.8a and 2.8b files. The difference in the 2.8a and b is the floor on where the dc jack sits on, and the lid to fit depending on the floor of the dc jack, so before selecting which one to print check the preview of the print and decide which one will be easier for you to print and which one you like. There are a couple minor imperfections inside the stand where the infill is but they are not visible from the outside and they dont compromise the stands display. the holes for the screws are not threaded, they are made to be used with 2.5*8mm screws, you will just have to screw them in and the screw will make the thread. In order to manage to screw in the engine with the stand especially at the front under the fan you may have to apply some pressure on the engine to sit down properly on the stand. Do not over tighten that screw as it may cause your fan casing to bend a little bit and touch the fan. parts needed 1x5mm Led to indicate power 1x spdt or dpdt flip switch (i used dpdt and it fits fine inside) https://static.rapidonline.com/catalogueimages/module/07/26/m072615p01wl.jpg 1x small potentiometer taken from a dc servo tester you will have to desolder it from the servo control board, attach it in the control box and connect it with wires to the servo control board) https://images-na.ssl-images-amazon.com/images/I/61kcKw9nOqL._AC_SL1000_.jpg 1x Dc jack https://cdn.sparkfun.com//assets/parts/1/0/8/00119-03-L.jpg parts needed to make the engine spin 1x 1806 drone motor (to fit the 60% size. please note that this motor gets very hot and you can only spin the engine for a few seconds at a time. you cant leave it spinning. the motor can spin it perfectly fine at about 0.5amps but if you want to spin it really fast it will draw up to 7 or even 10amps) 1x esc for the motor preferably with bec to provide power to the servo tester. if your esc doesnt have a bec, you will also have to use a 5v dc dc step down converter as the servo tester has to get 5v to operate while the motor will need 12v or more
With this file you will be able to print Jet Engine Motorized Stand 60% size with your 3D printer. Click on the button and save the file on your computer to work, edit or customize your design. You can also find more 3D designs for printers on Jet Engine Motorized Stand 60% size.