Joined diffuser for Canon MT-24EX macro flash
prusaprinters
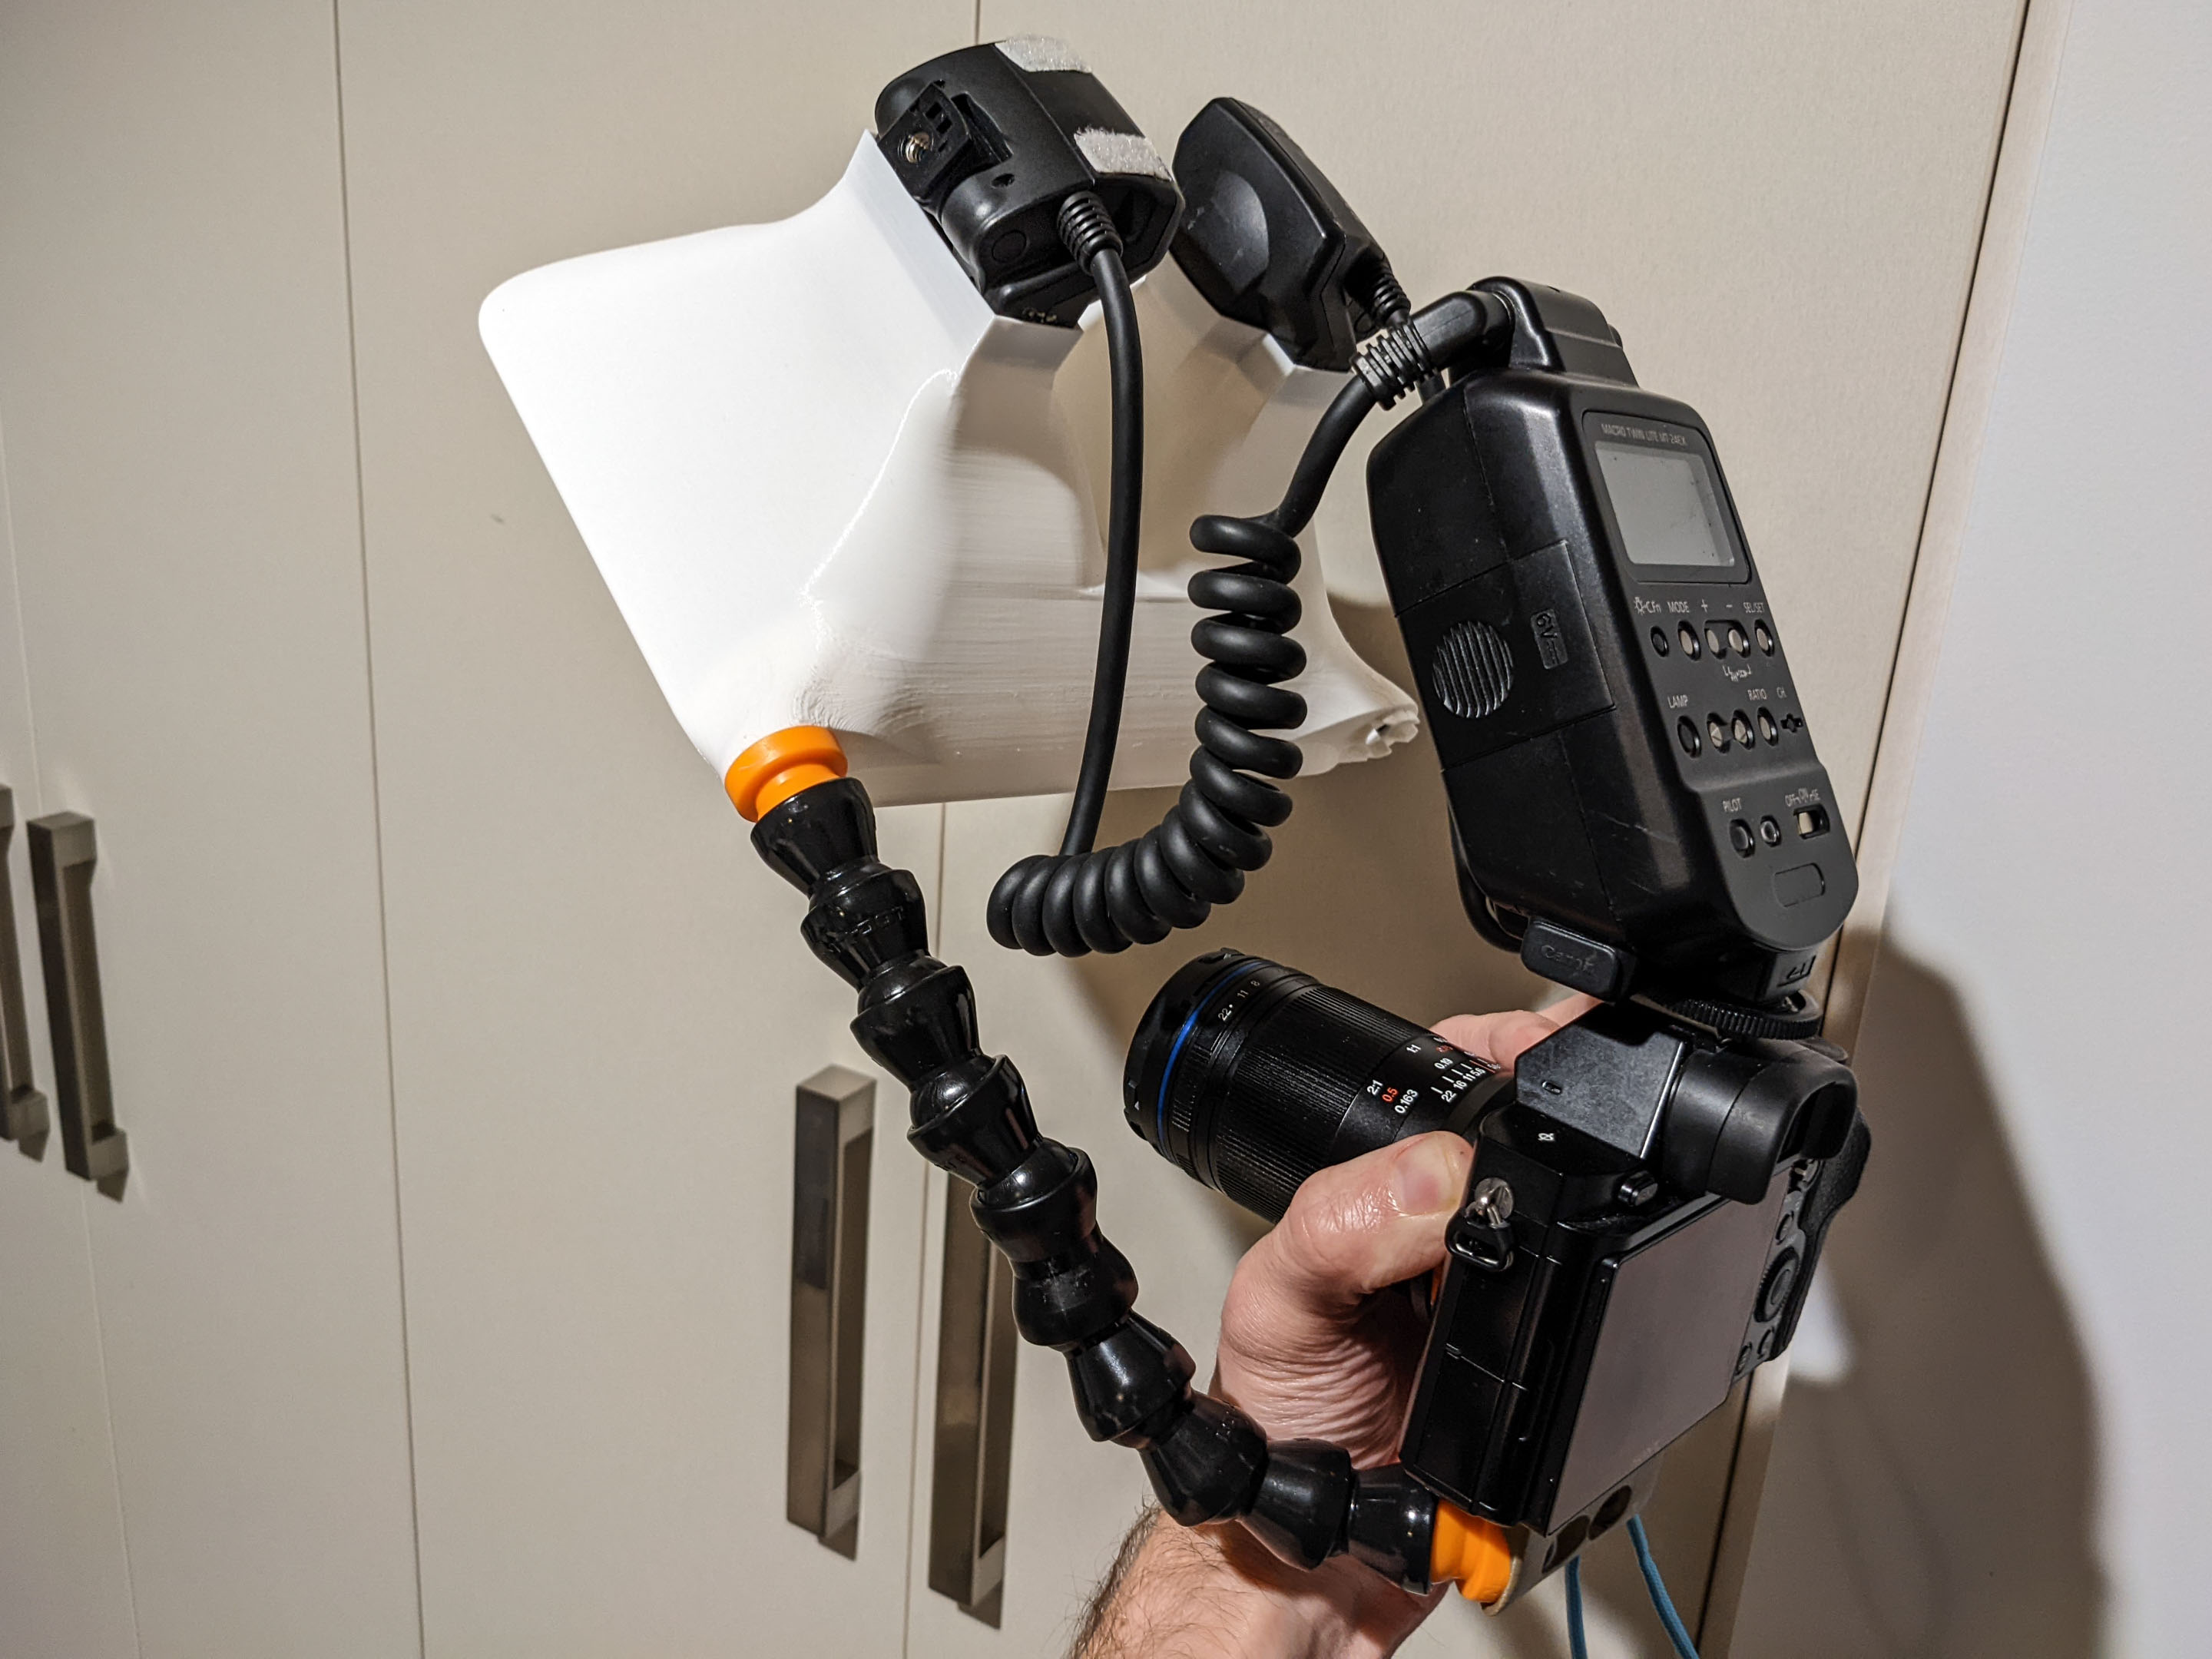
<p>This big diffuser combines both your MT-24EX flash-heads together to make one single light-source, and allows you to freely position it by joining it to your camera with one or two adjustable ½" Loc-Line arms.</p><p>For the corresponding Loc-Line mount to attach to your camera's tripod thread, please see my other design:</p><p><a href="https://www.printables.com/model/143763-twin-loc-line-arm-mount-for-camera-tripod-socket">https://www.printables.com/model/143763-twin-loc-line-arm-mount-for-camera-tripod-socket</a></p><p>If you'd prefer the two flash heads to be separated, you can use this diffuser design instead:</p><p><a href="https://www.printables.com/model/143772-diffusers-for-canon-mt-24ex-twin-flash">https://www.printables.com/model/143772-diffusers-for-canon-mt-24ex-twin-flash</a></p><h4>Bill of materials</h4><ul><li>¼"-20 hex nut x 2 pieces</li><li>¼"-20 x ¾" long button-head screw x 2 pieces</li><li>Loc-Line 1/2" Fixed Mount x 2 pieces (part number 51895)</li><li>Loc-Line 1/2" Double Socket x 2 pieces (part number 51811)</li><li>Enough Loc-Line 1/2" segments to make the arms the length you like, I used 8 segments per arm, plus the double-socket.</li></ul><h4>Printing instructions</h4><p>Print in white PLA with layer height 0.2mm and 2 perimeters.</p><p>Enabling "brim ears" is highly recommended, as it helps keep the two sharp corners at the front of the model from warping off the bed.</p><p><strong>The bottom (diffuser) face needs to be printed as two 0.1mm layers</strong> rather than one single 0.2mm layer, as this will prevent it from splitting along its layer lines. </p><p>To do this in PrusaSlicer you can right-click the model and click “Height Range Modifier”. Make the modifier start at 0.0mm, end at 0.2mm, and have a layer height of 0.1mm. On the Print Settings tab, on the Slicing page, set the First Layer Height to 0.1mm.</p><p>I bumped my flow up to 105% during printing the first layer to ensure the it was fully joined together, with no gaps between extrusion lines. Afterwards I dropped it back down.</p><p><strong>Add a colour change/pause </strong>at 18.70mm. When the printer pauses here, you can insert one hex nut into each of the two loc-line mounts at the bottom before resuming. The nut should have a flat side pointing upwards (not a corner). Ensure the tops of the nuts lie below the printed part, or else the nozzle will crash into them on the next layer.</p><figure class="image"><img src="https://media.printables.com/media/prints/222617/rich_content/3fb3f3a6-1c61-4cee-a3a4-c815857eb3eb/insert-nuts.png#%7B%22uuid%22%3A%228d302c55-84be-49ac-aca3-80c19fd81d47%22%2C%22w%22%3A1756%2C%22h%22%3A1114%7D"></figure><h4>Assembly</h4><p>Join <strong>two</strong> arm segments to a fixed mount. This requires a lot of force, so sometimes it helps to warm the sockets up using a hairdryer or by dunking them in boiling water to make them more flexible. Keep the heat away from the PLA printed parts!</p><p>Now push the fixed mount with the two arm segments onto one or both of the diffuser's mounting fins (I populated just the left side), and drop a screw through the two segments and screw it into the mount to secure the arm. <strong>We're joining these two segments with the fixed mount before attaching it to the diffuser</strong> to reduce the amount of pushing and pulling we have to do against the diffuser itself to join arm segments to it later, since it's relatively fragile.</p><figure class="image"><img src="https://media.printables.com/media/prints/222617/rich_content/6236704f-2070-4d24-a94c-1cdac0e8c5d6/assembled.png#%7B%22uuid%22%3A%221435061c-dd35-4604-97a2-93ab66cb91bb%22%2C%22w%22%3A2470%2C%22h%22%3A1216%7D"></figure><p>Now we have those two segments there to grab onto, you can join additional segments and the Double Socket to make the arm and to allow it to join to a fixed mount on the other side.</p><p>The two MT-24EX flash heads should just push into their sockets with a "click", this engages with the two little mounting slits on either side of the flash head.</p>
With this file you will be able to print Joined diffuser for Canon MT-24EX macro flash with your 3D printer. Click on the button and save the file on your computer to work, edit or customize your design. You can also find more 3D designs for printers on Joined diffuser for Canon MT-24EX macro flash.