Jubilee
thingiverse
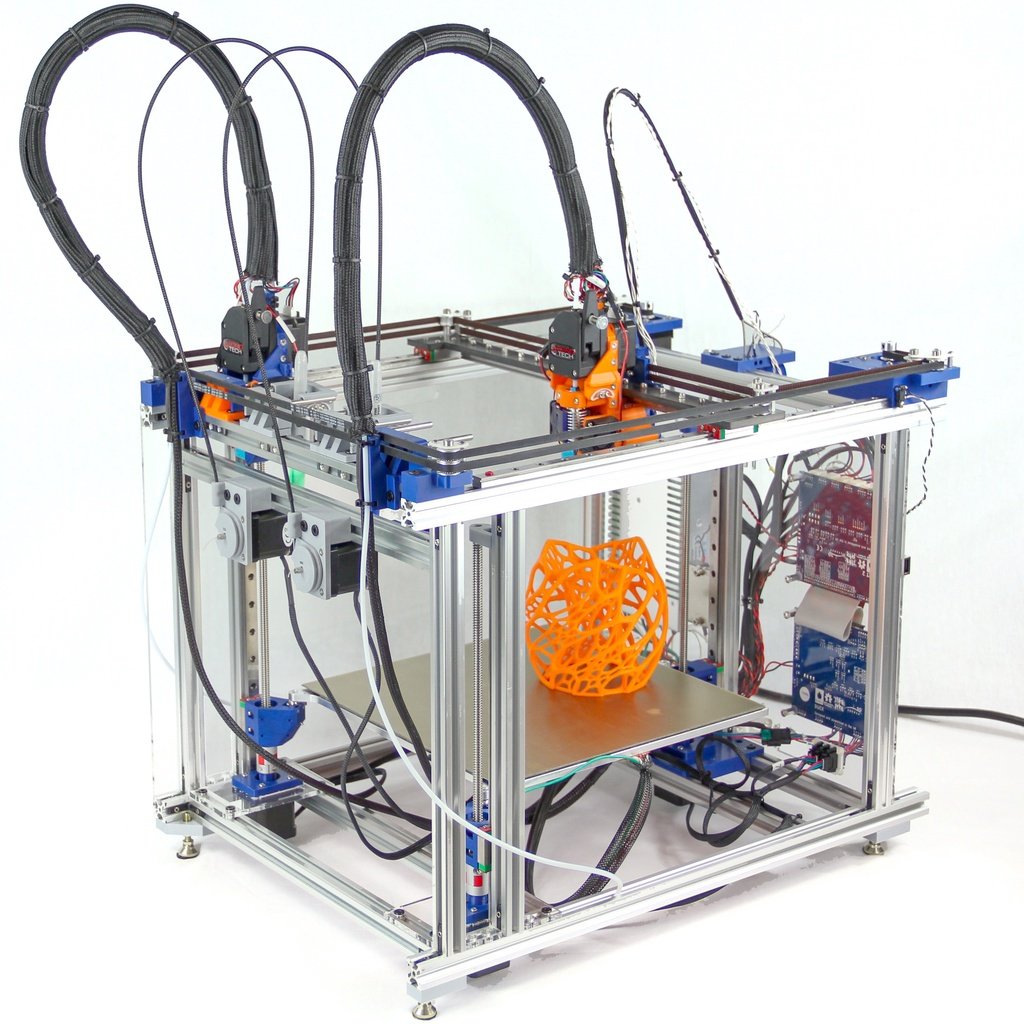
**Note 1:** The latest files for this project are now [on Github](https://github.com/machineagency/jubilee). **Note 2:** This project is best viewed through the [wiki](https://jubilee3d.com/). The Thingiverse snapshot is out-of-date and left up here only for historical reasons. Welcome to the Jubilee project, my take on an open-source multi-tool motion platform with a rock-solid toolchanging system. My hope is that, with toolchanging becoming a more common solution, we enable a community-driven ecosystem of tools for a variety of applications from fabrication, to art, to scientific instrumentation. Jubilee isn't just a 3D printer with many heads; it's a piece of infrastructure. For the 3D printer enthusiast, it is a rock-solid monochrome and multicolor 3D printer. For the budding machine designer, it's a reference design using classic machine-design principles. For the scientist, artist, and everyone else, Jubilee is your application platform; it can be extended to accommodate a range of custom applications. Jubilee's toolchanging system uses a torque-based locking system. As a result, it's able to consistently pick up toolplates with small geometry variations in the groove disc. This design tweak enables you to print tool plates from a variety of printers, and they will all lock consistently throughout the lifespan of the groove disc. Furthermore, with a special thanks to E3D, Jubilee's carriage is hardware compatible with E3D tool plates. Perhaps, someday, you will be able to buy them directly from E3D. Finally, Jubilee's build plate is also [kinematically-coupled](https://www.youtube.com/watch?v=a9irK9rOUHY), making it hot-swappable without losing its position. With this feature parts can be stopped-and-modified mid-process or loaded onto a different machine altogether to undergo a separate process. As a result, Jubilee can be leveraged for truly cross-platform applications that are especially useful to scientific instrumentation and mixed additive-and-subtractive manufacturing. ## The Why Building on contributions from E3D, I would like to invite us to standardize our printer-based toolchanging systems. We live in an exciting time where we're just beginning to taste the glory of truly multitool motion platforms. However, as we separately develop our own solutions for toolchanging, we segregate our victories. Toolchanging becomes a victory for a few lone builders with unique, isolated solutions. Jubilee is my attempt to bring toolchanging to the entire 3D printer community with a common standard. Jubilee isn't just my victory; it's yours! And with a carriage system compatible with E3D plates, we can create an ecosystem of platforms which all have a common set of interchangeable tools. With a common tool standard, we could step into a world where we design-and-share novel *tools*, not toolchangers. In the future, I would love to try building your syringe heads, plotter heads, pancake-extruding heads--you name it! But to do so, we need to settle on a common tool interface, an **API in hardware.** For that reason, I designed Jubilee with the hope that it can be replicated. In the spirit of RepRap, Jubilee maximizes its use of 3D-printed parts, leveraging them where they work best. And while it is not exactly *self-replicating*, it is *fabricatable*, something you can build yourself without specialized tools or machine-design expertise. ## Feature Breakdown * Designed with Exact-Constraint machine-design principles * Automatic Toolchanging System compatible with E3D tool plates * Perfectly-Constrained hot-swappable bed plate * autotramming with 3-point bed-leveling (courtesy of the Duet) * 300x300x190mm build space. Designed such that the Z-axis can be adjusted to your liking. * Core-XY layout for high-speed printing. Rapids of 25000 mm/min and higher with tuning. * *Flush-Form CoreXY* Belt Pattern. Upper and lower belts are laid out directly on top of each other, and belts only travel perpendicular to the frame. Belt-tensioning is done conveniently with two set-screws that adjust the motor locations along slots. * Stellar print quality with [direct-drive extruders](https://www.thingiverse.com/thing:3853796). Jubilee can compete with systems at the $5K price range. * User Extensible! Jubilee can accommodate custom tools and custom bed plates for specialized 3D-printing and uses beyond 3D printing. (See the *Extending* section) * Cycle-tested. Jubilee has performed thousands of toolchanges flawlessly. * Completely Open-Source with a CC-BY license. Make use of the Jubilee design in ways that suit you. (STLs, STEPs, and **original Solidworks assemblies** are included.) * Documented with a comprehensive BOM and set of assembly instructions. * Almost all fabricated parts are 3D printable. Printed parts are intentionally kept simple and minimize the use of support material. (Exceptions: the bed plate, crossbar, and toolchanger lock must be machined. See notes in the BOM for getting these parts made for cheap.) * Metric fasteners everywhere. ## Firmware Configs Jubilee runs on the Duet Ethernet with the Duex5 expansion board. You can download the config files to get you up-and-running [here](https://github.com/machineagency/jubilee/tree/master/software/duet_config_files) ## Running GCode Jubilee interprets Marlin-Style GCode. Any Slicer that can export Marlin-style gcode should be compatible. All toolchange-related state information is handled at the board level (via macro files). At the slicer level, you need only run T0, T1, etc. to execute a tool change; the firmware handles the complexity of parking the current tool, picking up the next tool, and adjusting XYZ offsets. # Quickstart for Making your Own Jubilee 1. Budget $1600 for the frame and ~$200 per extruder. Then order all parts in the [Shopping list](https://docs.google.com/spreadsheets/d/1gq5yLxlfPtb3yrGsuXR_ZLhAFGB77CzGvfcWYyYIvT4/edit?usp=sharing) 2. Gather all assembly tools in the [tools list](https://github.com/machineagency/jubilee/wiki/Assembly-Tools) 2. Setup an ethernet connection to Jubilee via the setup page [here]() 3. Upload all config files from the [repository](https://github.com/machineagency/jubilee/tree/master/software/duet_config_files) to the Duet SD card 4. Build the frame and your desired number of [extruder tools](https://www.thingiverse.com/thing:3853796) 5. Adjust the parking post positions for toolchanges 6. Run a bed temperature calibration and extruder heater calibration for each tool 7. Dial in the XYZ offsets for each tool. (See below) 8. Load some filament and celebrate! ## [Print Settings](https://github.com/machineagency/jubilee/wiki/Parts-to-3D-Print) ## [Laser-Cutting Settings](https://github.com/machineagency/jubilee/wiki/Parts-to-Laser-Cut) # Notes on Assembly Jubilee takes about 8-12 hours to assemble the frame. (Snag yourself a gummy-bear pack and some chocolate to get you through it!) However, some sets of instructions can actually assembled **in parallel** unless they specifically call for parts in prior instructions. With that said, get some friends or family in the same room to tackle this build. ## Tuning Parking posts are adjustable in the vertical (Z) and horzontal (X) directions through adjustable screw points. When it comes to tuning tool locations, rather than change your config files to match your hardware, I suggest changing your hardware to match the config locations. I suggest this route because the parking location *actually* needs to be changed in multiple files, *tfree.g*, and *tpre.g* and possibly even in your Slicer scripts if you adding any special wipe routines besides simply invoking *T0*, *T1*, etc. In this way, I can continue to push out releases and your config files, by and large, will remain mostly the same. # Extending Jubilee Jubilee can do much more than multitool 3D printing. Best of all, you need not be a machine-design expert to do so! ## Custom Tools Jubilee can be extended for custom applications beyond 3D printing. See the **upcoming extension notes** to get relevant dimensions for your own build plate. If you make a custom Jubilee head, why not tag it with *jubilee_head* so that others can find it? ## 2D Mode Jubilee can be used for multitool 2-axis applications, such as multicolor plotting or lightweight lab-automation and inspection. To do so, simply build the **xy frame**. (Stay tuned for config-files specific for plotter builds.) # Pre-flight Checks ## Adjusting Parking Post Locations To be written! ## Dialing in XYZ offsets To be written! # FAQs **Q: Can I just cut my own extrusions, instead of buying them from Misumi?** A: Yes, but it is almost certainly more trouble than it's worth. Misumi does a fantastic job getting square cuts within 0.1mm of the correct length. The building instructions assume that the frame cuts are the same length such that the machine can be squared properly. If you make these parts yourself, you'll need to get same-length extrusions to be as-close-as-possible to the same length in real life. (In practice, this is quite difficult without a milling machine or cold saw.) **Q: Why not just use a hobby servo to lock tools?** A: You can, but you lose one classy feature that makes this system so versatile. Here's the conundrum. Hobby servos are position-based, which means you will need to dial in the "sweet spot" position where you lock your tool. E3D's system uses a position-based locking mechanism with an additional spring to serve as a preload. In their case, this setup works fine because they're operating under the assumption that their tool plates will effectively never wear out. (Given that the locking wedge is hardened, that's a safe assumption.) In my system, I want to be able to lock E3D's tools but also tools with locking plates made from PLA. Tool plates made from PLA will definitely wear out. What's more, tool plates will wear out at different rates depending on how often the tool is being picked up, a situation that basically depends on what you're printing. Because I want to be able to pick up any tool plate regardless of where it is in its wear cycle, I opted for a torque-based system. Rather than lock down at a set position, my system locks down at a set torque. This ensures cross-compatibility between E3D's tool plates and printed tool plates, and it also ensures that plastic tool plates will continue to lock consistently even as they begin to wear out. # Final Thoughts Feel free to DM me if you find mistakes or if you use Jubilee to do something awesome. I would love to hear about how you are using Jubilee for art, science, and other mischief. If you're building your own Jubilee, why not join the [Discord Channel](https://discord.gg/XkphRqb)? # TODOs While the frame and toolchanging system is feature-complete, Jubilee is a work-in-progress. Be sure to check the *updates* list at the bottom to see if anything new happened. In the meantime, here are some changes coming down the road. * BOM update. (The current BOM is missing some miscellaneous items for cable management and optional connectors.) * Stay tuned for the Twist Lock component to go up on sale on Tindie. * Instructions update. The instructions are usable but still in draft form. Feedback via DM is most welcome. * Jubilee Head Assembly Instructions. * Jubilee currently prints with a wipe tower. With a proper nozzle wiping system, it should print without this sacrificial piece. Preliminary wiping looks promising, although it is not yet released, but that's where you, the community, could help! * Head Wiring Management Instructions * Wiring Diagram of the whole system * Build videos # Acknowledgements I have found so much joy in discovering new engineering tricks from the open-source community that I grew up with. Sharing my jubilee through Jubilee is one way that I can give back. Here's a quick (but still incomplete list of people to thank) * [Dr. Nadya Peek](http://infosyncratic.nl/) of the Machine Agency Lab * Fellow Machine Agents [Hannah](https://twitter.com/branchwelder?lang=en) (who took the spectacular front-page photo) and [Jasper](https://twitter.com/jtranoleary) * J Steve White and Tony Atkens of the [Railcore](https://railcore.org/) project * Sanjay Mortimer and the E3D Design team behind their Toolchanging Motion System * The folks at 713maker.com, who now offer [Jubilee parts](https://713maker.com/jubilee). * [James Best](http://subms.com/), [Amy Qian](https://www.youtube.com/channel/UCAdRYsUa92IgHotq0lqWqjw), Chris Cotner, Andrey Shur, Brandon Whitney, [Eric Moyer](https://twitter.com/flyer215), and many other fellow machine-and-mechanism builders of past and present * My Hackaday writing crew * [Matt Keeter](http://www.mattkeeter.com/), for showing me the value of well-documented infrastructure # Updates * **Sept 9, 2019** Initial Release * **Sept 14, 2019** (1) SW-2019 Files updated into a Hierarchical Assembly, (2) added countersink feature added to bed plate coupling screws for added generalizability across user community, (3) adjusted compact leadscrew retainer shape. * **Sept 27, 2019** Added Z axis assembly instructions draft and updated XY Assembly instructions. * **Oct 5, 2019** Updated Z axis assembly to add extruder ooze wiper assembly instructions. Updated CAD model to include Ooze wipers.
With this file you will be able to print Jubilee with your 3D printer. Click on the button and save the file on your computer to work, edit or customize your design. You can also find more 3D designs for printers on Jubilee.