K8200 redisign in to cnc
thingiverse
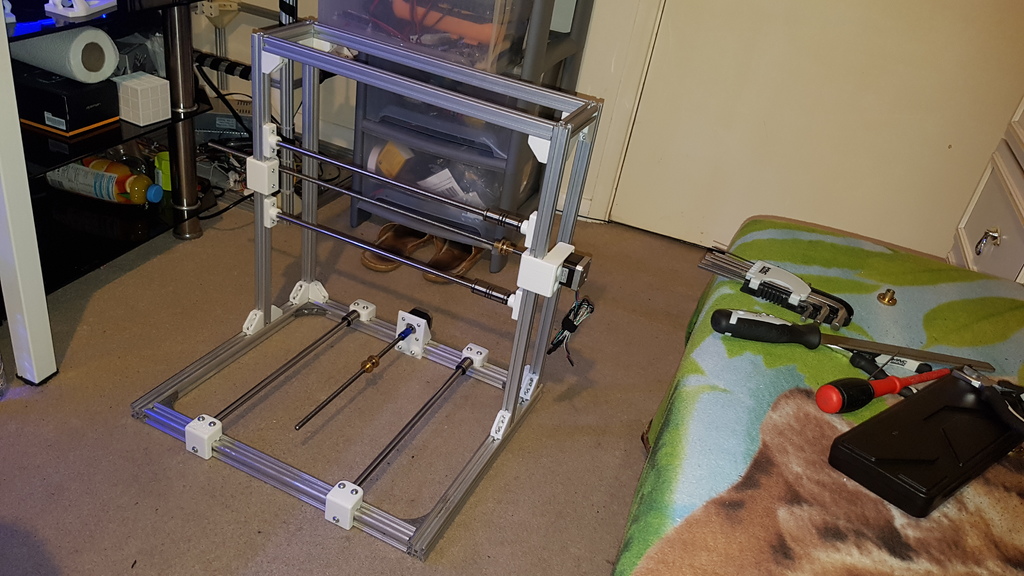
Hi.\nI'm excited to redesign the Velleman K8200 3D printer into a CNC milling machine.\nI'll do my best to explain each step clearly.\nPart 1:\n\nhttps://www.youtube.com/watch?v=2guMUcz4Vms\n\nTear down the printer, removing all parts and vertical profiles.\nPrint at least 16 corner brackets.\nPrepare M4 10mm (about 50) and 14mm (about 20) long bolts, washers, and nuts.\nCut or buy 20x20 aluminum extrusions T-slot in sizes: 2 x 458mm, 2 x 100mm, 4 x 500mm\n\nPart 2:\n\nhttps://www.youtube.com/watch?v=jxN05Op_uAI\n\nPrint 4 of YAxisRailFrame.stl.\nMount them on the frame using horizontal extrusions (bottom and top one), placing printed parts with 12x400mm rail at a distance of 110mm from left or right profile (don't forget about bearings - I have only 1 per rail for now).\nBolts used: M5 20mm (4), M5 30mm (8) and some washers, nuts.\n\nPart 3:\n\nhttps://www.youtube.com/watch?v=4L1pZ4TGTRw\n\nPrint 4 of XAxisRailFrame.stl.\nUse 8 earlier prepared corner brackets to assemble 4 vertical aluminum extrusions (50cm long). Combine them with 10x450mm rails and mount everything on front vertical extrusions.\nBolts used: M4 16mm (8) and some washers, nuts, 4 linear bearings.\n\nPart 4:\n\nhttps://www.youtube.com/watch?v=WuW093C4IXk\n\nPrint 1 of YAxisMotorFrame.stl.\nThe tricky part is now... Remove the aluminum extrusion from the bottom back part of printer/CNC. Take off one Y axis rail holder, put printed part in the middle between rail holders and tighten screws on place. Now add nema17 Y axis motor with trapezoid rod (in my project it's 8x300mm one).\n\nPart 5:\n\nhttps://www.youtube.com/watch?v=DEYo9oCoOQM\n\nPrint 1 of XAxisMotorFrame.stl.\nRemove 3 aluminum extrusions (both from sides and front one), take out top X axis rail, put motor holder on place (in middle, between top and bottom X axis rail, about 10.5mm distance). You will need M3 10mm (4), M4 15mm (4) and some washers, nuts. Trapezoid rod is TR8 (48cm long) with coupler.\n\nPart 6:\n\nhttps://youtu.be/JNVt687LsB4\n\nPrint 1 of XAxisBearingFrame.stl.\nDo the same as in Part 5 but put your part on end of X axis. Simply take out top front and top sides extrusions, take out top rail, put printed part on place, put everything back. Put your bearing (608) inside of plastic part, place your trapezoid rod in motor coupler.\n\nWait for next parts/steps :D
With this file you will be able to print K8200 redisign in to cnc with your 3D printer. Click on the button and save the file on your computer to work, edit or customize your design. You can also find more 3D designs for printers on K8200 redisign in to cnc.