Kaleidoscope IDEX
thingiverse
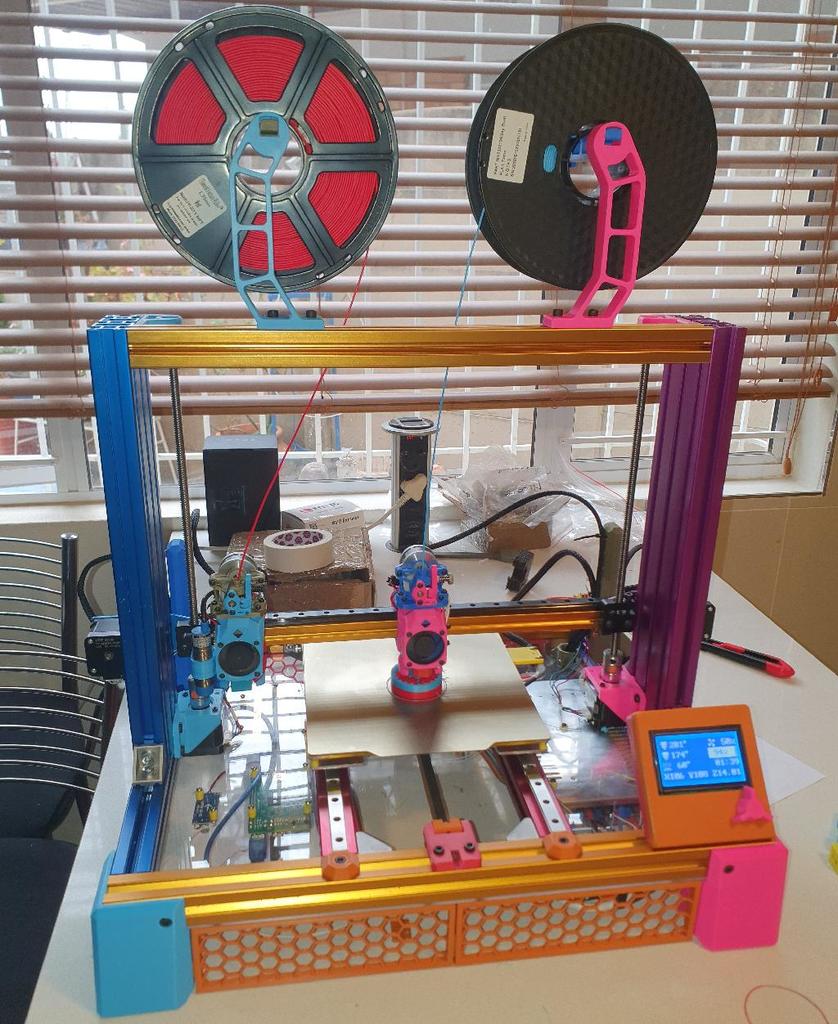
Wanted to build an IDEX based off as much spare parts of my A8 as I could. (and other various spare parts) Based this on the V-Cast, as it was a very rigid looking design, and I had some 3030 leftover. Built the Z-extrusions using 3090's as that's what I could get hold of. Used blind joints on the 3030's for extra rigid mounting (and it also looks cleaner) It's printed in 7 colours of ABS and has 4 colours of aluminium anodizing, as this is a Kaleidoscope. (Kids got involved, so I embraced the indecision re colours) The printer prints very well, with virtually no ringing even at 3k acceleration (without resonance compensation). Unfortunately the stock A8 motor isn't powerful enough to go reliably faster without skipping steps, when using a 12v power supply. I'm sure you'd get better acceleration from those motors with a 24v system, but consider upgrading to high-current low inductance motors, as they tend to operate better at speed. # Printed parts Used the RatRig V-Cast motor mounts, cable management parts and the leadscrew guiders/protectors. Used the EVA2 head assembly, as it had a decent cartesian IDEX mounts and supported a wide variety of head configuration. Used Voron Switchwire spool holders as the PTFE tube atop provides a perfect amount of friction. ## Modified printed parts: Since I didn't use the kit parts I had to modify some parts to fit: * Electronics bay is 60mm high instead of 40mm. * Custom parametric skirting to your specified size. * Taller feet * Generic bed idler doesn't fit in provided y_pulley_holder. I enlarged the cavity in the one here so the generic 10mm idler will fit. * X Motor brackets are designed to be easy to machine by hand, including a reference diagram. * Removed RatRig logo from y_motor_mount as this wasn't really a RatRig any more * 3090 end caps * Slightly lengthened the EVA2 MGN12H mounts (by 1mm) so that they would work with the 3.4mm thick X motor mounts I made. You'd have space for 5mm plates if you use an MGN15 for X like the spec says) * Rail stoppers (endcap.stl) that fits with the RatRig design language, but with flat stops so you can use the whole rail, and only allow rail to stick over the extrusion by 5mm on each side. ## New printed parts: There was some parts missing in the original spec that I felt I needed: * Simple MGN12C-mounted Bed strain relief * Simple NEMA17-mounted X-Motor strain relief * Filament runout sensor mount (on the top extrusion) ## Parts I plan to still do I still plan to do brush holders, drool buckets. Due to the restricted space by the X sides, I will have to make the brush holder and endstops integrated. I'll possibly put the drool buckets at the bottom. I also plan to do a nozzle endstop, like on a Voron2, do try and make auto-z alignment between the two heads automated and exact. Calibrating an IDEX is considerably more work than a regular printer, and having to recalibrate z-height every time you replace one of the two nozzles is... troublesome. The prints are also more sensitive to Z-offset misalignment than X/Y. # Parts list Unfortunately due to this printer being built from random spare parts I don't have a proper parts list. Had to use Klipper as the firmware as I had a few 4-driver boards lying around that I used for this build. Please refer to the kit parts list of the RatRig V-Core system, but your own part lengths. For the frame I used: 8x 3030 cast corner brackets 6x shouldered M12 blind joint button head 2x 390mm 3030 (Y) (tapped both sides) 2x 390mm 3030 (Y) (not tapped, for bed) 2x 530mm 3030 (X) 1x 470mm 3030 (X-over) (tapped both sides) 2x 390mm 3090 (Z) 1x 460mm 2020 (X gantry beam) For my rails I used: 1x 400mm MGN12H for X with extra block 2x 400mm MGN12C for Y with extra block 2x 350mm MGN12C for Z # Note on sensorless homing: Sensorless homing works fine for homing on Y, but is inadequate in consistency for the dual X rails, even when using endstop-phase calibration. I found out the hard way that sensorless homing accuracy is basically slightly larger than 2 whole steps, so sub-step correction doesn't help. You need to use x-endstops. Unfortunately the space by the gantry is extremely limited.
With this file you will be able to print Kaleidoscope IDEX with your 3D printer. Click on the button and save the file on your computer to work, edit or customize your design. You can also find more 3D designs for printers on Kaleidoscope IDEX .