Kayak Trolling Motor Steering Assembly - Newport Vessels 36lb
thingiverse
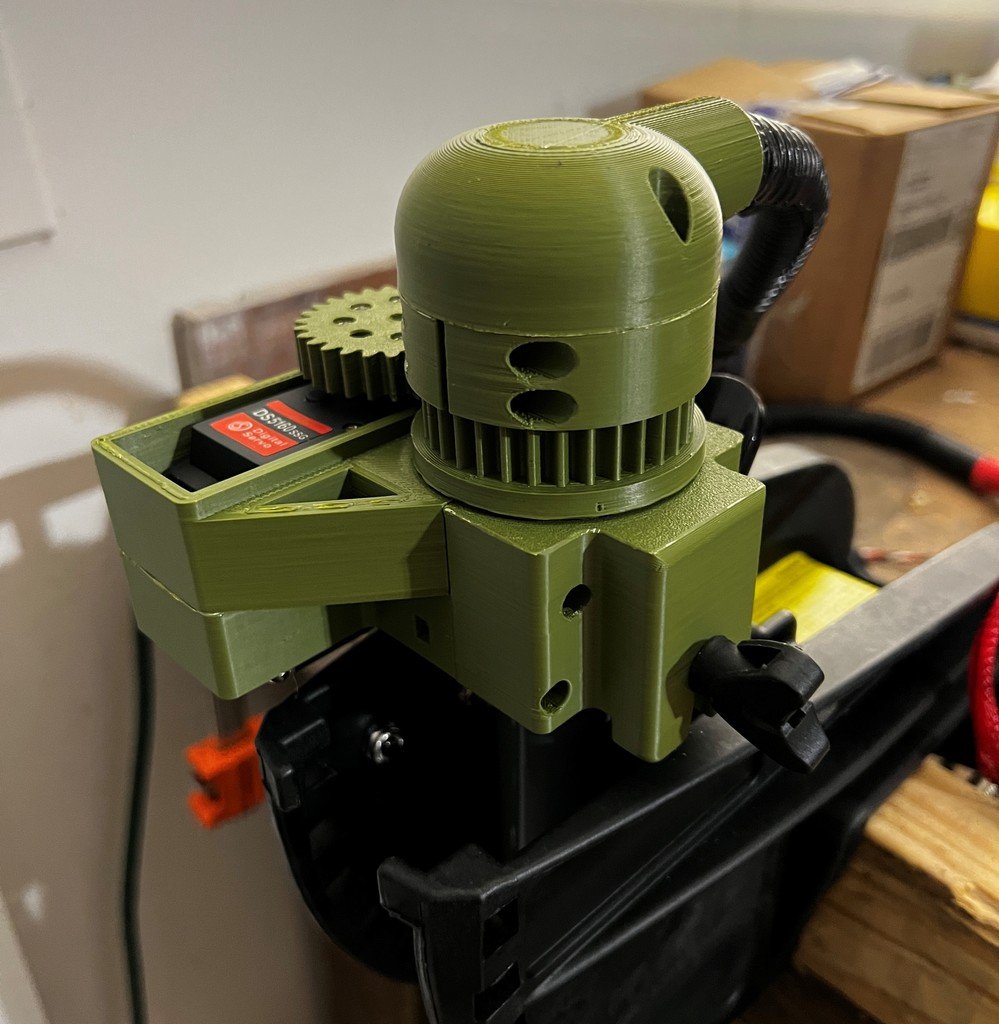
This is a heavily modified remix of [@Theo_Frieling's](https://www.thingiverse.com/Theo_Frieling) [Minn Kota Steering](https://www.thingiverse.com/thing:4713499) I recently installed a [Newport Vessels Kayak Series 36 lb. Trolling Motor](https://www.amazon.com/Newport-Vessels-Saltwater-Electric-Indicator/dp/B07454VQ71?th=1) on my Bonafide RS117 kayak, but holding my arm behind my back to control steering & throttle was uncomfortable. I can't use a pedal steering cable system because I have to run my foot pegs maxed out due to my height, and I've been building RC stuff for years so a servo seemed like an easy solution to me. The original design needed minimal tweaking to fit my motor, but I ended up making some dramatic changes which massively improved its performance for my use case. I've put about 50 miles on this setup so far, and it's working perfectly. **This is designed specifically for the Newport Kayak Series 36lb trolling motor, but it may fit similar motors with 26-29mm shafts - if you try it on another motor and it doesn't fit, please leave a comment and I'll try to get some dimensions from you and upload alternate parts.** Here's a video showing how it works: <iframe width="452" height="804" src="https://www.youtube.com/embed/1OAOW8SdK9M" title="Bench Testing my Kayak Trolling Motor Steering Assembly" frameborder="0" allow="accelerometer; autoplay; clipboard-write; encrypted-media; gyroscope; picture-in-picture; web-share" allowfullscreen></iframe> And the initial on-water test: <iframe width="1273" height="716" src="https://www.youtube.com/embed/JD70C5gxBoI" title="Kayak Trolling Motor Steering Assembly - On-Water Test" frameborder="0" allow="accelerometer; autoplay; clipboard-write; encrypted-media; gyroscope; picture-in-picture; web-share" allowfullscreen></iframe> # Modifications My design uses the same 60kg [DS5160 180°](https://www.amazon.com/ZOSKAY-Digital-Compatible-SAVOX-0236-Control/dp/B07Q3Z4SLS#customerReviews) servo as the original. I purchased mine from [AliExpress](https://www.aliexpress.us/item/2251832054601335.html?gatewayAdapt=glo2usa4itemAdapt), but Amazon has the same servo under a bunch of different brand names for $10-15 more but with faster shipping; mine took 2 weeks to arrive. I use [NuCanoe's Motor Retract Kit](https://www.nucanoe.com/product/7165-transom-motor-retract-kit/) to lift my motor vertically rather than tilting it up, because my version of the steering assembly prevents the tilt lock lever from being depressed; however, by loosening the rotation lock thumbscrew I can slide the assembly up the motor shaft out of the way of the lever if I need to tilt it. I can reach *just* far enough to accomplish this on the water solo, but a friend can do it easily. A side effect of lifting the motor is that it's likely to rotate, causing the gears to become misaligned when it's lowered back down. To solve this, I cut a keyway into the top face of what I'll call the spur gear (on the motor shaft) and designed a keyed collar that clamps onto the motor shaft and can only drop into/engage with the spur gear when aligned correctly. The original design had a thin bead along the bottom of the spur gear to reduce friction with the servo housing, but I think that would wear too quickly with the weight of the motor bearing down on it and put additional load on the servo. Because I knew I was going to remove the motor head anyway, I didn't mind losing the ability to install the assembly with the head attached, so I decided to add a [thrust bearing](https://www.amazon.com/dp/B089GGJ65D?ref=ppx_yo2ov_dt_b_product_details&th=1) beneath the spur gear to take the weight of the motor and allow it to spin freely. I also had issues with the assembly flexing under load due to the rotation lock screw being the only attachment point, causing it to bind up against the motor shaft. To fix this, I cut the shape of the rotation lock collar into the bottom of the assembly so that it slides all the way down and friction fits over the whole collar. This was much more stable and allowed the motor to turn smoothly. I'd like to point out that the issues mentioned in the previous two paragraphs are likely not present in Theo's original design because he leaves the height adjustment collar on the motor shaft beneath the steering assembly, which takes the weight of the motor. Because I need to be able to lift my motor vertically, that wasn't an option for me. ## Required Components 1. 8x M3x20mm Screws 2. 4x M3x12mm-16mm Screws - I used 16mm, but anything in this range should work 3. 10x M3 Lock Nuts 4. 1x [51107 35mm x 52mm x 12mm Thrust Bearing](https://www.amazon.com/dp/B089GGJ65D?ref=ppx_yo2ov_dt_b_product_details&th=1) 5. [DS5160 180° Servo](https://www.amazon.com/ZOSKAY-Digital-Compatible-SAVOX-0236-Control/dp/B07Q3Z4SLS#customerReviews) 6. [Metal Servo Disc](https://www.amazon.com/ERGFV-RDS5160-Digital-Quadcopters-Accessories/dp/B09GLW8SSQ/ref=sr_1_2?keywords=Ds5160+metal+disc&qid=1693543731&sr=8-2) (I just used the included plastic disc and some small course thread screws I found that fit) 7. 6-8.4v BEC - The stall current for the DS5160 is 3.5A at 6V, 5A at 7.4V and 6.2A at 8.4V. Make sure the BEC you choose is rated appropriately. - The stall torque is 58kg-cm at 6V, 65kg-cm at 7.4V and 70kg-cm at 8.4V, so I would recommend driving it at as close to 8.4V as possible. - I use a [Castle CCBEC 10A](https://www.castlecreations.com/en/cc-bec-010-0004-00) adjustable BEC to step my 12v battery down to 8.3v. A [Castle Link](https://www.amazon.com/Castle-Creations-CSE011-0119-00-Link-Programming/dp/B0716SH9V8) programming cable is required to adjust the voltage; you could probably call a local RC hobby shop and ask if they could do it for you. 8. [Servo Tester](https://www.amazon.com/HiLetgo-Consistency-Controller-Adjustment-Helicopter/dp/B07TQSKLBK/ref=sr_1_5?crid=1TJ3PEHVF8FEU&keywords=servo+tester&qid=1693543818&sprefix=servo+tester%2Caps%2C98&sr=8-5) - Cheapest & easiest way to control the servo (and/or a brushed ESC for throttle) but see the **DIY Remote & ESC** section for what I used instead. - Note that these have an input voltage range of 4.8-6V, so a second BEC would be required unless you run the servo at its minimum voltage of 6V which I'm hesitant to recommend # DIY Remote & ESC Because I want to remove the motor head to free up space and gain an inch or two of depth, I added a [brushed ESC](https://www.amazon.com/dp/B07NYBF6MQ?psc=1&ref=ppx_yo2ov_dt_b_product_details) to control the throttle. This also greatly improves efficiency because these cheap trolling motors just dump power into resistor banks to run at slower speeds, whereas the ESC uses PWM to control the speed of the motor. Brushed ESCs meant for RC cars/boats are much more robust than those cheap, bulky Amazon PWMs, and they're also often fully waterproof. Instead of using two servo testers to control the servo and ESC, I built a small waterproof remote with 2 potentiometers connected to another box via 5-pin waterproof cables/connectors which houses a Raspberry Pi Pico to read the pots and generate PWMs, 2 voltage regulators, and the ESC. There are tons of cheap microcontrollers you could use for this, but I've been looking for an excuse to buy a Pi Pico for a while now so I went with that. The Pico needs 5V, so I added a 12V to 5V regulator alongside the CCBEC. If you decide to go the microcontroller route, you should easily be able to find some example code for reading pots to control PWM outputs. I can post my micropython code for the Pi Pico W upon request. ## Required Components - DIY Remote & ESC 1. 2x [Waterproof Project Box](https://www.amazon.com/dp/B07RTYYHK7?ref=ppx_yo2ov_dt_b_product_details&th=1) 2. 2x [10K Potentiometer with Center Detent](https://www.mouser.com/ProductDetail/BI-Technologies-TT-Electronics/P164K101PNN20B103?qs=OlC7AqGiEDkgVj7upUjYaw%3D%3D&countryCode=US¤cyCode=USD) - These are 270°, 180° would be better if you can find them. 3. 1x [Raspberry Pi Pico](https://www.mouser.com/ProductDetail/Raspberry-Pi/SC0918?qs=T%252BzbugeAwjj9dgdBLZSmdg%3D%3D&countryCode=US¤cyCode=USD) - Any microcontroller with 2 analog inputs and 2 PWM outputs will work, or you can even just modify 2 servo testers. 4. 4x [PG7 Cable Gland](https://www.mouser.com/ProductDetail/Hammond-Manufacturing/1427NCGPG7B?qs=l4Gc20tDgJJ1uT2cLJ0NEA%3D%3D&countryCode=US¤cyCode=USD) 5. [12V to 5V Converter](https://www.amazon.com/dp/B07P663XJV?ref=ppx_yo2ov_dt_b_product_details&th=1) 6. [5-Pin Waterproof Pigtails](https://www.amazon.com/dp/B01LCV8SYK?ref=ppx_yo2ov_dt_b_product_details&th=1) 7. [5-Pin Waterproof 2m Extension](https://www.amazon.com/dp/B0895V97FM?ref=ppx_yo2ov_dt_b_product_details&th=1) 8. [10AWG SAE Cable](https://www.amazon.com/dp/B074V66ZSW?psc=1&ref=ppx_yo2ov_dt_b_product_details) - To connect motor to ESC 9. [Hobbywing Quicrun 880 ESC](https://www.amazon.com/dp/B07NYBF6MQ?psc=1&ref=ppx_yo2ov_dt_b_product_details) 10. [Hobbywing ESC Programming Card](https://www.amazon.com/dp/B08BXQ17T9?psc=1&ref=ppx_yo2ov_dt_b_product_details) 11. [Guitar Knobs](https://www.amazon.com/dp/B07F25QGDN?psc=1&ref=ppx_yo2ov_dt_b_product_details) - I'll probably end up printing a throttle lever to replace the knob, but it works well for now. # Additional Notes The project box I used was too small to fit both voltage regulators, the Pi Pico and the ESC, so I just mounted the ESC to the top of the box since it's waterproof. It's probably best for it to get some airflow anyway. I read a few reviews that said their servo incurred water damage after being submerged briefly, but I don't expect to have any issues with my current exposed configuration; it fits tightly within the housing, so I don't expect any water that splashes onto it will make its way in. If I do end up frying it, I'll modify the design to fully enclose it.
With this file you will be able to print Kayak Trolling Motor Steering Assembly - Newport Vessels 36lb with your 3D printer. Click on the button and save the file on your computer to work, edit or customize your design. You can also find more 3D designs for printers on Kayak Trolling Motor Steering Assembly - Newport Vessels 36lb.