KEEVO 3D Printer (CoreXY)
thingiverse
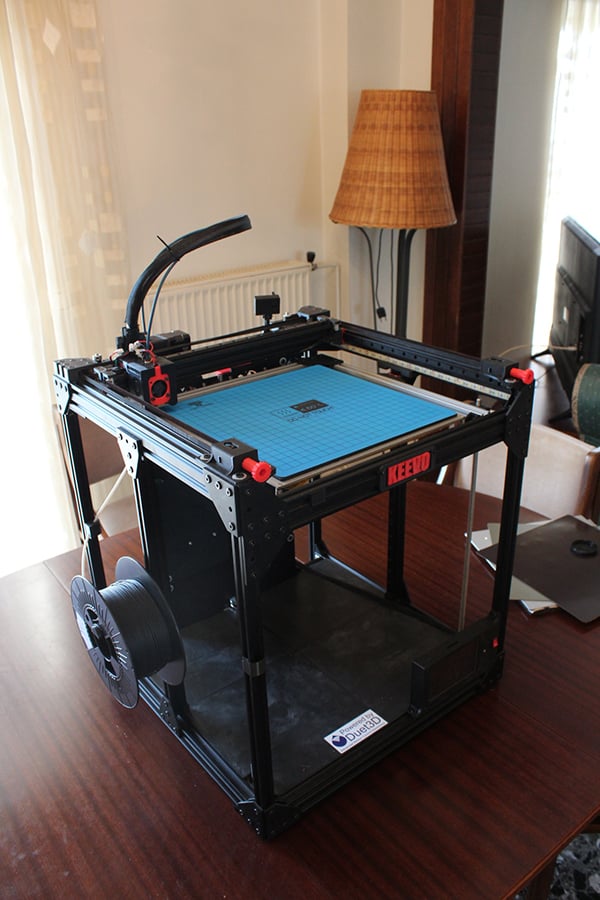
**Thingiverse latest update makes all text format broken and all images shown washed out for whatever reason! I will need to move the project to something like github since thingiverse latest update is a fail anyways.** **All SLTs are in the .zip file included. Updates will be done within that zip. I will also post updates in the comments, so if you want to follow the project, make sure to 'watch' this ;-)** --- ## Description **KEEVO** is the second iteration and update of my [previous 3D printer](https://www.thingiverse.com/thing:3013586). *(PS: KEEVO = A derivative word for Cube in Greek)* Open:  Partially Enclosed:  ### Specs / Features - CoreXY with low profile belt paths, crossing on the back side. - 2020 and 2040 extrusion profile frame. 500x500mm XY footprint. - 320x310mm (max) XY print volume. Customizable Z/Height (380mm default). - MGN12 Linear Guides for all axis. - One motor, triple leadscrew with 2:1 reduction ratio for Z axis. - Minimalistic approach and easy to print parts. No "overkills". No part need supports. - Easy to source, readily available materials. No custom machining. - 0.9° Stepper Motors. - 24 Volt Power. - Duet 2 WiFi with Touch Screen Controller. - Auto Mesh Bed Leveling IR Sensor. - Bondtech BMG Extruder. - Lattice Glass (aka Ultrabase). - Decoupled functionality parts. Easy to customize. - Can potentialy be semi-enclosed. - Hopefully good looking. --- ## Stuff Required (aka BOM) ### Frame ##### Profiles 8x [2040 460mm Extrusion Profile.](https://ooznest.co.uk/product/v-slot-linear-rail-20x40mm-cut-to-size/) (Top/Bottom). 4x [2020 540mm Extrusion Profile.](https://ooznest.co.uk/product/v-slot-linear-rail-20x20mm-cut-to-size/) (Vertical Corners) **HEIGHT CUSTOMIZABLE**. 2x [2020 460mm Extrusion Profile.](https://ooznest.co.uk/product/v-slot-linear-rail-20x20mm-cut-to-size/) (Vertical Back) **HEIGHT CUSTOMIZABLE**. 2x [2020 460mm Extrusion Profile.](https://ooznest.co.uk/product/v-slot-linear-rail-20x20mm-cut-to-size/) (Vertical Sides) **HEIGHT CUSTOMIZABLE**. 1x [2020 460mm Extrusion Profile.](https://ooznest.co.uk/product/v-slot-linear-rail-20x20mm-cut-to-size/) (Bottom Tensioner). 1x [2020 220mm Extrusion Profile.](https://ooznest.co.uk/product/v-slot-linear-rail-20x20mm-cut-to-size/) (Bottom Tensioner). 1x [2020 420mm Extrusion Profile.](https://ooznest.co.uk/product/v-slot-linear-rail-20x20mm-cut-to-size/) (Gantry X). 1x [2020 418mm Extrusion Profile.](https://ooznest.co.uk/product/v-slot-linear-rail-20x20mm-cut-to-size/) (Bed Back). 2x [2020 360mm Extrusion Profile.](https://ooznest.co.uk/product/v-slot-linear-rail-20x20mm-cut-to-size/) (Bed Sides). For using a CR10 Bed instead of an MK2A Bed, you also need: 2x [2020 378mm Extrusion Profile.](https://ooznest.co.uk/product/v-slot-linear-rail-20x20mm-cut-to-size/) (Bed Center). *Note: Both V and T Slot work with KEEVO. The "4x 2020 540mm" Profiles need M5 Tapping on both ends. You can either buy them tapped, or tap them yourself.* ##### Brackets 4x [4040 Double Corner Bracket.](https://www.aliexpress.com/item/32843660148.html?storeId=834897&spm=2114.12010615.8148356.1.6bf1364cahldge) (or use extra 8x 2020 Corner Brackets instead). 34x [2020 Corner Bracket.](https://www.aliexpress.com/item/32693218796.html?spm=a2g0s.9042311.0.0.27424c4dawIyu3) (or use Inside Corner Brackets instead) 20x [2020 Inside Corner Bracket (A)](https://www.aliexpress.com/item/32707599936.html?spm=2114.12010615.8148356.3.48d42586Lvjw1F) (8x more if you use CR10 Bed Configuration) 4x [6060 Angle T-Type Bracket.](https://www.aliexpress.com/item/32754924086.html?spm=a2g0s.9042311.0.0.27424c4diuTmJk) 20x [6060 Angle L-Type Bracket.](https://www.aliexpress.com/item/32754924086.html?spm=a2g0s.9042311.0.0.27424c4diuTmJk) *Note: The bracket quantities include a few extras. Note: 4x Inside Corner Brackets are required to be used in two situations. Note: If you opt to drill the extrusion profiles to fasten them, you will only need: 4x 6060 Angle T-Type Bracket for Vertical Side extrusions. 2x 6060 Angle L-Type Bracket for bed extrusions.* ### Kinematics 3x [400mm MGN12H Linear Rail and carriage](https://www.aliexpress.com/af/mgn12h.html?SearchText=mgn12h&d=y&initiative_id=SB_20190625061925&origin=n&catId=0&isViewCP=y&jump=afs&switch_new_app=y) (for X, Y). 2x [450mm MGN12H Linear Rail and carriage](https://www.aliexpress.com/af/mgn12h.html?SearchText=mgn12h&d=y&initiative_id=SB_20190625061925&origin=n&catId=0&isViewCP=y&jump=afs&switch_new_app=y) (for Z) **HEIGHT CUSTOMIZABLE**. 3x [500mm Leadscrew TR8x8](https://www.aliexpress.com/item/32695471104.html?storeId=834897&spm=2114.12010615.8148356.63.31a7c309du4XvY) (8mm, Pitch 2mm, Lead 8mm) **HEIGHT CUSTOMIZABLE**. 3x [Anti-Backlash POM Nut Block.](https://www.aliexpress.com/item/32779170423.html?spm=a2g0s.9042311.0.0.45204c4dCNMTF7) (8mm, Pitch 2mm, Lead 8mm). 3x [Pillow Block Bearing KP08.](https://www.aliexpress.com/item/32701618602.html?storeId=834897&spm=2114.12010615.8148356.1.66d41fb6PRRDoK) 3x [GT2 20T Pulley Bore 8mm.](https://www.aliexpress.com/item/32693346346.html?storeId=834897&spm=2114.12010612.8148356.11.7e2f71caSAjXrV) (for leadscrews driven). 1x [GT2 40T Pulley Bore 8mm.](https://www.aliexpress.com/item/32705158540.html?spm=a2g0s.9042311.0.0.45204c4dCNMTF7) (for leadscrews driver). 3x [GT2 20T Pulley Bore 5mm (for motors).](https://www.aliexpress.com/item/32693346346.html?storeId=834897&spm=2114.12010612.8148356.11.7e2f71caSAjXrV) You can use 16T for XY if you want, but not for Z. 1x [4 meters Open GT2 6mm Gates Belt.](https://www.aliexpress.com/item/32952396111.html?spm=a2g0s.9042311.0.0.48344c4dc1eWWp) (for X, Y). 1x [1524mm Closed GT2 6mm Belt.](https://www.aliexpress.com/item/32731326764.html?spm=a2g0s.9042311.0.0.27424c4dFBNTOP) (for Z Driven). 1x [160mm Closed GT2 6mm Belt.](https://www.aliexpress.com/item/32683922327.html?spm=a2g0s.9042311.0.0.27424c4dv0CrTK) (for Z Driver). 3x [F688ZZ Bearing.](https://www.aliexpress.com/item/32820942578.html?spm=a2g0o.productlist.0.0.70a072d0TM0zdT&algo_pvid=2313d0d5-28f9-4032-9be7-a659ddb50d24&algo_expid=2313d0d5-28f9-4032-9be7-a659ddb50d24-1&btsid=0ab6d69515960245937025672e9c92&ws_ab_test=searchweb0_0,searchweb201602_,searchweb201603_) (for leadscrew counter brackets) 28x [F695ZZ Bearing.](https://www.aliexpress.com/item/32707215043.html?spm=a2g0s.9042311.0.0.48344c4dc1eWWp) (for all belt idlers) *Note: The [seller](https://www.aliexpress.com/store/837425?spm=a2g0o.productlist.0.0.103d65a57kXigA) from which I got the Linear Rails (quite good for clones) is no longer selling them, so I can't recommend a specific seller right now. You can always opt to get Hiwin rails of course.* ### Electronics (and their friends) 1x [Power Supply 24v 480W - 600W](https://www.aliexpress.com/item/32948831075.html?spm=2114.search0302.3.15.24776ad8Sl3z9U&ws_ab_test=searchweb0_0,searchweb201602_0,searchweb201603_0,ppcSwitch_0&algo_pvid=f9e49c51-3840-4954-b908-353513976172&algo_expid=f9e49c51-3840-4954-b908-353513976172-2). (depends on the heatbed you choose) 1x [Power Socket with Fuse and Switch.](https://www.cableworks.gr/ilektronika/arduino-and-microcontrollers/prototyping/connectors/power-socket-inlet-with-fuse-holder-and-switch-ice320-c14/) (use appropriate fuse). 1x [XL4005 5A Step-Down/Buck Converter.](https://www.cableworks.gr/ilektronika/arduino-and-microcontrollers/buck-and-boost-converters/buck-converter-step-down-dc-dc/xl4005-step-down-5a-buck-converter-438vdc/) (only if you want to use 12v fans and/or 12v led strip). 1x [Duet 2 WiFi](https://www.cableworks.gr/3d-printers/duet3d/original-duet3d-duet-2-wifi-board-32bit-processor-tmc2660-drivers/) + [5'' Touch Screen Controller](https://www.cableworks.gr/3d-printers/duet3d/original-duet3d-paneldue-display-5/), or [clone](https://www.aliexpress.com/item/32921261431.html?spm=a2g0s.9042311.0.0.27424c4dAYjFfg). (screen optional if you only use a phone). 1x [David Crocker's Differential IR Probe.](https://ooznest.co.uk/product/duet-ir-probe/) 2x [Mini Microswitch KW10 SPDT.](https://www.aliexpress.com/item/32903254356.html?spm=a2g0o.productlist.0.0.21db7d94F0IU1z&algo_pvid=37a02d9b-476b-42f2-8552-1ba397c2f9d0&algo_expid=37a02d9b-476b-42f2-8552-1ba397c2f9d0-0&btsid=8470041c-43fe-4e3d-a236-76442142874d&ws_ab_test=searchweb0_0,searchweb201602_2,searchweb201603_51) (for X, Y). 3x [Nema 17 0.9° (400 steps/rev) 4.4kg/cm.](https://e3d-online.com/motors-high-torque-motor) (for X, Y, Z). You can opt to use 1.8° for Z axis for much higher torque. 1x [Nema 17 0.9° (400 steps/rev) 3.5kg/cm.](https://e3d-online.com/motors-compact-but-powerful-motor) (for extruder). 1x [24v 3010 Fan.](https://www.aliexpress.com/item/32846404079.html?storeId=212707&spm=2114.12010612.8148356.3.214e2d0d7br9zV) (for hotend, ball bearing). 2x [24v 4010 Blower Fan.](https://www.aliexpress.com/item/32798634077.html?spm=a2g0o.cart.0.0.2fdd3c00RelvG2) (for part cooling, ball bearing). 1x [24v 4020 Blower Fan.](https://www.aliexpress.com/item/32704332685.html?spm=a2g0s.9042311.0.0.48344c4dc1eWWp) (for board cooling). 1x [24v MK2A Aluminium Heated Bed 300x300 (328x328)](https://www.aliexpress.com/item/32811352753.html?spm=a2g0o.detail.1000060.1.43e5e504W7Davm&gps-id=pcDetailBottomMoreThisSeller&scm=1007.13339.146401.0&scm_id=1007.13339.146401.0&scm-url=1007.13339.146401.0&pvid=48bf7810-e2d5-40e7-806b-c0349bcb6c99) 1x [NTC3950 100K Thermistor.](https://www.cableworks.gr/3d-printers/build-it-yourself/thermistors/thermistor-ntc3950-100k/) (for heated bed). 1x [V6 Hotend Kit](https://www.aliexpress.com/item/32844028127.html?storeId=1654223&scm=1007.22893.125781.0&pvid=1dea1908-99db-4b33-baf6-08fcafc53ab5&onelink_thrd=0.015&onelink_page_from=ITEM_STORE_DETAIL&onelink_item_to=32844028127&onelink_duration=0.801645&onelink_status=noneresult&onelink_item_from=32844028127&onelink_page_to=ITEM_STORE_DETAIL&aff_platform=link-c-tool&cpt=1561476628048&sk=caZqu2H6&aff_trace_key=38eaf7150d264744bca171af3d7acef7-1561476628048-05123-caZqu2H6&terminal_id=28b81e23678d45dfb906b5e8531a48f9) (24v, All-Metal Heatbreak). 1x [Hotend Radiator with Threaded Pushfit.](https://www.aliexpress.com/item/32705856640.html?storeId=834897&spm=2114.12010615.8148356.29.6db52fac04l8Yt) (Threaded pushfit on top is preferred to be able to add/remove collet easier.) 1x [Bondtech BGM Extruder](https://www.cableworks.gr/3d-printers/bondtech/extruder/original-bondtech-bmg-extruder-standard-oriantation/) or [Clone.](https://www.aliexpress.com/item/32969268193.html?spm=a2g0s.9042311.0.0.27424c4d9n2BUT) ### Highly Recommended [ESP32-Cam.](https://www.aliexpress.com/item/32992663411.html?spm=a2g0s.9042311.0.0.2a514c4dT428oA) (for watching the printer over IP). [Super Lube Grease](https://www.super-lube.com/silicone-lubricating-brake-grease-with-syncolon-ptfe) or [similar Silicone + Teflon grease](https://grobotronics.com/silicon-and-teflon-grease-smar-tf-20g.html). (for luricating the linear rails). [~700mm Capricorn XS PTFE Tube, 1.9mm ID.](https://www.cableworks.gr/3d-printers/build-it-yourself/extruders/0.1m-original-capricorn-ptfe-1.9x4mm/) (for less extrusion friction and better retractions). [2x or more Collet Clips.](https://www.cableworks.gr/3d-printers/build-it-yourself/extruders/original-e3d-collet-clips-for-1.75mm-hotends-pack-of-2/) (for securing PTFE tube). [Hardened Steel Nozzle.](https://www.aliexpress.com/item/32955293790.html?spm=a2g0s.9042311.0.0.4c1b4c4d7LQdbT) (for reliability and abrasive filaments. I opt for 0.6mm). [Titanium Heat Break.](https://www.aliexpress.com/item/32853548000.html?spm=a2g0o.cart.0.0.461d3c00cnFH5F) (for better heat insulation between heaterblock and radiator). [ATC Semitec 104GT-2 Thermistor Cartridge.](https://www.aliexpress.com/item/32843785247.html?storeId=1654223&spm=2114.12010612.8148356.39.3f0622f4bqC4WI) (for higher temperatures if needed). [310x310mm](https://www.aliexpress.com/item/32919815984.html?spm=a2g0o.productlist.0.0.23fc1a03nr4NNK&algo_pvid=cd9ecf95-4a04-4b6a-b2b2-9911cd5acda4&algo_expid=cd9ecf95-4a04-4b6a-b2b2-9911cd5acda4-12&btsid=61658349-ca06-46ea-b412-84396ee2245c&ws_ab_test=searchweb0_0,searchweb201602_2,searchweb201603_51), or [330x330mm Lattice Glass](https://www.aliexpress.com/item/32924082482.html?spm=a2g0o.productlist.0.0.5c951104HujiRf&algo_pvid=44e2a5dc-b0c2-4728-afee-e05b1d4845c6&algo_expid=44e2a5dc-b0c2-4728-afee-e05b1d4845c6-0&btsid=c914d5f9-aa50-403f-8e88-eb2001bf5315&ws_ab_test=searchweb0_0,searchweb201602_2,searchweb201603_51). aka [Anycubic Ultrabase](https://www.aliexpress.com/item/32843178556.html?storeId=721071&spm=2114.12010612.8148356.5.4a3d2a101RYyPy) OR [310x310mm Magnetic Spring PEI Sheet Surface.](https://www.aliexpress.com/item/4000064162515.html?spm=a2g0s.9042311.0.0.48344c4dc1eWWp) (for bed adhesion). [300x300mm Heat Insulation Cotton.](https://www.aliexpress.com/item/32879285916.html?spm=a2g0s.9042311.0.0.27424c4dwvXDfk) (for heated bed heat insulation). [4x Nema17 Cork Gaskets.](https://www.aliexpress.com/item/32911443497.html?spm=a2g0o.productlist.0.0.dee67f08juwUTM&algo_pvid=a6575d6f-d2e4-4f7d-abfa-225f1aaa2165&algo_expid=a6575d6f-d2e4-4f7d-abfa-225f1aaa2165-0&btsid=11fb2e7d-be68-450e-960c-456eb3be20bf&ws_ab_test=searchweb0_0,searchweb201602_2,searchweb201603_51) (for reducing heat transfer from motors to the plastic brackets). [~400mm Drag Chain 10x10mm Internal Dimensions.](https://www.cableworks.gr/3d-printers/build-it-yourself/drag-chain/l1000mm-10-x-10mm-cable-drag-chain-wire-carrier-black/) (for Z axis cable management). [~5meters Braided Sleeve 20mm.](https://www.aliexpress.com/item/32824810154.html?spm=a2g0o.productlist.0.0.43f14cb2wJXMnk&algo_pvid=5f7ca403-7a5d-4451-b2fd-d81586f59eaf&algo_expid=5f7ca403-7a5d-4451-b2fd-d81586f59eaf-13&btsid=c9c660ca-ed40-4306-a2b1-5e713fc4a124&ws_ab_test=searchweb0_0,searchweb201602_2,searchweb201603_51) (for general use cable management). [~800mm Extrusion Slot Cover.](https://ooznest.co.uk/product/slot-cover/) (to stick Led Strip on). [~800mm Waterproof Led Strip, ideally with <=10mm width.](https://www.cableworks.gr/ilektronika/led-strips-el-wires/led-strips/strips/12v-led-strip-5050-waterproof-ip65-5m-cool-white/) (for looking cool in the dark). [V6 Silicone Sleeve/Sock.](https://www.aliexpress.com/item/32916210903.html?storeId=1654223&spm=2114.12010615.8148356.1.207675ffjBSaVZ) (to sustain heat, avoid thermal alterations by fans). [4x Rubber Feet or similar.](https://www.aliexpress.com/af/rubber-feet.html?SearchText=rubber%20feet&d=y&initiative_id=SB_20190625075405&origin=n&catId=0&isViewCP=y&jump=afs&switch_new_app=y) (to avoid scratches on your table and stabilize the printer). ### Hardware ##### M5 150x M5x8mm. (mostly for metal parts). 150x M5x10mm. (mostly for plastic parts). 4x M5x12mm. (bed-rail brackets). 4x M5x20mm. (XYZ tensioner part idlers). 12x M5x25mm. (XY motor part idlers). 4x M5x30mm. (XY joiner part idlers). 2x [M5x35mm with Hexagon Head.](https://www.aliexpress.com/item/32858736606.html?spm=a2g0o.productlist.0.0.309d8b34BawrQM&algo_pvid=43cadd78-378a-4e49-afd5-23b1a3e34c52&algo_expid=43cadd78-378a-4e49-afd5-23b1a3e34c52-20&btsid=151bc6d3-5d17-42d6-a302-7c69bf1d6967&ws_ab_test=searchweb0_0,searchweb201602_2,searchweb201603_51) (for XY belt tensioners). ~20 M5 Flat Washers. (optional use when fastening plastic parts on extrusion profiles). 2x [M5 Double Teeth Lock Washers.](https://www.aliexpress.com/item/32841139880.html?spm=a2g0o.productlist.0.0.7eb62358hCH5A2&algo_pvid=ae70c018-f806-46ae-b173-4312b602465e&algo_expid=ae70c018-f806-46ae-b173-4312b602465e-31&btsid=1eef8b73-9194-4bba-b892-fdeea71924a5&ws_ab_test=searchweb0_0,searchweb201602_2,searchweb201603_51) (for XY belt tensioners). 16x [M5 5x8x1 Precision Shims.](https://www.aliexpress.com/item/32847580275.html?storeId=834897&spm=2114.12010615.8148356.1.56e574faP9RfUS) (for belt idler). 12x M5 3mm Aluminum Spacer. (for belt idlers). 14x M5 Nuts. (or Nyloc Nuts). 150+ [M5 Sliding T-Nut.](https://www.aliexpress.com/item/32705820422.html?spm=a2g0s.9042311.0.0.3dce4c4dSfvjqj) You can opt for about 20 [spring loaded](https://www.aliexpress.com/item/32706208829.html?spm=a2g0s.9042311.0.0.27424c4dTxhHeW) ones as well. (sliding t-nuts are slightly better than drop-in nuts. Use them for the frame). 150+ [M5 Drop-In Hammer T-Nuts.](https://www.aliexpress.com/item/32706324351.html?spm=a2g0s.9042311.0.0.3dce4c4dSfvjqj) ##### M4 4x M4x10mm. (for the power supply). ##### M3 20x M3x6mm. 30x M3x8mm. 20x M3x10mm. 20x M3x12mm. 10x M3x16mm. (buck converter, power socket, espcam, toolhead loom). 10x M3x20mm. (duet fan and hotend fan). 5x M3x25mm. (duet board and screen). 2x M3x30mm. (XY joiner). 3x M3x35mm. (bondtech extruder). 40x M3 Nuts. 4x [M3 Screw + Spring + Knob Kit.](https://www.cableworks.gr/3d-printers/build-it-yourself/beds/accessories/3d-printer-bed-leveling-m3-screw-with-spring-and-hand-knob/) (for the bed). 20x [M3 Drop-In Hammer T-Nuts.](https://www.aliexpress.com/item/32706324351.html?spm=a2g0s.9042311.0.0.4c1b4c4d7LQdbT) ##### M2 - M2.5 8x M2x6mm. (for 4010 blower fans). 4x M2x12mm. (for XY microswitches). 2x M2.5x10mm. (for IR Sensor. M2 should work as well). 8x M2 Nuts. (these are optional for extra security. The holes can be threaded instead). *Note: The quantities include spares and/or rounded up numbers. Note: For M5 bolts, use either [Low Profile Head](https://www.aliexpress.com/item/32842758081.html?spm=a2g0o.productlist.0.0.77f94aacEFZyhk&algo_pvid=bd3d5c70-f7f2-4b73-b616-8a0b8cb4f49c&algo_expid=bd3d5c70-f7f2-4b73-b616-8a0b8cb4f49c-3&btsid=5e87c8fb-75c6-42cd-89fa-179aa8e74e10&ws_ab_test=searchweb0_0,searchweb201602_2,searchweb201603_51), or [Button Head](https://www.aliexpress.com/item/33021568231.html?spm=a2g0o.productlist.0.0.45834b3892CmHu&s=p&algo_pvid=b241751c-1da2-4c9f-b01f-5f28e8feeb9b&algo_expid=b241751c-1da2-4c9f-b01f-5f28e8feeb9b-2&btsid=8f27644e-0a6f-4173-9dd5-050e84438541&ws_ab_test=searchweb0_0,searchweb201602_2,searchweb201603_51). I used Low Profile. Note: For M3 bolts, use anything you like. I used Cap Head. Note: Use Hex Socket bolts. They are simply better than Philips. Note: Remember that for small hardware quanitities, it's actually cheaper to buy from your local hardware store.* ### Wiring / Connectors *Lengths and quanitities include spares since mistakes can be made easily when wiring, crimping, etc. Cable lengths are also depending on the height you chose to build.* ~2 meters [Silicone Stranded Cable 14AWG 2xCore.](https://www.aliexpress.com/item/32903241720.html?spm=a2g0o.productlist.0.0.59fd66ffs1w4R8&algo_pvid=e9b6bf38-4d9e-4e65-8883-cf11181d8762&algo_expid=e9b6bf38-4d9e-4e65-8883-cf11181d8762-1&btsid=b7110a8b-617b-4b50-97a8-78c09734ec34&ws_ab_test=searchweb0_0,searchweb201602_2,searchweb201603_51) For PSU and Heated Bed. ~2 meters [Silicone Stranded Cable 18-20AWG 2xCore.](https://www.aliexpress.com/item/32903241720.html?spm=a2g0o.productlist.0.0.59fd66ffs1w4R8&algo_pvid=e9b6bf38-4d9e-4e65-8883-cf11181d8762&algo_expid=e9b6bf38-4d9e-4e65-8883-cf11181d8762-1&btsid=b7110a8b-617b-4b50-97a8-78c09734ec34&ws_ab_test=searchweb0_0,searchweb201602_2,searchweb201603_51) For hotend and buck converter if you use it. ~4 meters [Stranded Cable 22AWG 4xCore.](https://www.cableworks.gr/ilektronika/arduino-and-microcontrollers/prototyping/dupont-jumper-wires/tinned-copper-4-pin-22awg-led-rgb-stepper-cable/) For stepper motors and the Duet Screen. ~10 meters [Silicone Stranded Cable 24-26 AWG 2xCore.](https://www.aliexpress.com/item/32903241720.html?spm=a2g0o.productlist.0.0.59fd66ffs1w4R8&algo_pvid=e9b6bf38-4d9e-4e65-8883-cf11181d8762&algo_expid=e9b6bf38-4d9e-4e65-8883-cf11181d8762-1&btsid=b7110a8b-617b-4b50-97a8-78c09734ec34&ws_ab_test=searchweb0_0,searchweb201602_2,searchweb201603_51) For everything else. 6+ 1/4'' Spade Female Connectors. Either pre-insulated or not. (for mains power socket wiring). 3+ M4 Ring or Hook Terminal Connectors. Red. (for mains wiring to the PSU). 4+ M4 Ring or Hook Terminal Connectors. Blue. (for PSU to board, PSU to buck converter wiring). 1x [XT60+ Male/Female Pair.](https://www.cableworks.gr/ilektronika/arduino-and-microcontrollers/prototyping/connectors/xt60-xt90/xt60-male-female-bullet-connector-plugs-for-rc-lipo-battery-black/) (for heated bed power connector). 1+ [JST SM 2Pin Male/Female Pair + Crimps.](https://www.cableworks.gr/ilektronika/arduino-and-microcontrollers/prototyping/connectors/jst-sm2.54-2pin-2.54mm-male-female/) (for heated bed thermistor connector). 5+ [JST XH 2Pin Male/Female Pair + Crimps.](https://www.cableworks.gr/ilektronika/arduino-and-microcontrollers/prototyping/connectors/jst-xh2.54-2p-2pin-connector-male-female/) (for everything on the toolhead). *Note: Your Duet should come with all the Molex connectors, their crimps and ferrules required.* *Note: I chose to use JST XH for wire connection on the toohead due to their small size. This requires some tricky soldering and properly insulating the male connector. If you don't feel comfortable in doing this, use JST SM for those wire connectors as well, or don't use wire connectors on the toolhead at all is also an option*. ### Tools Required Allen Keys **with ball head**. Wrenches. Any Decent Tapping Kit if you are going to tap the profiles yourself (8x M5 taps are required). Any Decent Wire Cutter and Stripper. Good Crimper + Stripper + Bolt Cutter Combo. If you can only get one, I recommend [Engineer PA-01](https://www.amazon.co.uk/Function-Crimping-Strippers-Cutter-Engineer/dp/B000W9N452/ref=sr_1_1?keywords=engineer%20pa%2001&qid=1561483070&s=gateway&sr=8-1) as an all-around tool. Also [Engineer PA-09](https://www.amazon.com/Engineers-Precision-Crimping-Pliers-Pa-09/dp/B002AVVO7K) if you can spend more. Good Soldering Iron. I recommend [TS100.](https://www.ebay.co.uk/itm/TS100-Mini-Portable-OLED-Digital-Soldering-Iron-PR-BC2-Tip-Interface-DC5525-65W/173616452840?epid=6004821570&hash=item286c58d4e8&enc=AQADAAAC8FjVrDbVsZ8oH/8PNHtt9VX4/w7FZcmMuqsX8uaFEduVZF%2bv/cG%2bTWpL1Nglsmyb1jgPmtVupvwVvn8z4mEQZfkrMXlp9jFqla5ZLcZZV4X2NEYs2cJFV%2br0YbEdud5C6BHWFv7j6%2bxbzCLzx3yrW8GfKL7%2b7mA4vlnKBPIWH%2bEMXtP%2bdTglU0cn9Uwq9xnKegC4ISUUZhRqkGCpofFsp8n9xJmL6xJwpYBawZqCx37IRcbDtpS8PINlwXyC5yzAC/hCGa2992PJbto0QPIpaamrXKljTTTctB7UK3RKypwHNses1JBGNgNtu8E6N5GST/5ETBIp7fttor%2baR2jpc1Ih2c2HGoSSAx5UBCOcb9YXYWevxUs5TnwsYtkBrY7ifkecbyiPzXmvYcj8aokGINL9jE2ag94pml0/vU4uM%2bf33rPi46jDy1xE9YTPqFGq4EvgKIfMxh8fV33/RVVXt0jV4xQSZ/qeCzO0FT3vJlwBE7LfGFw1aXRPWjSTWalkIdWtaCKSwzwo9pQu1LjOvcMcaEvLDD/nw0Mah3OTJjdZmTVkO/Lwb5iy0qDIK3Jh%2bhUphf%2bJmBL21EUbrEC6Vhftc23aHQBgRrgPPouxEAdrZJovJL8apasBjWXKJSiJRf5byHrQ0sDIb7YNNbLc9QGCVd8MaJPED2p8/dJQq62re8cU0rpX2mpvTRX1ras5QqLOvYolbpA8mHFQbW6Je9Sunq4r0mg8cgRJhV9d5WJ1MQD5rgzkJiqDoHcJxH/xVOKLRabu4qmchfnqGFJSvdP7kNfQKJy4fYnUU8f0Uu1MxKlHmAKMJVc1YmqKgIAdjHcE5S10pUEZl5I5jwyp9qRIdqpZh92yh7MWjRwaZUt3ZxyjTGI%2bxX44ywD7WTq6pg6VpJPKSo9f5C2m5TQUtQEmMYMrmu4HUY8TF3L6cr0d1qxkF0u9Fq9tMyrrzuA/uUOUFFVX8VUJnopny5RdHoBpWe%2b9hFh0u2Nlon0ee6EY&checksum=173616452840ead6e5a0740345b2bdb914c64eacb516) (like everyone else) Heatshrinks of various diameters. Technical ability and patience :-) --- ## Build Diagrams I will update the diagrams with listing of each item used as well as further information when I find the time to do so. Meanwhile if you need anything, feel free to ask. Also make sure to check the printer.obj 3D file for more guidance! **Open images in new tab to view their original, non-washed-out size!** #### Frame & Bed  #### XY Joiner & Toolhead  #### Idlers & Tensioner  --- ## Build Options and Alternatives There are some options and alternatives you can chose. The most noticable ones are: #### Different Target Heights. In the BOM list, certain items (6 to be more specific), are marked as "**HEIGHT CUSTOMIZABLE**". The currently listed item lengths are targeted for 380mm build volume height. You can change your desired target height by increments of 50mm (either increase or decrease). So for example, if you want to target 330mm build volume height, you simply need to subtract 50mm to the lenghts of those items. Nothing else needs to changed. It can go as low or as high as you want (280/330/380/430/480 etc). #### Semi-Open Front. You can opt to lower the 2040 extrusion profile in the front by a certain amount, as to give you a clear view of your hotend nozzle and bed (this is the default), but I do not recommend lowering it more than ~100mm. 40mm are actually enough to give you a clear view at your hotend nozzle and bed. If you do decide to do this, the only thing that is required is to print 2 extra parts to fasten the XY belt tensioners in place were previousy was the extrusion profile, and to rearrange the frame brackets on the front.  #### Enclosure Panels For enclosure as well as electronics mounting (back) panels, there are many options (acrylic, aluminum, cardboard even). However for the bottom and back panels specifically, the panels will need to have certain openings so that other stuff (leadscrews, cables, brackets, etc) are not in the way. Making those cuts however while keeping your sanity will most than probably require certain tools like laser cuting depending on the material. As such, I opted to simply print the panels (specifically bottom and back). It required a lot of time and material, but in the end it was less expensive anyways, just not as great looking as it would be otherwise since the panels are printed in separate parts. The side panels are easier and thus an acrylic sheet can be used there. #### Blind Joints instead of brackets. You can opt to connect the main frame profiles with blind joints instead of using tons of brackets. The pros is that the build will be much cleaner and will require less materials (thus also less weight). The cons is that it is required to drill the profiles (very precisely) and that it kind of disallows further experimentation once that is done in case you care about that. #### Different Board Needless to say, but yes of course, you can use a different board other that Duet (which is great of course), like SKR to run Marlin 2.x, or even some 8-Bit board + RPI to run Klipper. The board and screen mounts included however are for Duet. I might add one for SKR if requested. --- ## Build Notes #### XY Belt Paths The belt design is made so that XY belts are very low profile, spaced only 2mm apart and crossed-flipped on the back. The X belt path (left motor) is the low one, while the Y belt path (right motor) is the high one. When assembling all the belt idlers, shims and spacers are used to make that separation. Make sure that the X motor belt path idlers are low, while Y motor belt path idlers are high! This means that: - X motor belt path idlers are stack of [shim, F695ZZ, F695ZZ, 3mm spacer]. - Y motor belt path idlers are stack of [3mm spacer, F695ZZ, F695ZZ, shim]. This information is also presented on the assembly images. Finally, the two belt paths are crossed and flipped on the back side. #### Jigs There is a certain number of parts, all with a prefix "Jig_" in their name, that I recomend you to print. These are used to help you in aligning the rails, some extrusions etc. #### Linear Rails Cleanup and Lubrication There are various opinions and videos on the internet telling ways on how to clean and use linear rails. The following is my personal opinion and experience. You definetely need to clean your rails/carriage when you get them. Ideally you would want to completely dissasemble them apart, remove the balls and use a solvent like WD-40 or simply IPA to clean both the balls and the carriage. You can also do this with the carriage still assembled but I cant comment on the effectiveness. You then need to lubricate the inside of the carriages. I have found that relatively thick grease works best (for me). The thick grease also helps in dampening micro vibrations. Yes, the carriage will not simply slide by gravity when you vertically tilt the rail, but that is not the point. I recommend Silicone + PTFE synthetic grease but whatever you use make sure the balls roll (not slide). Finally, mounting the rails on the profiles, they need to be as parallel as possible for Y and Z axis where two rails are used. It will take some patience, but remember to print and use the jigs parts for alignment! In general, I recomend keeping the rails bolts slightly lose at first. Then after the carriages are mounted, slide them to one end and tighten up the rail bolts on that end and then slide them to the other end and do the same. Once both ends are tighen up, incrementaly move the carriages and fasten the rest of the rail bolts. #### Bed Mounting and Leveling KEEVO uses DCs IR Sensor for Mesh Bed Leveling, but that is to compensate for the minor bed misalignments. The Bed has to be as mechanically leveled as possible in the first place. To mechanically level the bed so that it is as parallel as possible to the gantry, is a matter of adjusting the three leadscrews (rotation wise), so that the bed tilts respectively. To do this, - Manually move the bed down. - Un-tension the Z axis belt. - Rotate each of the leadscrews enough so that all three bed nut blocks touch the leadscrew spacers (leave a small but even gap is preferable). - Tension the Z axis belt.  Once that is done, you can then use bed spring knobs first and finally [Mesh Bed Compensation/Leveling](https://duet3d.dozuki.com/Wiki/Using_mesh_bed_compensation) to take care of any imperfections. Afte that, you won't have to worry about it anymore. This only needs to be done once. Last but not least, the default mounting brackets are designed to work with the bed that is listed in the materials (MK2A). An option for using a CR10 bed is also available. --- ## What to expect Some Keevo 3D printed parts.   --- ## Printing The Parts - Do not use PETG everywhere, but only where high heat or high loads is relevant. The stiffness of PLA is more desirable wherever is possible. - A layer height of 0.28mm works. 0.2mm is preferable. - For PLA parts use 25-30% Infill, or more if you wish. - For PETG parts use 30-50% Infill, or more if you wish. - For structural parts prefer to use 4 or even 5 perimeters (x 0.4mm nozzle). - Instead of PETG you can opt to use CF PETG like FormFutura Carbonfill. - None of the parts require supports. Where relevant, support structures are part of the model. Also, many bolt holes have a very thin sacrificial layer in the hole (for easier printing) which you will need to break.
With this file you will be able to print KEEVO 3D Printer (CoreXY) with your 3D printer. Click on the button and save the file on your computer to work, edit or customize your design. You can also find more 3D designs for printers on KEEVO 3D Printer (CoreXY).