Keg King, Kegerator Fan Mod
thingiverse
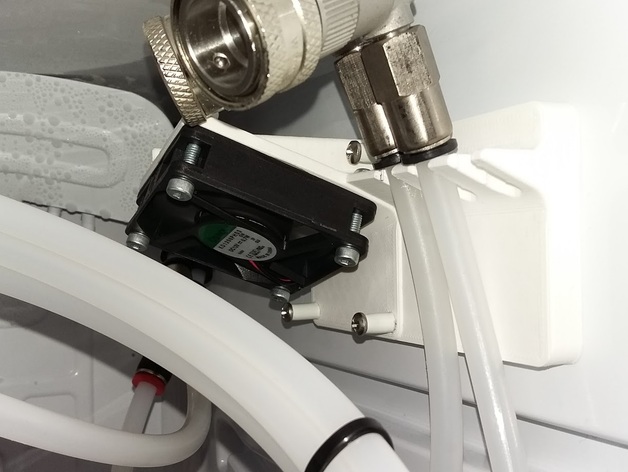
A replacement fan housing for the Keg King Kegerator. Should improve refridgerative efficiency and reduce the chance of warm spots within the fridge. Utilises the existing 60mm fan, but points the airflow in a useful direction. Also adds 3 hanging points for gas and beer lines. This mod is for the series 3 kegerators from Keg King. It might fit other series and brands, if they use a 60mm fan that is mounted to the inside wall of the fridge. The manufacturer mounted the fan in a manner that does not permit any useful airflow. The fan is intended to move air around the fridge so the temperature is even throughout. This modification repositions the fan so that it blows towards the door of the fridge at a slight angle; it is hoped this will swirl the air around enough to reduce warm spots, especially those furthest from the heat-exchanger at the rear of the fridge. The number of kegs, and other items, in your kegerator will affect the ability of air to circulate. If you can, position contents to enable airflow. I you replace the OEM fan with another, be sure not to use a high current fan; you might over-stress the driver circuit. The OEM fan in my fridge was rated at 12VDC @ 0.10A (or 100mA), yours may vary. Files: 60mmFanMount.2.stl is the basic angled fan mount. 60mmFanMount.3.stl is the angled fan mount with 3 hose holders (the holders have a very positive grip, which might mar some hoses). 60mmFanMount.4.stl as above but should be "kinder" to your hoses and it has a bit more clearance for one of the nuts. Cheers If you like these mods, and you'd like to fuel even more of them, please send beer coupons to:https://www.paypal.me/azza68 Print Settings Rafts: No Supports: Yes Resolution: 2mm layers Infill: 50% Notes: 3 shells May be printed in ABS or PLA or your favourite hard plastic. Anything that is OK with cold and occasional humidity. Post-Printing Step 1. Turn off your kegerator. Step 2. Review Step 1. Step 3. Remove the 2 screws on the fan cover. (It's the white thing in the upper right inside the fridge, just forward of the hose port.) Step 4. Remove the 4 screws from the fan. (Being careful not to damage the fan blades.) Step 5. Disconnect the fan cable and remove the fan. The plug needs to be pinched, to release it from the socket, look closely; there is a lever with a pad. (You should not need to pull hard.) Step 6. Fasten the fan to the new mounting using 4 4mm by 25mm machine screws with 4 Nyloc nuts and 2 washers. The fan should be oriented so the blades face the new mounting; the fan will blow towards the front of the fridge at a slight angle. (Sticker side downwards.) The 2 screws closer to the bulk of the new mount have wells for the nuts. Do not use washers on these nuts. (One nut is a tight fit, on the present version, you might need to use a small/nail file to remove give clearance.) The 2 screws at the thinner part of the new mount will need washers under the Nyloc nuts. (These washers are not critical but they do help spread the load and neaten the length of eposed thread to zero.) You may wish to install a fan gaurd, if you do so you will need longer screws to suit. Step 7. Install the new fan mount inside you kegerator. The plug needs to be plugged back in, observe the polarity. (It should only fit one way and not need forcing.) Fit the new mount to the kegerator using the old fan screws with the standoff tubes fitted to the screws. *** Insert all 4 screws, finger tight only, to allow proper positioning. Do not tighten the screws until you are sure the cable is not pinched between the mount and the fridge. Alternately: you may wish to purchase better fitting screws. Get stainless steel if you do. Step 8. Turn the kegerator back on and test your new fitting. (This fan should come on when the compreessor is running.) If the fan is noisy, check the screws are not overly tight; they can distort the fan chassis and the blades can strike the sides. Step 9. Pull a cold one and marvel at your DIY abilities... then pull another one for me. How I Designed This Almost but not quite... OEM was a great idea... a fan forced fridge... but the reality was just turning electricity into a small humming noise. The OEM fan just did not move air around inside the fridge; it couldn't. It was too close to the wall, too blocked by gaurding, and was left running in a pressured pocket of air that didn't really move anywhere at any great speed.
With this file you will be able to print Keg King, Kegerator Fan Mod with your 3D printer. Click on the button and save the file on your computer to work, edit or customize your design. You can also find more 3D designs for printers on Keg King, Kegerator Fan Mod.