Keg Tower Adapter (Frosty Keg)
thingiverse
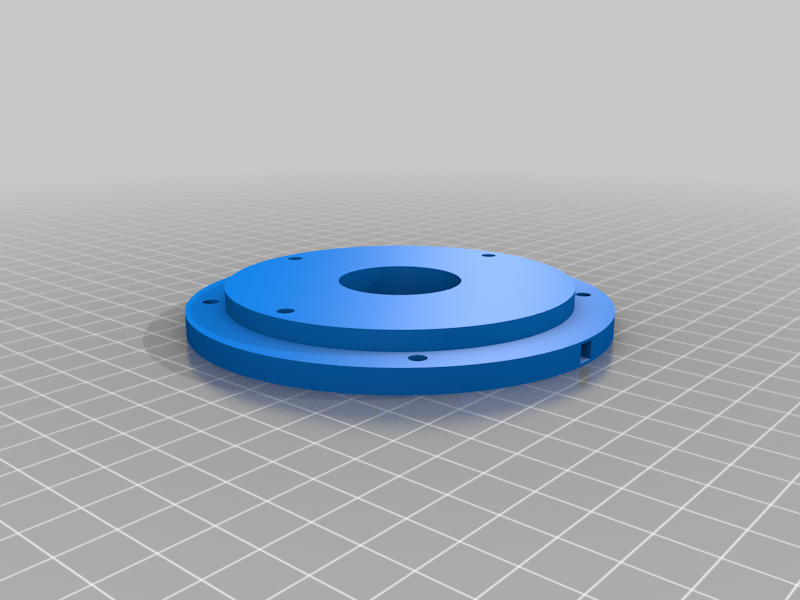
I have a 2010 Frosty Keg (Great Northern 7975), basically a Kegerator knock-off, that came with a rather unique beer tower, which attaches via a twist-lock/screw-in mounting mechanism. Sadly, it's impossible to mount anything but the original tower to this old kegerator without some invasive drilling into the top of the fridge. Rather than risk drilling (for the many reasons you can imagine), I designed this beer tower adapter, which utilizes the Frosty Keg's existing twist-lock and screw pattern of 79mm (3 1/8") and converts it to 98mm (3 7/8"), which is more commonly found on standard 3" beer towers. The Frosty Keg's twist-lock is set about 5mm below the fridge surface, this adapter raises it flush, then provides an additional 6mm of depth for the new screw pattern. #### Files - Adapter: 2 versions; one has a hole for running wires (e.g. for some kind arduino/rpi/esp flow meter), the other is plain, no hole. - Twistlock: in case you don't have the original twist lock, this is a near-exact replica you can print out. #### Required parts - (3) 10/32 machine screws, I used 3/4" length but 1/2" might work. - A standard 3" beer tower (should have come with it's own mounting screws/gasket) #### Installation 1. Print the parts - at least 10% infill - High quality settings are preferred, but the design is tolerant of lower quality settings. - The twistlock needs supports, so enable all support options in your slicer just for it. 2. Install the twistlock, line it up with the 3 existing screw holes. 3. (optional) Install your gasket on the ring of the adapter (see notes). 4. Place the adapter on the twist lock, line up the screw holes. 5. Using the 10/32 screws, secure the adapter to the twist-lock (they should go all the way through the twistlock into the existing screw holes, might take some force as you're creating new threads in the process). 6. Install/mount your new tower per a normal tower installation. #### Notes - Your tower may sit about 1-2mm above the fridge surface after install, depending on the flange design. I've found this to be almost unnoticeable. - If you want to use a gasket, it should be placed between the adapter and the fridge surface. However, due to size limitations, the adapter itself only provides space for about 10mm of gasket. You'll likely be able to cut the rubber gasket that came with your new tower to size, or you can buy something like this and cut it to size: https://www.amazon.com/Fel-Pro-3060-Gasket-Material/dp/B000CNKUGO. You may be able to find a premade gasket, but I could not. If you try, OD should be <=110mm, ID should be >=90mm, and thickness should be <=2mm, preferably 1mm.
With this file you will be able to print Keg Tower Adapter (Frosty Keg) with your 3D printer. Click on the button and save the file on your computer to work, edit or customize your design. You can also find more 3D designs for printers on Keg Tower Adapter (Frosty Keg).