Keiran XY Carriage System
thingiverse
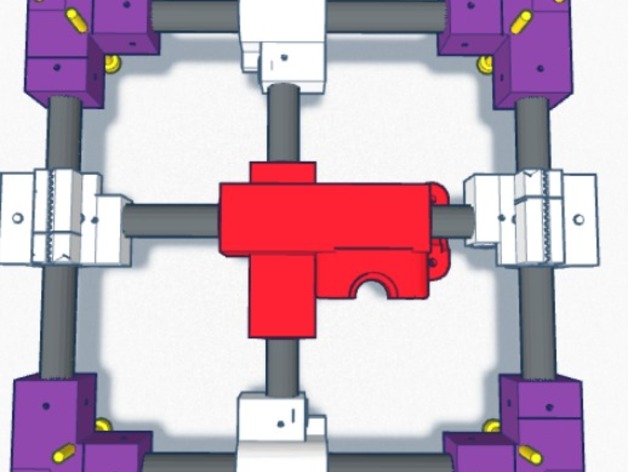
(End Build will be a fully adopted Ultimaker Clone that uses absolutle Minimum Hardware. going for ALL printed parts Except Frame and Electronics) ■and please note there is constant testing and printing on my end trying different mods on nearly every model, ive wasted over 300 feet of filament in test printing already and cant even use so please show support for my project. This isnt adhered towards Non 3D users but towards users who want to quickly build Another Quality printer where cost is greatly reduced by no hardware barrier and awaiting overseas shipping of hardware in bulk. ●And if you arnt sure what a part or file is because ive changed Alot from my start Picture above i carefully Name the STL files in the ZIP for ease of understanding which is which. (Current Status 4/2/16) - I added a HotEnd Carriage with modified LM10UU Holes (This does NOT have the Printed LM10UU because its recommended to use Real LM10UU for the Center Carriage, If you want to use the Printed LM10UU Use the TEST LM10UU file and make the Z size larger before the print). I also Changed the X and Y carriages and they are now different so to fit the new Hotend carriage. There are 2 versions of each one with the LM10UU printed into the carriage and the other Without if you want to use real ones. I also uploaded the Frame Brackets and Bolts on the previous update. The Next step is to get the Z Axis system built, Motor Mounts (Easy), and the Pullys uploaded. On with the Borafill! (Update 4/2/16) - Added X Carriage and Y Carriage files 2 versions of each ( one with the LM10UU printed into it and one Without it so you can use Real Bearings if you wish.) Also added an adopted Ultimaker HotEnd Carriage with Modified LM10UU Holes (Note That his is recommended to have Real Bearings so I did not Upload 2 versions of this, If you want to use the Printed LM10UU bearings just use the TEST LM10UU file and Make the Z Size Larger before the Print (LM10UU bearings are 29MM Tall/long) (Update 3/31) - I added the Frame Brackets with Fitted Bolts and a Bolt Wrench. (Update 3/29/16) - I replaced the XY Carriage with thicker wall support for the X-Cross sections. -Added the "LM10UU Linear Bearing Test Print File" PRINT THIS FIRST! SEE BOTTOM INFO! This is a complete build from scratch of an X Y System. This runs with 25mm Extrusion rods for the corner brackets to mount into and requires very small amount of hardware which was my overall goal. Even the Linear Bearings are printed from the LM10UU Self Center bearings that can be found in several places. The Rods (I am Using 3/8 inch Rods and mine are snug and Smooth) are build for 10mm smooth rods but 3/8 inch will also work. The Hot End mount is built into the carriage and made for the E3D V6. I will add in later Fan mounts but the Open Bottom system allows you to use whatever Fan mount you wish. If there are issues (I come across) Ill update accordingly. This was ALL designed in Tinkercad and took a couple days Id appreciate feedback and support on this thank you. Please Note you obviously Wont print the 10mm Rods they were added into Tinkercad to align the entire system and I highly doubt the system would function properly so I am Not adding them into the downloads. My official build name is the Keiran System. -Additional Information- Please 1st print the LM10UU Test Size file. This is set at 10mm and all printers have small deviations whether its + or - 50-100 Microns and this will affect the smoothness of the carriages. I added the Test print file and its small and takes 10 minutes about. Print this on the Highest Resolution at the Maximum Fill to get your printers quality. Then if you need to offset the set of the XY Carriage the change your Print Setting to 0.99 or 0.98% (.99 is -100 Microns , .98 is 200 microns. [I had to do mine at .99 for use with 3/8 inch rods]) The Dowel Rods for the Bearings whichever you chose these are set for 4mm Inside Diameter Rods So please make proper modifications for your Bearings that you Use. I am Adding in Printable Bearings to Use that will go with these Rods to take another Hardware Factor out of this build. :) The Carriages are to be used with the common GT2 Timing Belt Ill add a finish build photo VERY SOON to show my setup but this works like other CORE XY systems only my build takes out 90% of the Hardware factor. (Ill be testing Printed Frame peices soon and adding my Z axis system which is completely custom and very cool for this build. Stay tuned for daily updates. Print Settings Printer: M3D Rafts: Doesn't Matter Supports: Yes Resolution: Medium/High Infill: Medium/High Notes: I printed Everything on Mine in Medium quality and fill with no issues. The Linear Bearings are snug fit at 1st but running them up and down the Rods for 20 seconds broke them in for the perfect size. After a few weeks Ill take apart and see if there is much deviation but im not too concerned. How I Designed This Tinkercad
With this file you will be able to print Keiran XY Carriage System with your 3D printer. Click on the button and save the file on your computer to work, edit or customize your design. You can also find more 3D designs for printers on Keiran XY Carriage System.