Kensington Expert Mouse Trackball - Scroll Ring Mechanism (v2)
thingiverse
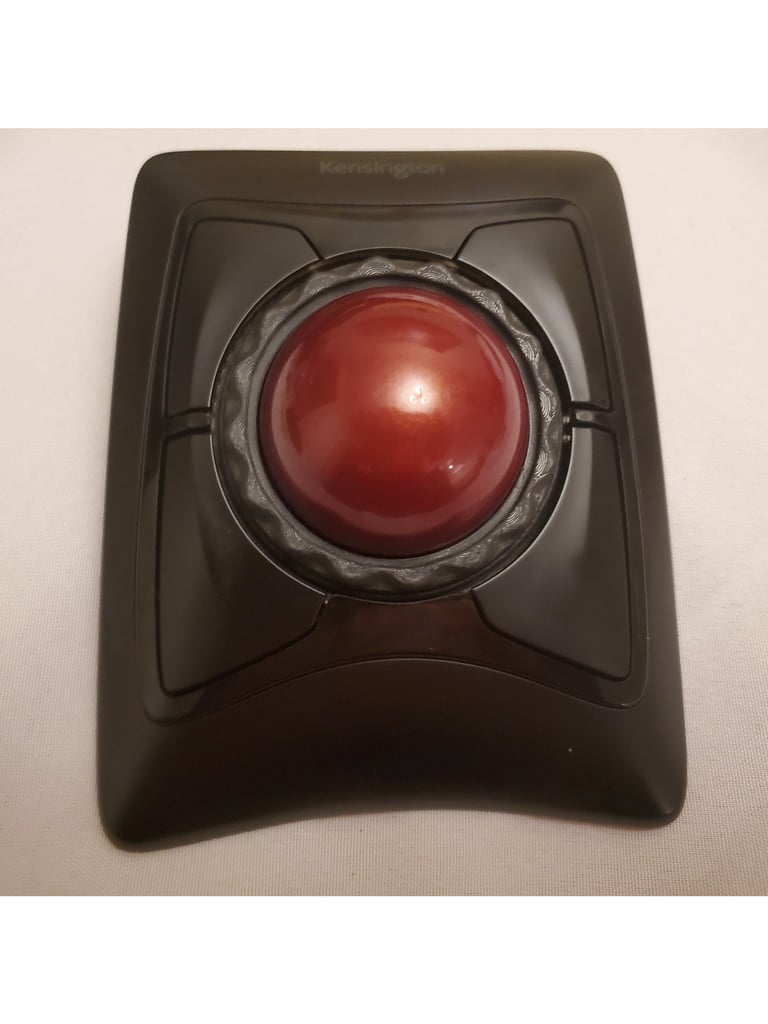
This was originally [thing 4140712](https://thingiverse.com/thing:4140712), but I've updated it to work for both the wired and wireless versions of the Kensington trackball mouse and moved it under my original account (which I had forgotten I had, it had been so long). Most of the parts have been revised. What This Is and Why It Exists This is a replacement scroll ring mechanism for both the wired (K64325) and wireless (K72359WW) versions of the Kensington Expert Trackball Mouse. I created this because the scroll ring on this trackball is problematic. As Wirecutter put it, "[T]he scroll ring felt gritty when we turned it.... Many owners report the same problem ... 'the scroll ring feels so jerky and janky.'” In addition to turning poorly, the Kensington scroll ring also has problems giving feedback to let the user know that scrolling is about to occur. The scroll wheel on most mice creates a tiny but noticeable amount of resistance immediately before scrolling happens, as if the scroll wheel mechanism has a series of notches built into it. The Expert Wireless Trackball Mouse tries to do this through use of a magnet. However, the magnet works so poorly that many sites recommend removing it entirely. My replacement scroll ring spins on 4mm-diameter chrome steel ball bearings and--optionally, for those of you who are interested--creates scrolling feedback by having a 623ZZ miniature bearing press against a portion of the side of the ring that is shaped like a wave. Caveats - I don't have much time to support this, so if you run into issues don't be surprised to be left on your own. - The tolerances for this thing are extremely small. Expect to do some sandpapering and even that may not be enough for some of you. - In addition to the sandpapering, I also had to use an Exacto knife to clear out the little hairs that stretched across the windows of the windowed ring component (Component6). The longer you spend on post-processing, the better the result you're likely to get. - Assembling this requires that you first disassemble the existing scroll ring, which unfortunately cannot be easily re-assembled if you decide the replacement scroll ring isn't for you after all. You literally have to break the (weak) connection between two pieces that are held together by four tiny, molten plastic pegs. - The Component9 pieces that hold the 623ZZ bearing against the notched ring will break in over the first 24 hours and will hold the bearing against the ring with a lowered amount of pressure. The use of some small rubber bands compensates for this. - Component11 is used to hold the optional rubber band that connects to the Component9 pieces. I've uploaded a SCAD file if you want to change its length to make it a better fit. The length parameter is in line 1 of the file. You can also use Thingiverse's Customizer to adjust it. - Aside from Component11, I did the model in Fusion360 and have included a file that can be uploaded into Fusion360 if you want to alter this. Parts Needed Aside From Printed Objects - 4mm diameter chrome steel ball bearings (available in a package of 100 from VXB.com; you'll need about half that) - 623ZZ miniature bearing (3x10x4) (also available from VXB.com) - M3-0.5 x 5mm screw and nut (pan or flathead recommended; socket cap screws are too big) - Small rubber band(s); I purchased some "polybands" under the brandname of Scunci at Target. - Superglue (the parts snap together, but some glue reinforcement isn't a bad idea); I personally like Loctite Ultragel Control Super Glue Assembly See videos for instructions. What's Changed Since I Created the First Instruction Video - The current version has 48 "windows," which is shown in one of the other videos. The Kensington ring has 39 windows. The increase in windows means that you get more scrolling for less turning of the ring. - PrusaSlicer recently implemented a change for "Elephant Foot Compensation" (Print Settings -> Advanced) that changes how the first layer is printed so that it isn't wider than subsequent layers. I recommend setting the value for this at .1mm, because I found this change to be problematic. More importantly, my pieces already compensate for first layer issues. - The three Component7 pieces that hold Component3 & Component6 together are difficult to get into place. Expect to do quite a bit of sanding here, or just use superglue. - I had to sand down the bottoms of the Kensington's top mouse buttons in addition to some nubs between the mouse buttons on the top plate. None of this is visible when the device is reassembled. - I also sanded off the tiny (1.5mm) ball bearing holders on the underside of the cup's lip. You can omit this initially (while seeing if this design is for you) if you don't snap Component8 into place. Alternatively, you can snap Component8 into place without sanding but things may run a little roughly. Sanding down the ball bearing holders is a point-of-no-return decision, so be careful before taking this step. - The top of the ring (Component6) initially mimicked the design of the Kensington version but I found it to be a trap for debris. I tried coating it with black Sugru but that made it slick. I eventually redesigned it completely and think it makes it easier to turn the wheel. - There are two Component9 pieces. These hold the 623ZZ bearing that presses against the notched ring to provide feedback while scrolling. One piece is for the wired version and the other is for the wireless version, to account for differences in the two trackball models. They each include a circular tab (basically a small brim) that helps keep the piece from coming off the print surface while printing; the tab can be removed once printing is done. https://youtu.be/gQpbLYEUtiM https://youtu.be/QqUpg-sxk5I https://youtu.be/i8YDzRhLhCo
With this file you will be able to print Kensington Expert Mouse Trackball - Scroll Ring Mechanism (v2) with your 3D printer. Click on the button and save the file on your computer to work, edit or customize your design. You can also find more 3D designs for printers on Kensington Expert Mouse Trackball - Scroll Ring Mechanism (v2).