Keyforge Key Token - Multipart
thingiverse
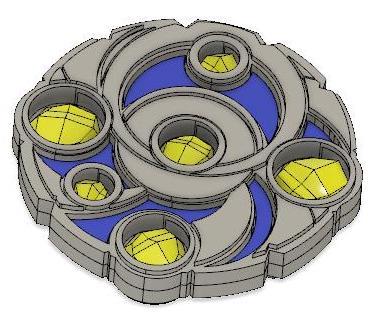
BIG UPDATE Mar 2, 2019: Now that I've got my own 3d Printer, I've been doing some iterative tweaks to the design behind the scenes and it's resulted in a v3 update. Instead of having fiddly inserts, it uses a solid puck and a ring that sandwiches between the forged and unforged sides. There are two versions of the insert, one solid (v3_SolidInsert) and one hollow (v3_HollowInsert). The hollow one reduces material needed and has space for a 1.5" steel washer to add weight to the key for a much better feel in hand. I tweaked the aember design (v3_NewAember) so that it's flush with top of the key and a little chunkier and then created sprues to make printing them a LOT simpler. Previously you had to use a raft or brim or you ran the risk of them not sticking to the build plate. Now they print as a single piece and you can clip the sprues like on a model kit. No supports needed (all files should be properly oriented). For v3_NewAember I needed to enable "Print Thin Walls" in Cura to get the sprues to print correctly. Everything in the pictures was printed on my Ender 3 Pro with Hatchbox PLA. I used Silver for the key body parts; red, yellow, or blue for the inserts; yellow for the aember. I tinted the aember with an orange sharpie and did a black wash on all the silver parts. V3 Instructions: For ONE key - Print v3_ForgedSide, v3_UnforgedSide, and v3_MidRing in whatever color you would like the body of the key to be. Print v3_HollowInsert if you want a weighted key or v3_SolidInsert in the key color (Red, Blue, or Yellow). Print v3_NewAember in whatever color you'd like your Aember to be and clip the sprues off. IMPORTANT NOTE: You will probably need to enable "Print Thin Walls" or the equivalent in your slicer to get the sprues to print. The insert should fit somewhat snugly in the MidRing part, the washer will be a little lose. Before assembly, I recommend lightly sanding both sides of all parts except the aember, which you can just sand the tops of. Make sure you sand them on a true (flat) surface to make sure it all fits cleanly. For the ones in the pictures I used 400 grit sandpaper laying flat on my steel welding table. I used gel style crazy glue to assemble everything. For a full set for one player, you would do this all three times. All of the older files are still included on the thing for folks to play with if they want, but you only need the ones that start with v3 to print a set of tokens. UPDATE Sept 8, 2018: Had the same friend that printed the v1 files print out the v2 files for me and they work MUCH better. Not so chunky, everything fits MUCH better. The insert bits are a little fiddly to print (he ended up using a raft), but they fit and look much better. Switching this thing from Work-in-Progress to Done now. Enjoy! UPDATE Sept 1, 2018: v2 Uploaded - The v2 simplifies the design and adjusts the insert so that they should actually fit now without a ton of post processing. The key is thinner overall when assembled now, too. Because of the changes, supports should not be needed for any prints. For 1 complete key, you need 1 each of Key v2, Key v2 Inserts, and Key v2 Aember. A full set will either be for one or two players, so 3 or 6 complete keys (respectively) plus extra Aember for people to use as tokens as you see fit. NOTE: I removed the thumbnail images of the v1 files, though I've left those STLs in place for anyone who wants to play with them. Forged.stl probably requires supports when printing (I had to use them), and the insert will not fit without post-processing (and even then, it might not fit). UPDATE Aug 30, 2018: I received the print of this my friend made and the tolerances are WAY too tight, so the file needs to be modified. Because of the way I designed the insert, it also needed supports to print (at least on his printer), and cleanup was a pain because of how shallow it is, so I think I'm going to redesign how the colored insert for the forged version works. I also don't like how thick the piece was overall, so I'm adjusting the design in that regard. Because of this, I've changed this to a "Work in progress" while I tinker some more. No file changes or new uploads at this time, just a heads up for anyone who likes the design that as it stands now, you won't actually be able to put the insert into the key. UPDATE Aug 23, 2018: I've posted a make of this file https://www.thingiverse.com/make:529285 that a friend fired off for me to test fit and sizing and such (he's mailing it to me so I can check it out in person). Pretty happy with how it looks, though. I'll update when I have it in hand about how things all fit together. As soon as I saw Keyforge, I knew I wanted to make physical keys for it. Inksplat beat me to the punch with the design here, https://www.thingiverse.com/thing:3040187 , but I wanted something a little fancier, so here we go. Unfortunately, I don't have a 3d printer to test things out to see how well everything fits. Used the image of the key from the manual to create a vector (Photoshop and Vectornator Pro), then used that to model from scratch in Fusion 360. This is my first 3d model ever, so I claim no level of quality on this. For a set for ONE player, you will need 3 each of Forged and Unforged. The Forged Insert is the colored insert for the keys, and in the manual, they are red, blue, and yellow, but you can print them whatever color you would like, 3 total. The Aember is designed to be used installed in the forged side as well as tokens while playing, so you would print 6 sets total - three to attach, three to play with. I would love feedback and to see how this looks when printed up.
With this file you will be able to print Keyforge Key Token - Multipart with your 3D printer. Click on the button and save the file on your computer to work, edit or customize your design. You can also find more 3D designs for printers on Keyforge Key Token - Multipart.