KEYTouch ABL©
thingiverse
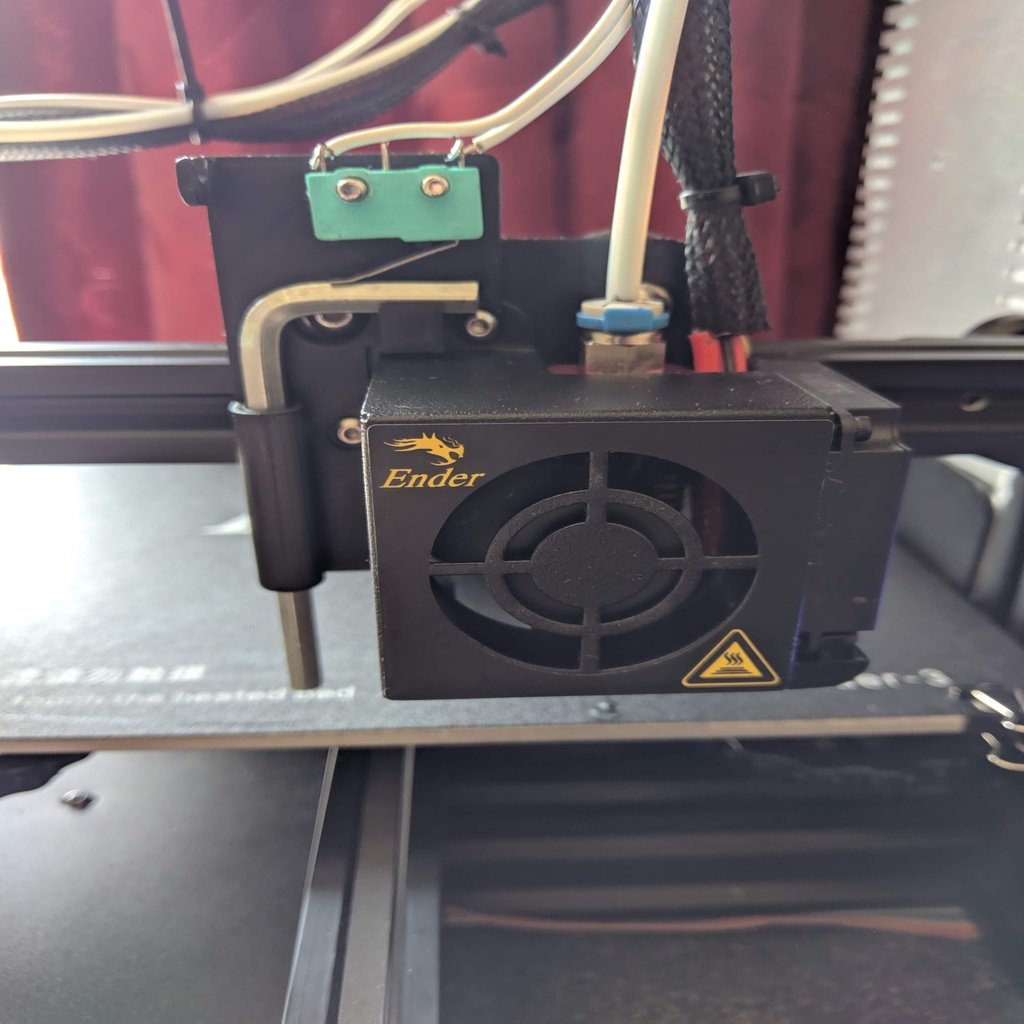
Hello 3D printing community Here is my way of doing the ABL on an Ender3. You just need a NC microswitch and an Allen-Key, so no need for fancy or expensive other things. The accuracy it is very good, I did get on M48 a rang of 0.012 with a standard deviation of 0.003, Basically, the idea I did take from inside Marlin where I have seen the allen-key was used in delta printer. So here is what I have done: I did connect a new micro-switch in series with the one from the Z end-switch to work as a new input, so no need for a PIN27 or the other one that is free (PIN29). Also is no need for extra device to match the voltage or the polarity. Here is a fritzing drawing of the wiring connections. No matter how you make it physically but the result should be something like that, the wire have to be at the pins that have continuity when the switch is not pressed, is called NC or normally closed! You need to enter somehow in between, so or you just cut the wire and connect there or remove a pin from the plug wire (on the mother board side or the Z-stop) and use some Dupont wires. If you don’t want to keep the back-up and use only one switch then you just relocate the z-stop switch to the Allen key side, the functionality will be the same, but is MANDATORY to NEVER forget to drop the key else the machine will CRASH on your bed and damage some things. YOU have been warned! Now you just need to print an adaptor to accommodate the key and the switch. Next step will be software! You need to flash the board. For flashing I did use Marlin 1.1.9 bugfix. For firmware update please use any other tutorials because are so many, Teaching Tech for example, if you prefer video. The modification that I did there are so: * In configuration.h #define SLIM_LCD_MENUS #define AUTO_BED_LEVELING_BILINEAR #define Z_SAFE_HOMING #define X_PROBE_OFFSET_FROM_EXTRUDER -45 // X offset: -left +right [of the nozzle] #define Y_PROBE_OFFSET_FROM_EXTRUDER -3 // Y offset: -front +behind [the nozzle] #define Z_PROBE_OFFSET_FROM_EXTRUDER -10.93 // Z offset: -below +above [the nozzle] For the Z offset you need to discover yourself, it all depends how long is the Allen-key you use! // For M851 give a range for adjusting the Z probe offset #define Z_PROBE_OFFSET_RANGE_MIN -20 #define Z_PROBE_OFFSET_RANGE_MAX 20 #define AUTO_BED_LEVELING_BILINEAR // Set the number of grid points per dimension. #define GRID_MAX_POINTS_X 4 // Homing speeds (mm/m) #define HOMING_FEEDRATE_XY (20*60) #define HOMING_FEEDRATE_Z (20*60) #define EEPROM_SETTINGS // Enable for M500 and M501 commands //#define DISABLE_M503 // Saves ~2700 bytes of PROGMEM. Disable for release! //#define EEPROM_CHITCHAT // Give feedback on EEPROM commands. Disable to save PROGMEM. #define NOZZLE_PARK_FEATURE //Need for M600 * In configuration_adv.h #define BABYSTEPPING //#define ARC_SUPPORT // Disable this feature to save ~3226 bytes #define ADVANCED_PAUSE_FEATURE This I keep to be able to use M600 Filament change feature. It all depends if you need it or not. To win some space you can disable M48 //#define Z_MIN_PROBE_REPEATABILITY_TEST And I think that’s about it. Compile and if everything is OK you can flash. I hope I didn’t forgot something. * Now on the software on the PC In slicer after G28; You need to add a new line for ABL to work G29; ABL ##Now Also VERY Important!!!!!!!!!!!!!!!!! Is not my fault if you forget to park the key or remove, I know because I forgot several times at beginning We move in front G0 X150 Y0 Z40 F10000; MOVE IN FRONT Also I add some noise! M300 P200; G4 P400; M300 P200; G4 P400; M300 P200; G4 P400; M300 P200; G4 P400; M300 P200; Now we need a stop to have time to remove the key! M0 RETRACT KEY PROBE; PAUSE TO REMOVE KEY ALSO move back to start point G1 X0 Y0 Z30 F5000.0 ;Move to start position From here everything remains how you have it set up in the slicer. If you want to modify less in slicer you can add it in Marlin #define Z_PROBE_END_SCRIPT And there you can add what you want the machine to do I hope you like my tutorial or at least the explanation. Happy 3D Printing with your newly made KEYTouch ABL©! LE. As recommended here is the modification for Marlin 2.0 "FYI, i was setting up this great add on following the tutorial on thingiverse Using Marlin Bugfix 2.0.x i found out that those three lines** ' #define X_PROBE_OFFSET_FROM_EXTRUDER -45 // X offset: -left +right of the nozzle ' #define Y_PROBE_OFFSET_FROM_EXTRUDER -3 // Y offset: -front +behind the nozzle ' #define Z_PROBE_OFFSET_FROM_EXTRUDER -10.93 // Z offset: -below +above the nozzle have been replaced by** ' #define NOZZLE_TO_PROBE_OFFSET { -45, -3, -10.93 } where the three numbers are X, Y, Z The Arduino IDE will tell you the errors and the corrections, so it's not difficult to debug but maybe we can anticipate the compiler :) **added ' at the beginning of the line for avoiding thingiverse text formatting, don't know any other way..." Thanks @Jester_ITA ! https://youtu.be/xnBpRn5ex0Q
With this file you will be able to print KEYTouch ABL© with your 3D printer. Click on the button and save the file on your computer to work, edit or customize your design. You can also find more 3D designs for printers on KEYTouch ABL©.
