Kinetic sculpture
thingiverse
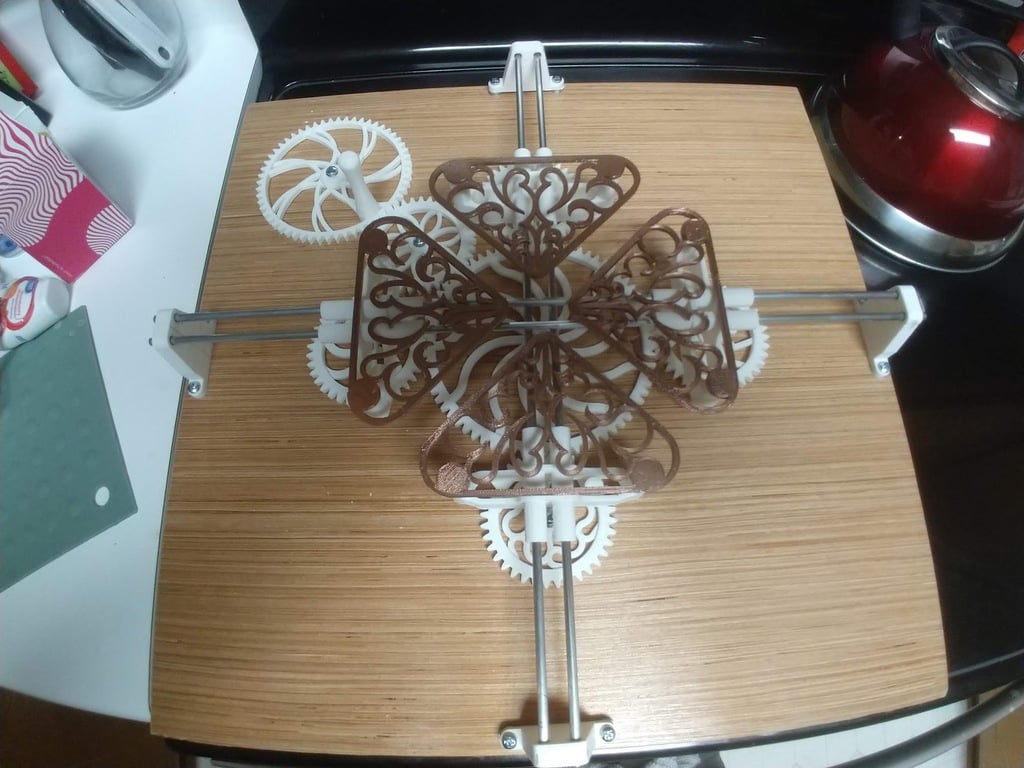
I wanted to make something with gears for the first time. I also find scotch yokes pleasing to my eyes. So I made this useless machine, not completely useless as it works and impossible for me to walk past it without stopping to turn the crank. But doesn't do anything beyond make me smile like a dork. Video of it in action: <iframe width="560" height="315" src="https://www.youtube.com/embed/-PpTpAVn2Kg" frameborder="0" allow="accelerometer; autoplay; encrypted-media; gyroscope; picture-in-picture" allowfullscreen></iframe> To make one of these you'll need: 4x 18" steel rod a hair between 4-5mm in diameter 15x 4mm x 30mm bolts, washers and nylock nuts. 1x 18"x18" of plywood, wood or laun. I used luan as it was cheap and had a nice finish. 5mm or equivalent-ish drill bit and drill super glue For printing, I used ABS but I can't see why PLA or other blends wouldn't work just as well. Unless noted, most parts don't require printing with supports: 4x wedge2 1x gear_handle 1x gear_idle 1x gear_south 1x gear_north 1x gear_east 1x gear_west 1x gear_main 2x log_rodholder 2x log_scotch_yoke (use supports) 2x lat_scotch_yoke (use supports) 2x lat_rodholder Assembly: Pretty easy build, take your pllywood and draw a line down the middle in both the X and the Y axis. Attach the gear_main in the center. Line up the gear_east, gear_west, gear_north, gear_south to their corresponding cardinal directions and the 'handles' of those gears should be positioned where they are the closest they can be to the center of gear_main. The axel holes of each gear should fall on the X/Y line you've drawn on the board. The lat_ and log_ rodholders correspond to latitude and longitude directions, as do the lat_ and log_ yokes. The rodholders are of different heights as one axis goes under the other. Run the rods through the yokes but leave them a loose fit at first to make sure they are sliding freely along their rods, yokes don't get hung up on screw heads etc. May have to raise the rod holders with some washers if your bolt heads sit too proud. The gear_idle and gear_handle can be placed a bit more freestyle. Just mate the idle gear to the main gear, drill and attach. Followed by the gear_handle. Once you have everything moving smoothly (don't tighten any bolts too much!) you can use super glue to attach the rods to the rodholders. Finally you add the wedge2 pieces to the holes in the yokes. Update: Needed an excuse to experiment with my printers settings and decided to print out these peices at 50% of their original size. Works great, would recommend setting your printer speed pretty low and print with cooling on (even with ABS). Another treat for doing it at 50% smaller is that you can affix the gears to a board with tiny nails. For the rods i used floral wire at first and then upgraded to clothes-hanger wire. Works really well and makes for a good desk toy.
With this file you will be able to print Kinetic sculpture with your 3D printer. Click on the button and save the file on your computer to work, edit or customize your design. You can also find more 3D designs for printers on Kinetic sculpture.