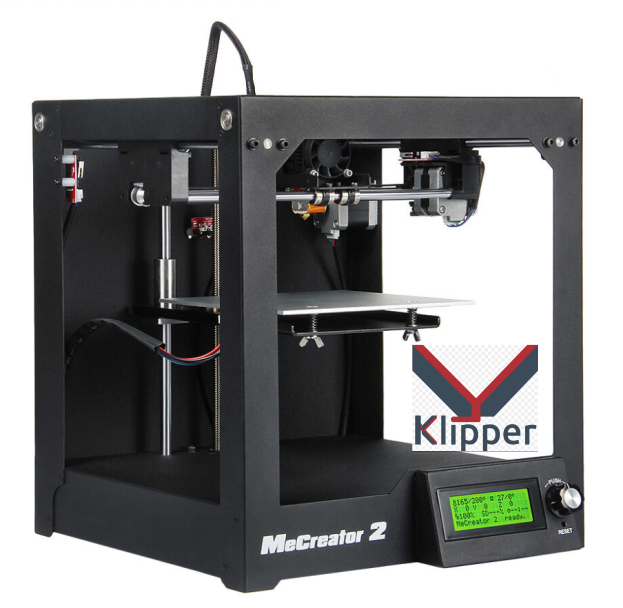
Klipper Configuration for Geeetech Mecreator 2
thingiverse
Fact : Marlin is getting bigger and 8bit Arduino based controller boards have to cope with more and more code. The problem in such situation is operational memory space which is slowly vanishing. This is leading to printing problems like prints which are just stopping after a few moments, when the buffers are overflowed. I fixed the problem by installing Octopi on a Raspberry Pi 3, one year before. This solution is working great but it has some limitations : each time you want to change something, you have to flash the controler. Not convenient at all. A few times ago, I saw some great feedback about a new comer : Klipper. I did read the documentation and thought that the project was not mature enough to spend time on it. One year passed since my last overlook and I had to flash Marlin to fine tune the thermal runaway feature. As in the past I replaced A4988 stepper drivers by TCM2208 stepper drivers, it was a great opportunity to upload the latest version of Marlin 2.x. The stepper drivers replacement is causing an axis rotation inversion, I knew it. I modified the config files with the right settings and it didn't work. I spent hours, browsed tons of pages, same result: nothing worked as expected. It was the ideal time to look back to Klipper. My printer is modified and the caracteristics are: - Controller : Geetech GT2560 Rev B. - Stepper drivers : X/Y/Z => TCM2208, standalone // Extruder => Pololu A4988 Should be not too much complicated. Well, it was quite ... epic. But not for what you are thinking about. ----------------------------------------------------------------------------------------------- Banging the head to the walls ---------------------------------------- Never trust any source without cross-checking... I personnaly lost time with "trusted sources". I was banging my head to the walls despite having the "right data". I lost so much time that I was almost ready to flash Marlin back in place. One exemple: You think that the pinout schemas provided by Geetech for their controller boards are right? Nope! For example, following Geeetech documentation the pinout for the X axis stepper should be X_STEP_PIN : PA3 X_DIR_PIN : PA1 X_MIN_PIN : PA0 X_MAX_PIN : PA2 X_ENABLE_PIN : PA5 In Klipper, the right entries are X_STEP_PIN : PC0 X_DIR_PIN : PG2 X_MIN_PIN : PA0 X_MAX_PIN : PA2 X_ENABLE_PIN : PC2 Not really the same... You can check it by yourself : https://www.geeetech.com/wiki/index.php/File:GT2560_REVB.pdf Well, I was suspecting Geeetech documentation but I was not sure. I decided to dowload the original 1.x Marlin firmware source for my Meacrator 2 and check from there : Bingo! In this firmware, I discovered that the GT2560 rev B. is considered as an Ultimaker controller. Continuing the verification, I made the relationship between Configuration.h, Boards.h and Pins.h files to finally get the pinout. Saved? Not really! Because the Pins.h is only providing the logic pins number, not the physical pins number. This data is quite easy to find and after a few minutes, I found the missing link : https://www.arduino.cc/en/Hacking/PinMapping2560 The puzzle was finally completed, after several evenings. To summary: - Download the version of Marlin for your printer - Check the board name in Configuration.h (#define MOTHERBOARD) - In Pins.h, find the section for your controller - Get the digital pinout mapping for your Arduino micro controller - Enjoy! ----------------------------------------------------------------------------------------------- Installing Octoprint ------------------------- OK, Octopi was already set on my Raspberry Pi but it was an epic fail to compile Klipper. Too old, too modified... My advice on this : Reinstall everything fresh, you are truly going to spare time and avoid compilation problems. Quick guide(really quick...): ------------------------------------ Important note: Windows user? Please use Notepad++ instead of the embedded notepad. Installing Putty is also a must have. Winscp can also help. Just my 2 cents on this... 1/ Download the latest version of Octopi from here : https://octoprint.org/download/ 2/ Install Balena Etcher and write the image to your SD Card 3/ Mount the SD Card and modifiy dhcpcd.conf to get a fix IP address interface wlan0 static ip_address=192.168.1.63 static routers=192.168.1.1 static domain_name_servers=192.168.1.1 static domain_search=8.8.8.8 noipv6 Just put it at the end of the conf file 4/ Set the WPA supplicant if, as myself, you are using the wifi network => All the details can be found here : https://community.octoprint.org/t/wifi-setup-and-troubleshooting/184 You are ready to go for the first boot! Then... => Log into your Pi via SSH (it is located at octopi.local => Change the password via “Change User Password” => Optionally: Change the configured timezone via “Localization Options” > “Timezone”. => Optionally: Change the hostname via “Network Options” > “Hostname”. Your OctoPi instance will then no longer be reachable under octopi.local but rather the hostname you chose postfixed with .local, so keep that in mind. => Do a SUDO APT-GET Update then SUDO APT-GET UPGRADE and let it update the OS => Finally, connect to your Octopi plateform using http://octopi.local or http://<your pi's ip address>. => set your user and that should be it for this part ;0) ----------------------------------------------------------------------------------------------- Klipper ---------- From a terminal(or Putty), connect to your Raspberry Pi then: - Connect your printer to the Raspberry Pi (if not already done) - type ls /dev/serial/by-id/* to get the serial port (/dev/serial/by-id/usb-FTDI_FT232R_USB_UART_A700CYLO-if00-port0 in my case) - Download Klipper by typing git clone https://github.com/KevinOConnor/klipper - Install Klipper and all tis dependencies by typing ./klipper/scripts/install-octopi.sh - Go to Klipper folder : cd ~/klipper/ - Set the configuration options by typing make menuconfig => For the Mecreator 2, select the Atmega2560 => In the advance options, select the Baud rate to 250000 => Save and Exit - Type Make to initiate the compilation and installation - Finally, flash the newly compiled firmware by typing all the followin commands: sudo service octoprint stop sudo service klipper stop make flash FLASH_DEVICE=[port] sudo service klipper start sudo service octoprint start [port] is the /dev your determined upper with the ls command => Klipper is installed, let's configure it ----------------------------------------------------------------------------------------------- Klipper configuration ---------------------------- To ease your life, I warmly suggest you to install the Octoklipper plugin. It will help you to modify the settings from the web interface and will restart the service each time a modification will be made. /!\ : Don't forget to rename printer.txt to printer.cfg if you use it as is! From a terminal(or Putty), connect to your Raspberry Pi then: - Copy the example config file to the final destination by typing cp ~/klipper/config/example.cfg ~/printer.cfg - Open the the provided printer.cfg file and copy the content of the provided one then, save - Restart the Klipper service (sudo service klipper restart) OR - Open the config file from Octoprint (through Klipper plugin) and copy the content of the provided printer.cfg then, click on Save. The service is automatically restarted. Finally, test your new configuration using https://www.klipper3d.org/Config_checks.html Once everything is checked, your printer is ready to print. It's now up to you to fine tune it. I hope this experience will help you. Enjoy!
With this file you will be able to print Klipper Configuration for Geeetech Mecreator 2 with your 3D printer. Click on the button and save the file on your computer to work, edit or customize your design. You can also find more 3D designs for printers on Klipper Configuration for Geeetech Mecreator 2.