Knick's Prosthetic Finger v3.5.5
thingiverse
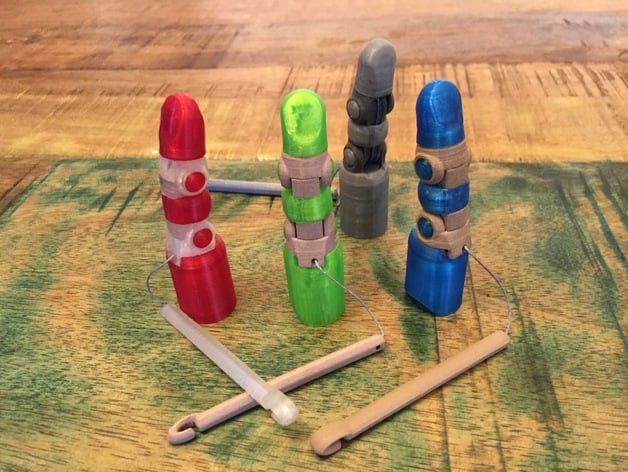
Version 3.5.5, of Knick's prosthetic finger. Find more info at my site, http://dangercreations.com Recent Updates -6/28/2016: Socket refinements, minor bug fixes -6/27/2016: Found workarounds for two configurator bugs, and uploaded version with new parameters that match the measurement guide exactly. Fixed another weird issue with plugs and sockets sometimes not forming right. Also fixed configurator issue that folks had reported with 1 knuckle. The configurator now generates all parts at once, but a couple parts aren't used for 1 knuckle, causing errors. It now generates a dummy STL to avoid the error. -6/17/2016: Created a measurement guide, find the PDF in the files/downloads section. Introduction This 3d printable prosthetic finger ideal for those missing two finger segments, though it can be configured for either 2 or 1 knuckles. Open it with the configurator to enter your own values and generate a custom model. Many options are configurable, so with the right measurements and tweaking it should be adaptable to most people's needs - though it takes some trial and error to get a perfect fit. See the measurement guide PDF for instructions on measuring and configuring the model. Designed from scratch in OpenSCAD, it's about 1400 lines of carefully written code. There are a lot more settings that are hidden, so if you really want to tweak - download OpenSCAD and the latest .scad file from here. ChangeLog Update: 6/3/2016 : Fixed where several settings couldn't be seen in configurator, due to some spurious comments which seem to be causing problems after a recent site update. Also added some more description for variables. Update: 4/2/2016 : Version 3.5.1 fixed something weird that happened to the hinge plugs, where they sometimes rendered misshapen. I updated both the STL and the openscad customizer. Also made a couple small parametric fixes and little improvements. 2/15/2016: Initial upload Print Settings Printer: Flashforce Creator Pro clone Rafts: No Supports: Yes Resolution: 0.1 (or finest possible) Infill: 80% Notes: Print items slowly and at best accuracy your printer can, it's worth it to get things fitting together best. I use Simplify3D, and generally print everything with supports, 0.1mm layers, 80% infill, 4 layers on top and bottom, 3 on sides, at 20mm/s. I've started to print sockets with thicker layers and a .6mm nozzle, which is much faster. For the moving parts where accuracy is more important, I use a .3mm nozzle and 0.1 to 0.15 layers. Material: I use PLA for the hard items - the two knuckles, middle section, and linkage. In this example, I used http://www.amazon.com/gp/product/B00GTY3Z9E Use something flexible for the socket, tip cover, hinge plugs, and bumper. In this case I used elastic TPU: http://www.amazon.com/gp/product/B00TI3JUSI Another good option is Ninjaflex: http://www.amazon.com/gp/product/B00HSEWKSQ Post-Printing Required Hardware You'll need a few things that are not 3d printable. Required:- Strong (100lb) braided fishing line (http://www.amazon.com/gp/product/B009661Y72)- 1mm Elastic cord (http://www.amazon.com/gp/product/B0047BIRUS) Strongly Encouraged:- Metal knuckle pins (http://www.ebay.com/itm/311168002311) If you cannot get the metal pins, there are two alternatives. Nearly as good, you can use 2mm aluminum wire, like this: http://www.amazon.com/gp/product/B003LTGS4E It's quite soft, so I carefully straighten it with parallel-jaw pliers after cutting. If you're really desperate, you can use a short length of PLA or ABS filament, but it isn't nearly as smooth. - M2.5x3mm Set screws (http://www.amazon.com/gp/product/B00JA08E6S) If you don't have these (or aren't good with teeny parts), you can tie knots instead of using set screws. It's a lot tougher to get the tension perfect this way, and you can't adjust it after -you need to restring it. 100lb Fishing line, 1mm elastic cord, 2x12mm steel pins, and m2.5x3mm slotted set screws. Required Tools Essentials: - Small drill and/or Dremel- Small Drill bits I use a 1mm for cleaning holes, a 1.75mm for the set screws, and a 2mm for the pins. (http://www.amazon.com/gp/product/B001RJE3X8) - Needle Files At least a small flat one for smoothing the inside of the hinges. I also like the round ones for getting burrs out of the tunnels. (http://www.amazon.com/gp/product/B000NPUKYS) - Sanding block or large metal file Use for smoothing the sides of the middle segment, and for bigger cleanup depending on your print accuracy. (http://www.amazon.com/gp/product/B00THXTXUE) - Digital Micrometer For measuring yourself for the model, checking drill bit sizes, etc. (http://www.amazon.com/gp/product/B000GSLKIW) - Adjustable temp soldering iron I like these for smoothing certain areas, and may be needed to weld the bumper in place (depending on how elastic your material is. I can stretch it over with Ninjaflex, but need to cut and weld it with Sainsmart/generic elastic TPU). (http://www.amazon.com/gp/product/B000AS28UC) - Eyeglass screwdriver For the little set screws, if used. (http://www.amazon.com/gp/product/B00480FQJ8) Other tools, as needed: - Wire trimmers (http://www.amazon.com/gp/product/B00FZPL6NU)- Parallel jaw pliers (http://www.amazon.com/gp/product/B000HYMQHE)- Exacto knife and hobby pad All the tools I use to build one. Described in tools section in more detail. Assembly Instructions Follow along with the written instructions below. Instructions Read these along with the accompanying 8min how-to video, above. I give time offsets to make it easier to follow along. Original link: https://youtu.be/2EEjio4TvL8 1. Cleanup and check (0:25) Clear support material. Spot check to make sure everything printed well and fits together. The PLA parts should barely be able to squeeze tightly together. If the hinges are already loose, or so tight you cant force them on, something is wrong. You'll smooth these later. I use a 1mm bit to start with on the tunnels, and then smooth the elastic tunnels with a 1.75mm bit. 2. Drill the hinge-pin holes (0:38) Drill the pin hinge pin holes with a 2mm bit, on both knuckles and the middle section. The pins should push in smoothly and easily, but not sloppy. 3. Smooth the hinge insides (0:53) Using a needle file, lightly sand and smooth the the built-in washer on the insides of each knuckle. It should should still protrude, this minimizes hinge friction. You don't want the joints to be sloppy, so just a little at a time. Alternate working on the inside of the hinge and the sides of the middle segment just enough until they fit very smoothly together. The middle segment end with two holes faces the tip. The side toward the base only has one hole. 4. Pre-assemble the hinges. (1:27) Pre-assemble the 3 PLA parts and ensure that they all work smoothly together. Push the pins (or wire) through the hinge holes, ensure it's long enough to make it all the way through both sides of the hinge. It should take nearly zero friction to move the segments across their full travel - if you can't fully articulate the finger using only gravity, then keep working at it with the files until you can - or else it won't work well later. 5. Install the set-screws (1:45) Each of the two lengths of elastic has a knot on one end, and a set screw on the other. You'll need to get the set-screw holes just to the right size. Too small and the screw will be hard to turn, and can crack the plastic. Too big and it will slip out - a 1.75mm bit works about right for me. You might want to practice on a scrap piece. 6. String the elastic (2:14) For the tip, run it through whichever way is easiest. I sometimes use a small drill bit or length of wire to help me push it through. Tie a tight triple square knot on the end that protrudes from the bottom of the middle segment. Trim it neatly, and it should pull flush. For now leave a couple inches on the other side. For the base, I use a double knot on the side coming out of the end of the middle segment, in the gap of the tip hinge. It will sink down flush. If it pulls through easily, try again with a triple knot. Then on the base the elastic will protrude in the socket area with a set screw. 7. Tighten set-screw to create tension (4:15) Put slight tension on the elastic cord and carefully tighten the set screws to hold in place. You'll want the base knuckle just barely tight enough to pull itself fully closed. The tip should have slightly more tension, to compensate for the additional leverage that it has. trim all but a small amount on both sides, for later adjustment. If you're not using set-screws, you'll need to tie knots on both sides of the elastic. I find it easiest to stretch to the desired tension and then mark the elastic with a bright paint marker. This way as you're tying the knot you can get it just at the right spot. 8. Install the hinge Plugs. (4:25) I warm the hinge plugs on my coffee warmer for a while, making them soft and easier to squeeze into the ends to hold the pins in place. You should now have fully assembled hinges. 9. String the fishing line "tendon" (5:23) String the fishing line through the tip, down under the middle section, and back up through the base. Tighten the set-screw at the tip, leaving just a small amount for later adjustment. Leave 3 or 4 inches on the base side, to ensure you have enough to connect it to your wrist linkage. 10. Test the action! (6:04) At this point, you can snap the socket and tip on, and should have a fully articulating finger! Make sure it all works well before moving any further. 11. Install the bumper. (6:09) If you use NinjaFlex or FilaFlex (more stretchy) you can probably stretch the bumper enough to get it over the tip and on to the middle section - that stuff is almost indestructible. Lately I've preferred the cheaper Sainsmart elastic TPU, but it is not as stretchy. I print it with the cut in the bumper, which you can separate carefully with an exacto. Then wrap the bumper around, and trim the plugs as needed until it fits together well. Then I use my soldering iron (set around 3/medium) to quickly weld the TPU back together. 12. Install the linkage (7:19) Clear the hole through the linkage, at least halfway, to make room for extra string. Make sure you've cleaned the set-screw hole and gotten one started. Feed the loose end of the tendon string into the linkage, and tighten the screw. Link the hook around a bracelet. You'll have to find the right amount to allow you to fully close the finger with the range of travel you have available.
With this file you will be able to print Knick's Prosthetic Finger v3.5.5 with your 3D printer. Click on the button and save the file on your computer to work, edit or customize your design. You can also find more 3D designs for printers on Knick's Prosthetic Finger v3.5.5.