Knuckle Coupler for LGB
thingiverse
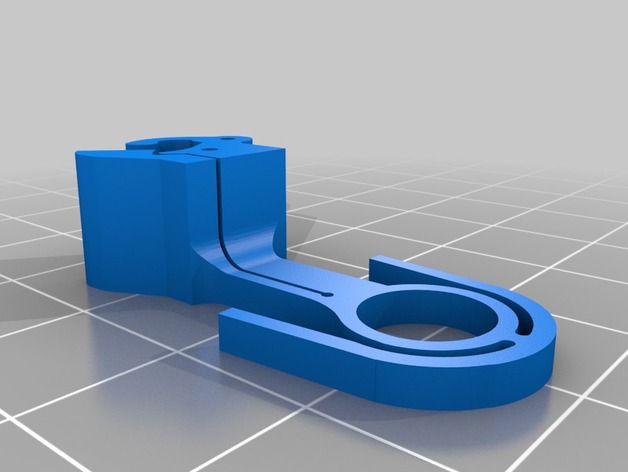
Updated Dec 2019: added the "V2" Opening Knuckle versions from the Motorised coupler.. Updated Oct 2017: I have added the "fixed 7 degree" version of my revised geometry couplings here. These are single piece parts, and need the lock ring to push them down firmly in the housings. It has similar "push" performance to the two part version and they do interlock, but the single piece geometry is designed to work "optimally" with my servo operated coupling, which uses the same geometry, but has the fully working knuckle.https://www.thingiverse.com/thing:2553019. The two piece parts were originally revised 27 Feb 2017 to provide better "push" performance, because I discovered that my original design had a fault when "pushing" a long train. When the coupling is subject to strong push forces, the old design allows the coupling to open. . (I have added a picture to show four coupled together with me pushing them together. You can see the left (old) coupling opening, whilst the right (new) coupling remains in line) The new "push" versions has a very small additional feature on the knuckle, which engages with the opposite knuckle in push mode and holds the two together better. I have also very slightly increased the spring strength. It has been designed to work with LGB and LGB type models fitted with the "LGB peg". The strange cut outs in the housings are there to allow it to fit without having to modify the train or coaches. Once fitted, it sits below the central LGB buffer on the Coaches, but the Central buffer on the Stainz loco is larger and has to be removed. This is a press fit part, so the process is fully reversible if you wish to return to hook and eye couplers later. This design differs from Raby's original design in that the "hook" is now above the "tang", and so this design cannot use the iron bar type decoupling. However, the "Hook" eye is now fitted directly to the LGB peg on the train model, so should transfer loads well. I have tested one version at about 1.5kg pull and it survived. (27-02-2017.. See also my comments on pushing) It has been tested to fit the LGB Stainz loco, and the coaches from the standard starter set. It has been tested pulling this around standard R1 curves, and up and down on a garden railway. There is a small hole in the "peg" part of the main body that you can use to screw a screw into the ""peg" on the coach if you want ultimate strength, but I have not used this so far. The photos show a slightly earlier version, with a "knob" on the end of the spring. This actually limited side to side movement a bit, so I have removed it in the final version. In the photo, the coach and Loco are fitted with my electrical connection, http://www.thingiverse.com/thing:1023944 Print Settings Printer: Mini Kossel Rafts: Yes Supports: Yes Resolution: 0.1 Infill: 35% Notes: This must be printed in ABS. The main body needs to be printed with support type "Everywhere", so that the overhang prints nicely. Although the "overhang (upper) part of the main body is not structural, it holds the parts together when assembling, and helps align the body with the LGB peg on the train/coach when fitting to the train. The Support structures will need care when removing. I have only rarely got them out in one piece. Using a flat head screwdriver and levering out from the sides seems the most successful way to get the main support out. The knuckle is printed in two parts, with the small bottom part being glued to the upper part after printing. I use Acetone and it glues ABS very well, but I am not sure the extra part is actually necessary, as the coupling works fine without it. Once printed, the eyes of the tang and hook should be reamed out to give a good fit. I use a 8mm rat tail file and gradually advance the eye down the file, whilst rotating the file. You can get an excellent circular fit this way. I also give the top surface of the main "bar" section of the tang and hook a quick file, so that they slide smoothly against each other. To assemble, simply slot the "tang" in first, then the "Knuckle" should slide in and partially engage with the peg in the main body. It will then align with and held by the peg on the coach when you assembly it to the coach. How I Designed This Using 123D I designed this in 123D, but started with a Step file of Raby's original design. (thank you!) I have added 0.75mm to the face of the tang to make the coupling a bit "tighter", but this may be unnecessary.
With this file you will be able to print Knuckle Coupler for LGB with your 3D printer. Click on the button and save the file on your computer to work, edit or customize your design. You can also find more 3D designs for printers on Knuckle Coupler for LGB.