Kossel Mini Magball Effector with PCB Mount
thingiverse
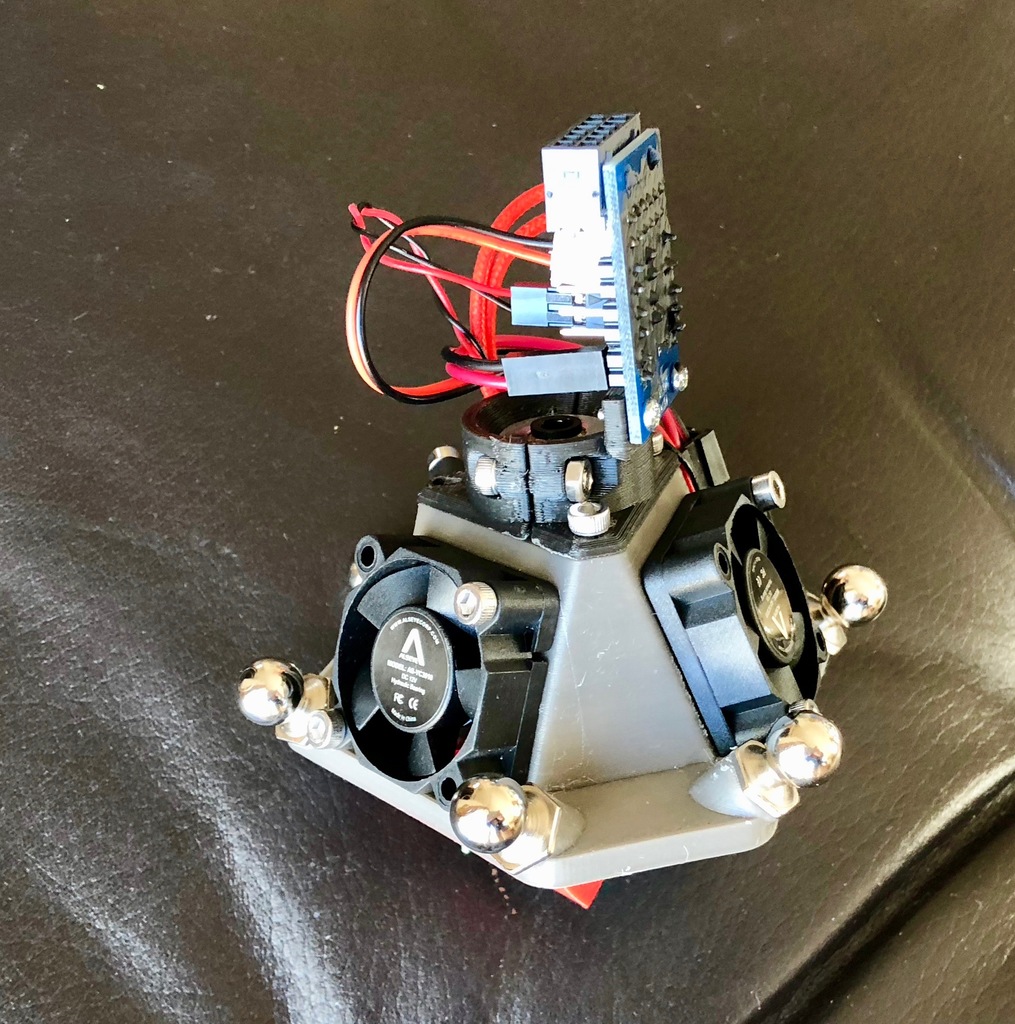
This Kossel Mini effector is a slight remix of Lauman’s Super simple upgraded Kossel Mini effector, combined with the main body changes from RandomFactoid’s remix, along with a modification of the top collar to hold the Think3DPrint3D wiring harness PCB. I'm using the magballs and rods from Haydn Huntley: http://www.magballarms.com I’m only including the STL here for the modified piece, and direct you to the two upstream projects for the rest of the components. The assembly instructions provided by Lauman are excellent. I did create a more detailed Bill of Materials (BOM) for the required hardware: - Hardware BOM: -- Magballs: (6) -- Magball nuts 3mm (6) -- Cooling vent bolts (8mmx3mm) (3) ((4) if not using dc42 IR probe) -- Fan attachments (10mmx3mm) (12 - but I only used 2 per fan for total of 6) -- Attaching collar to body (8mmx3mm) (3) -- Collar attachments (10mmx3mm) (2) -- Collar attachment nuts (3mm) (2) -- dc42 IR board attachment (2.5mm self-tapping) (2) -- dc42/T3P3 PCB attachment (2.5mm self-tapping) (2) --- Totals: ----- 10x3mm (14) (if populating all 3 fans with 4 bolts, otherwise (8) ----- 8x3mm (7) (if using dc42 IR probe, otherwise (6)) ----- 3mm nuts (8) (if using Haydn magball studs, otherwise (2)) ----- 2.5mm self-tapping screws (4) (if using T3P3 PCB, otherwise (2)) The magnets in Haydn's rods are strong enough to keep the fan blades from spinning, or to even stop them after they start spinning. Flipping the rods can help. I am also investigating shielding for the rod-ends.
With this file you will be able to print Kossel Mini Magball Effector with PCB Mount with your 3D printer. Click on the button and save the file on your computer to work, edit or customize your design. You can also find more 3D designs for printers on Kossel Mini Magball Effector with PCB Mount.