Labists X1 Extruder Motor Upgrade
thingiverse
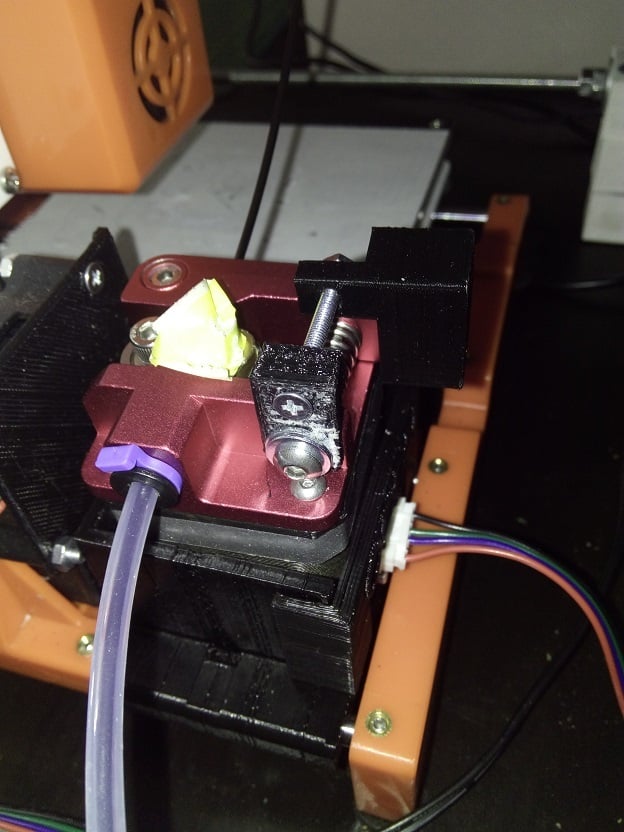
Hello THIS IS STRICLTLY USE AT OWN RISK AND LIABLITY DO YOUR OWN RESEARCH. This is a LABISTS X1extruder upgrade for when your old motor is broken. I wont say its perfect as I'm still fighting with the settings. I used a Nema 17 Motor (NEMA17 38mm 1.5A 0.42Nm 17HS4401) and a Creality Ender CR-10 MK8 extruder. I removed the entire old motor with gear and used 600mm of PTFE 2mm / 4mm tube from the extruder directly to the hotend where the old piece of PTFE was sticking out the top. I also used this filament guide as a Extruder PTFE guide. https://www.thingiverse.com/thing:4922466 You will also need to know what your motors steps are and enter them in your firmware (warning brick danger) You dont need to do this as you can also enter M92 Exxx motor steps in your slicer software. (Not all nema are the same and you will need to lower your driver voltage and in my case retraction of the filament from 2mm to 4mm in my slicer software. Some motors wires may be different too. You will want to read up on the following resources (very good) http://cmsj.net/2021/01/12/ez3dbedmod.html https://marlinfw.org/docs/configuration/configuration.html#movement Make sure your board version is correct one for firmware (warranty void when opened the box) In my case my Labists X1 was ET-4000 V2 Next I download the Easythreed Arduino firmware update software http://www.easythreed.com/h-col-1158.html or https://download.s21i.faiusr.com/7583133/0/0/ABUIABBPGAAghOTPggYo5OjziwY?f=Arduino+update+firmware.zip&v=1616114182 Inside this Zip is the USB Drivers for connecting your computer to your Labists as well as Arduino..but this version of Ardiuno has all the mainboard drivers including "Melzi" what this board uses. In short you have to enable Melzi and the Com port in Ardiuno software or you will brick you mainboard. Make 100% sure you know what your motherboard is and what the correct settings are and firmware your board uses. So before you start anything, you will want to make sure you are on the same firmware, to do this you will need to install your USB driver if not already and then get Pronterface software. http://www.pronterface.com Connect to Pronterface and check for the line M92 X600 Y600 Z600 E1040 as well as the version!! Most Important. DISCONECT from Pronterface, you don't want thing messing with the printer during a upgrade. Get the firmware if the same Firmware Marlin 1.1.0-RC3 https://github.com/cmsj/Marlin/tree/1.1.0-RC3-Labists-X1 Download and unzip the folder on your computer Open Ardiuno software and load the "marlin" file in this folder (close the old window) MAKE SURE YOU ARE CONNECTED TO THE CORRECT COM PORT AND BOARD DRIVER You will then want to look in configuration.h file and find the line of the xyz & E steps I change mine from E1040 to E131 (Im still not sure this is correct, i used no formula, I read some people say for this extruder 98.8 or 100 or 106.77) It sounded like a old typewriter and I had to create a un-tensioner part as it was too tight. I created the WALL TEST so it can be fine tuned (tension). If ready, run the test compile and if no errors, then upload. Next you want to make sure your settings are right so you want to extrude some filament in Pronterface. But before you do, mark the filament from where it enters the extruder , measure 100mm then heat the hotend in Pronterface 185c and extrude 100mm When done measure what is left over. Now enter your results in this calculator and see what the steps for marlin should be https://www.th3dstudio.com/estep-calculator/ WHAT YOU CANNOT DO You cannot setup the eprom memory to save with this stock version of Labists. I have tested and there is an issue with marlin in this version. Basicly this alows you to run M500 command from Pronterface to save changes without flashing the device all the time. Note: My stepper motor NEMA 17 I had to map out my wires to get the correct wiring, I used this video to get ideas. (Its not my video) -----https://www.youtube.com/watch?v=mPSPtvD8PiU I had to rewire The stepper to fit the old cable I chopped, you will have to figure out how your NEMA is wired. Once you testing make sure its running in the right direction. PS. Don't upgrade unless you really need to. You don't need to print anything to get it working. Another thing I noticed, If you extrude filament on the button and then press again to stop. The hotend does not switch off on this printer. Kids fire hazard if left on Of course if you went this far you will need to upgrade your power supply and also enough to change the hotend. I found when doing this I had to clean my hotend and its was really difficult with this model. I included my wires for my NEMA17, but I can tell you right now, your NEMA17 will not be the same, you will have to figure out your pinout by yourself, including your voltage for your motor and the steps.
With this file you will be able to print Labists X1 Extruder Motor Upgrade with your 3D printer. Click on the button and save the file on your computer to work, edit or customize your design. You can also find more 3D designs for printers on Labists X1 Extruder Motor Upgrade.