LaForge Diversity V2 Module (Buttons) for Headplay HD Headsets
thingiverse
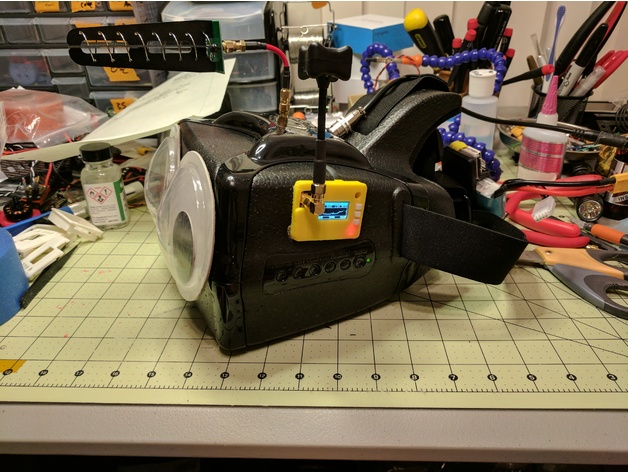
The first version of the Headplays only had a 32 channel receiver with no diversity and no scanning. The receiver sensitivity also left much to be desired. Rangevideo also sells an easy plug-in to a 40 channel receiver but does not have the scanning feature. The idea was to make the Laforge integration look as clean as possible. It takes about a few hours to do all the work. Print Settings Printer Brand: MakerBot Printer: MakerBot Replicator 2X Rafts: Doesn't Matter Supports: Yes Resolution: 0.2 Infill: 15% Installation This is totally worth the trouble :-) You got this. Where do I plug my modules in? Undo the four screws holding the headplays together in the corners. Carefully separate the top from the bottom. Loosen the 4 screws holding the display board. Be careful to not pull on any wires. Red: Mark which slot the module plug into. The plug next to it is the same size. Blue: Mark the wire with the signal name before cutting the connector off. You need Video, Audio, +5V, and one of the grounds. Pick your favorite. Extend the orgional RangeVideo reciever patch cable with a 4 wire of ribbon cable. The extra ground and the RSSI are not used. This is about how long the cables should be. Keep track of the signal wire before you heat shrink everything up Optional: Connect the newly cut cable to some spare servo wire so we can test the laforge modules before voiding the warranty. Pinout from the manual. Tie the audio lines together. the NC stand from not connected so we're not using them IT'S ALIVE! last chance to turn back before voiding the laforge warranty. The headplay warranty is long since lapsed. Check to see if the diversity is switching properly. Prep the main module. Cut off the pins flush to the plastic spacers. Then you can carefully wiggle off the plastic connector leaving a small nub of standoff to solder the wire to Cables soldered and use double stick tape to hold it in place. Plug in the white diversity cable and lay it where the blue is indicating. Then heatshrink the two cables together Prep the top plate and diversity module. Optional: Drill a small hole to allow the diversity module's led's to shine through. Patch up the hole left by the old receiver with some sandable putty. After sanding the putty flat. Paint with some model paint or just use a large enough sticker to cover up that ugly paint job :-\ Test fit the laforge diversity module in the hole where the old receiver used to be. Cut off this standoff because it's blocking our connector The blue parts shows where you should apply hot glue to hold the module in place. Cutting the headplay case. Use the bottom template on how big to cut the hole. Be careful not to cut all the way through. Hollow out just enough foam to put the back plate in. Take a small chunk out at a time Hole complete. It doesn't have to look pretty. If you accidentally cut to deep. You can glue it back with some E6000 glue. Cut a slot for the cable into the top of the headplays. Use the backplate as a template on where to put the cable slot. You want to put it close to the centerline of the top case. Test fit the back plate into your newly voided headplays. See what I did there ;-) heatshrink the diversity cable and the signal cable together to make it look neater. The cables fit into the slots cut out in the back plates. Test fit the buttons into the top plate. Make sure they're loose enough to push the buttons. Also test fit the laforge and everything should have very little play Check the fit of the module, you might need to tweak some dimentions. The board with the buttons should just rest up agains the bottom of the back plate. The spacers that go between the buttons should just touch the board. As you can see here there is a gap so those parts needs to be lengthened a bit. Tack some superglue the top plate to the bottom plate. Everything should line up. Check to make sure the buttons click properly. If not then take it apart and sand it until the fit is correct. Test fit. Make sure the wires lay flat into the cable guide and the case sits flush into the headplays. if not then you need to remove more material. 1) Plug in the diversity module 2) Plug in laforge main module and the power power cable into the headplay board 3) Screw headplay board to top mount 4) Reassemble headplay top plastic piece to foam housing 5) Insert laforge module housing into newly cut hole 6) reassemble headplays 7) Glue headplay module to the foam using E6000 adhesive. Lightly glue all 4 corners to make it easier to disassemble in the future. YOU DID IT! NOW LET'S FLY! Googly eyes ++style_poi
With this file you will be able to print LaForge Diversity V2 Module (Buttons) for Headplay HD Headsets with your 3D printer. Click on the button and save the file on your computer to work, edit or customize your design. You can also find more 3D designs for printers on LaForge Diversity V2 Module (Buttons) for Headplay HD Headsets.