LairdWarp Rollercoaster
thingiverse
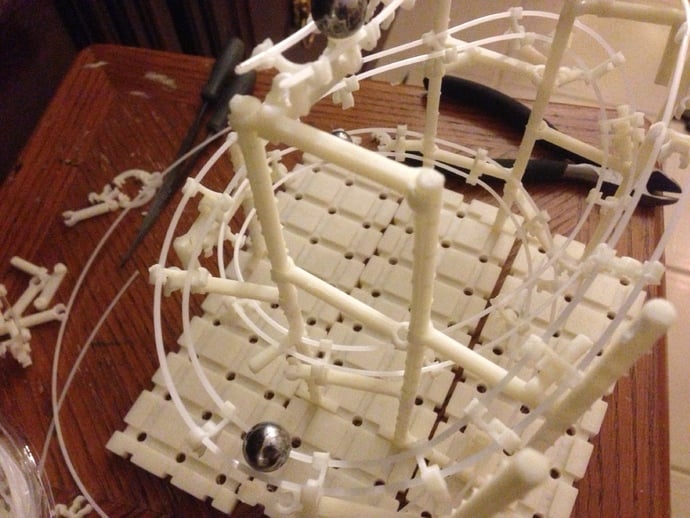
Inspired by the (now out of production) Spacewarp roller coaster system, I decided to see if I could make something similar that's all printed. Here's the result! For examples of SpaceWarp in action, see http://www.youtube.com/watch?v=LJK1NxoreDI and follow the links. Or browse around http://www.angelfire.com/journal/scottmills/SpaceWarp/spacewarp.html . In particular, the Gallery ( http://www.angelfire.com/journal/scottmills/SpaceWarp/Gallery/Gallery.html ) has some good example sets. And if you read the manuals he's scanned and posted, you can see exactly how large, complex sets are put together. UPDATED: Added parts: Loop: flip a ball around 180 degrees Tee Bar: makes it easy to run track looping around a vertical bar Instructions First, locate 1/2" steel balls. If you don't have any, buy some 1/2" Carbon Steel Balls e.g. "40 pack 1/2" Steel-Ball slingshot ammo (12 oz)" from http://www.amazon.com/gp/product/B004PX9KO0/. You can use glass marbles, but steel balls are smaller and heavier, which works best. Design a layout. See http://www.angelfire.com/journal/scottmills/SpaceWarp/spacewarp.html for inspiration. He's got all of the manuals for all of the pre-packaged designs that were sold. Print enough base plates to cover the area that you want to build. Print enough vertical bars to hold up the rail. Or you can use 5mm metal rods, which are stronger, but don't have that "I printed the whole thing" goodness. Print horizontal arms. Or you can use 3mm or 5mm metal rods. Print cross ties to attach to the rails. Use filament (3mm or 1.75mm) as the rails. I think any filament should work, but Taulman 618 Nylon works very nicely for me. The original SpaceWarp rails are nylon rails, just over 3mm. You can buy it as 1/8th in nylon tubing ("oil pressure guage tubing") sold by auto shops. But since everyone with a 3D printer has filament already, I made sure that it works. Roll the 1/2" steel balls down the track. Help design more parts to fill out the set. The SpaceWarp had all sorts of switches, jumps, elevator, etc. Let's see what we can come up with! In particular, we need something to take the marbles from the bottom and load them into the top to keep motion going. The Marblevator is awesome - I'm sure that it can be adapted to work with these railings! To save people time, I've generated three pre-configured Things. They are: 1.75mm Laird Warp Rollercoaster: for all-printed parts with 1.75mm filament rails. http://www.thingiverse.com/thing:83947 . This is what I've been using, so you can see the photos for details. 3mm Laird Warp Rollercoaster: for all-printed parts with 3mm filament rails. http://www.thingiverse.com/thing:83951 . Laird Warp Rollercoaster for SpaceWarp Rail: Sized to use 5mm vertical metal rods, 3mm horizontal metal bars, and SpaceWarp rails. This will let you use printed parts to replace lost or broken pieces from an original SpaceWarp set. http://www.thingiverse.com/thing:83952 The specific parts that I have modeled so far are: Cross Tie: This is the part that holds the two rails at the proper distance apart, and is what other pieces attach to. Base: A flat plate with holes in it. I added a grid of slots to allow for pieces to fit into place more firmly, and to minimize warping. To cover large areas you could use a sheet of wood with 5mm holes drilled every Vertical Bar: A 5mm vertical bar. It has a cross piece at the bottom so that it fits into the slots in the base. Horizontal Bar: Clip between vertical bars. Clip Cross Ties or B2B Clips to it. This isn't in the original set, but it's easier to print a single piece to clip between two vertical bars than to print a horizontal bar and two clips and attach them all together. 3D printing is more flexible than metal bars and injection molded pieces. Cross Bar: A horizontal bar that clips in the middle rather than at the ends. B2B Clip: Horizontal bar with a clip at one end, which you can use to clip Cross Ties to. Base Clip: to attach two bases together to cover a larger area Full Circle Tie: A Cross Tie, but a full circle so that it holds four rails around the ball. Good for holding extra rails in place for making high-speed turns. This isn't in the original set - I added it.NEW Loop, to flip a ball around 180 degrees. This consists of a loop and some clips, and is plated for your printing convenience.NEW T-Bar, makes it easy to run track around a vertical bar, with the long bar of the T on the vertical bar, and the arms holding the cross ties to hold the track. And I made some 'plates': Assembled. Don't print this. But it shows how the pieces fit together. Plate of clips. An assortment of clips of various types and lengths. Plate of vertical bars. Plate base and base clips. Loop plate It's all customizable, so you can make exactly the piece you need to build what you like. Can you print 250 mm bars? Go for it! That'll give you lots of room to play! One nice recent addition to Customizer is that when you generate your customized Thing, it'll have all of the parts attacked, using your settings. And all of the source is there, with lots of reusable modules, and even a tiny amount of commenting, so let's extend this to do everything we can think of!
With this file you will be able to print LairdWarp Rollercoaster with your 3D printer. Click on the button and save the file on your computer to work, edit or customize your design. You can also find more 3D designs for printers on LairdWarp Rollercoaster.