Large Strong Waterproof Boat Fully 3D Print 3650/3660/3670 Motor
thingiverse
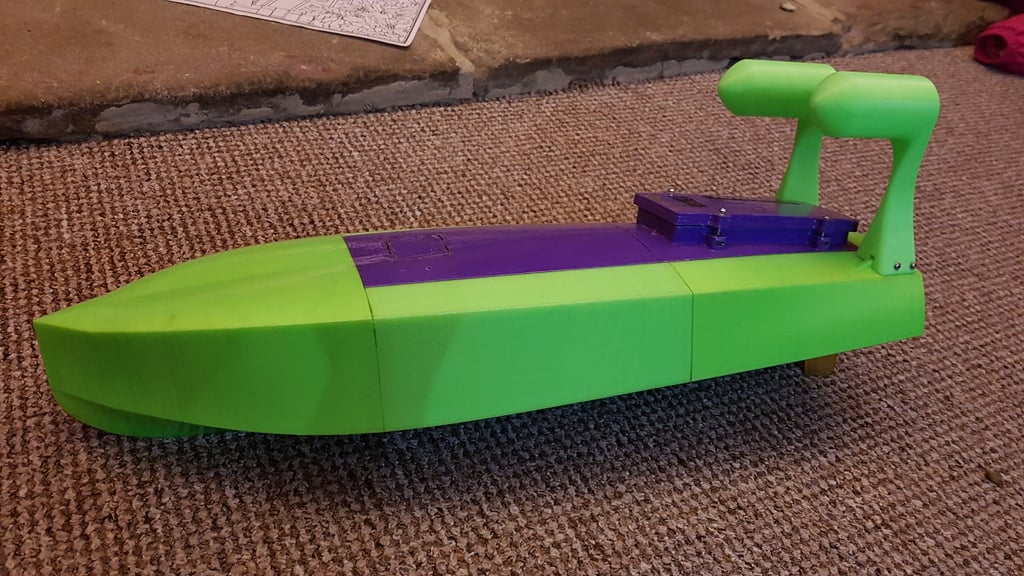
This is my first design that I have made of this size. Based on a 1930's gentlemans Launch that i already had model plans for. http://www.brackleyboats.com/files/brackley/Product_Pictures/1279500477.jpg Measuring in at nearly 550mm long this thing is big. I designed it to go on the sea so is very robust. It is a 4mm shell with inner side shells so in theory if it did get water inside it would still float. It is also designed to be 100% watertight. It does include water cooling holes, however these can just be glued shut if not needed. The spoiler on the back acts as a carry handle but most importantly helps the boat self right if rolled over. All parts print without support. The "body back" needs support inside for the servo mount. (138 size servo). Then the "topback(hatch)" also needs support to print. Each part has alignment pins for glueing. I would recommend printing with a raft to reduce the warping on the layers. (personal preference) I glued together with gorilla glue epoxy and this worked really well. I printed this on my Tronxy P802MA so each section is designed to print within a 200x200x200 build space. I used 2 outer walls and 10%infill with 0.4mm nozzle at 0.3mm layers. It should all be able to be printed with one 1KG spool, though I didnt have a fresh one, hence the purple. You will need: 3650 motor or equivalent https://www.ebay.co.uk/itm/GoolRC-3650-3500KV-Brushless-Motor-with-60A-ESC-Combo-for-1-10-RC-Car-Truck-P4K2/153174694549?epid=24023574448&hash=item23a9ec5a95:g:pSIAAOSwZ11aZrX8:rk:3:pf:0 about 20 M3 10mm bolts 4 M3 Nuts for the top hatch Epoxy or similar 138 servo https://www.ebay.co.uk/itm/HKing-138-Standard-1-10-servo-4-3kg-0-17s-Steering-Tamiya-Touring-Maverick-SF1/222024400890?hash=item33b1af7ffa:g:MuQAAOSw5vBZc6bI:rk:1:pf:0 (this just being what i had laying about, anything else smaller would fit too but wouldnt fit in mount holes) Rudder (i used the medium one) you just have to cut the top down a little to fit in the hull https://www.ebay.co.uk/itm/Model-Boat-Rudder-Brass-with-Tiller-Arm-for-Radio-Remote-Control-RC-Boats/321830576246?hash=item4aee98e076:m:mkc6qt5ABx0aJvBy8N1AoKA:rk:2:pf:0 Propeller https://www.ebay.co.uk/itm/1-Pair-M4-x-45-x-31-5mm-Left-Right-2-Vane-Rotating-RC-Boat-Prop-Propeller-Black/183147687971?epid=620944213&hash=item2aa473f023:g:pUkAAOSwM9xbmuGj:rk:20:pf:0 10 inch/250mm prop Shaft 8mmDia 4mm Shaft https://www.ebay.co.uk/itm/RC-Model-Boats-Heavy-Duty-Propshaft-M4-Thread-Brass-Tube-Choice-of-Sizes/322530397611?hash=item4b184f4dab:m:m4O184diqFO52qDB54FxjuQ:rk:7:pf:0 2200mah to 3000mah battery, probably could go larger but i've not tried small universal joint https://www.ebay.co.uk/itm/STEEL-COUPLING-Huco-type-3-2mm-to-4mm-rc-model-boat-universal-joint/390966804683?epid=707438354&hash=item5b077000cb:g:BqcAAOSwfcVUARhj:rk:3:pf:0 Once all parts are printed glue all the hull pieces together in turn, I roughed up the ends of each before glueing for better adhesion. just used tape to provide the pressure while drying. Then install the hardware and electronics. Check that they are all functioning properly ensuring motor is turning the right way for your prop. Then glue the prop shaft and rudder tube into their position. Grease those well once glue has set. Then you can glue on the hatch parts (purple in my example) which could be broken away if alterations are later needed. On the "topback(hatch)" you need to install the m3 nuts into the slots on the side, I glued mine into position. This means water cant get in as they're on the outside of the seal and wont thread out like the plastic would. On the "hatch" there is a recess where you can put some builders style silicone and smooth it flat for a 100% waterproof seal. There is a slot in the bottom for a velcro strap to go through to secure the battery so it doesnt shift the centre of gravity if the boat rolls over etc. Then you can just bolt on the spoiler with some m3 Bolts. This part is of course an optional addition. I have literally thrown this into the sea and it just bobs up and goes! It stayed bone dry on the inside. I cant wait to throw it out into some rougher conditions. I will update this with a video once I manage to take one. (my first test i had wired the motor in reverse so flipping the throttle only allowed it to go 50%power as it thought it was in reverse and this was the ESC default setting)
With this file you will be able to print Large Strong Waterproof Boat Fully 3D Print 3650/3660/3670 Motor with your 3D printer. Click on the button and save the file on your computer to work, edit or customize your design. You can also find more 3D designs for printers on Large Strong Waterproof Boat Fully 3D Print 3650/3660/3670 Motor.