Large Volume Paste Extruder
thingiverse
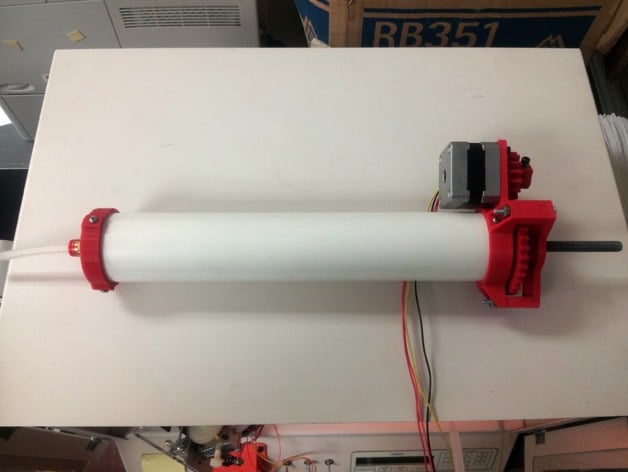
This precision-made extruder is engineered to pump a massive volume of viscous paste through a durable bowden-style tube, feeding directly into your preferred nozzle. It employs a reliable stepper-driven piston to accurately dispense the paste, ensuring effortless control with your current stepper controller (i.e., ramps, rambo, etc.). The designer intentionally crafted the nozzle to attach snugly onto the cap of an inkjet refill bottle. Stay tuned for future updates as this will enable greater adaptability and fewer part-specific constraints. Enjoy exploring! Video: https://www.youtube.com/watch?v=f6YL5gFNG1g In addition to the included printable parts, you'll need the following: 3 x 8mm nuts 2 x 8mm washers 1 x ~400mm x 8mm threaded rod 1 x 350mm x 1.5in sch. 40 PVC pipe 1 x 1/8in NPT hose clamp 1 x 1/4in air tubing (as long as you need) 1 x 10mm M3 screw and nut 2 x 608 skate board bearings 3 x 3in 6-32 screws 3 x #6 washers and nuts 6 x 1/2in 6-32 screws 2 x 1.5in x 1/8in o-rings 1 x NEMA 14/17 stepper w/ mounting screws Drill and drill bit set If this project fascinates you, you may want to explore the exciting realm of creating with 3D printers, laser engravers, and other cutting-edge maker-tech. Dive into "The Makerspace Workbench" from Maker Media to unleash your creativity! To follow this build and discover more incredible projects, join me on Twitter! Instructions 1) Print parts using >15% infill (ABS tends to yield better results than PLA). 2) Perform a fit check on the printed components, carefully removing any burs as necessary. 3) Assemble the piston by installing one 8mm nut within the piston itself. Next, screw in the rod until it reaches its lowest point. Securely place a washer over the rod and hold in position with another 8mm nut. 4) Carefully insert an o-ring onto the piston assembly. 5) Mount both caps onto the PVC tube. You may need to drill additional holes or apply taps as needed for proper fitment. 6) Remove the caps and lightly coat the piston assembly with Vaseline. Gently slide the piston into the tube until securely seated. 7) Place a skateboard bearing into the stepper end cap, followed by screwing it onto the PVC pipe. 8) Feed the piston assembly until the threaded rod emerges from the bearing on one side. Apply an 8mm washer to the protruding portion of the rod. 9) Install a third 8mm nut into the drive gear and securely fasten it to the threaded rod, followed by sliding in a last washer for protection. 10) Attach the final bearing to the top mount. Insert it over the exposed section of the rod, securing with three standoffs using the 6-32 screws. 11) Securely fasten the NEMA 14/17 stepper onto the provided mount and apply gentle pressure onto the input gear, tightening with an M3 screw and integrated nut. 12) Attach a hose clamp to the front cap, securely connecting it to your tubing. At the opposite end of your hose, connect your chosen nozzle. Be sure this nozzle is mounted correctly on your printer (referencing adjustments as necessary). 13) Fill the extruder assembly with your preferred substance or 'goop,' carefully tightening the end cap in place. 14) Give the device a trial run and properly calibrate your slicer and controller settings for precise performance
With this file you will be able to print Large Volume Paste Extruder with your 3D printer. Click on the button and save the file on your computer to work, edit or customize your design. You can also find more 3D designs for printers on Large Volume Paste Extruder.