LarryDNJR Segmented Pen Blank Resin Casting Mold 1
thingiverse
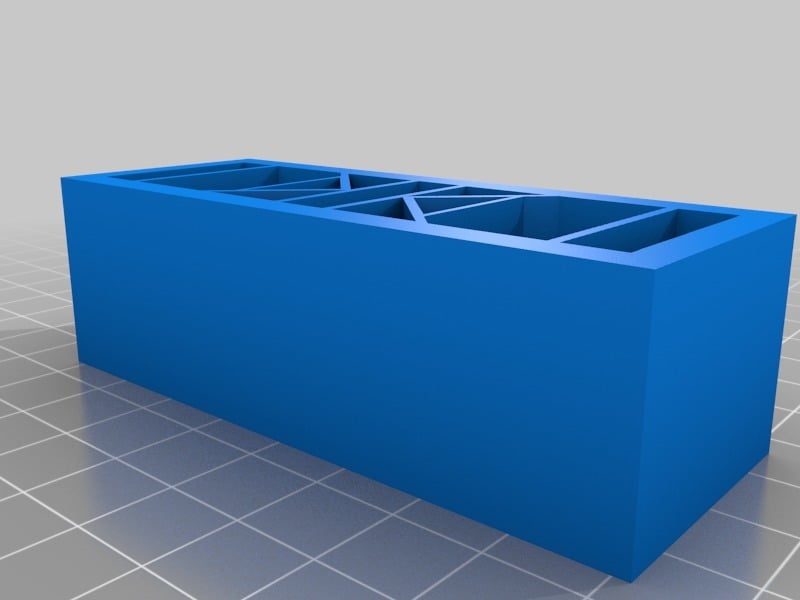
Segmented Pen Blank Casting Mold for use with Resin. Information provided by Thomas Walter with permission from https://www.thingiverse.com/tswalter and https://www.thingiverse.com/thing:2872597. This is a mold designed for pen makers who want to create segmented pen blanks without spending time cutting individual pieces. The design fills cells with different colored casting resins to achieve the look of a segmented pen. I made my mold with interior walls that are higher and go all the way to the top, so you don't have to fill them to the brim, which usually means spilling resin from overflows. I made this mold with solid walls and 100% infill so it can be used with Alumilite and other resins that heat during curing without distorting the mold like previous versions of printed molds do. I also made the mold with uniformed angles for better appearance in the finished pen. HOW TO MAKE A 3D PRINTED SEGMENTED MOLD RESIN CAST PEN BLANK By Thomas Walter, 2018 Having the right settings for printing these molds is crucial. Use a nozzle temperature at the higher end of the range to prevent stringing and get a better bond between layers so the molds won't leak during casting. Use a layer height of .15-.20 for more layers that also prevent leaking of resin. Use contrasting colors when printing and casting the molds. If you use a dark mold color, try out some lighter colored casting resin colors, and vice versa. Always print the molds with a brim to help prevent warping of the molds when printing the higher portion of the mold. Use whatever method works best for you to get the best adhesion. Casting the printed molds: Check the mold for holes or defects. Although the prints have been designed with overlapping tracks, each printer is different and you may have small holes in the floor or walls. This is no big deal, and you can use Scotch Masking tape or CA to fill the holes before casting. You should print the mold with a layer height of no more than .2 with a floor and wall height of .8 so that you have at least 4 layers thick to prevent leaking of the mold when you fill them with resin. When printing molds, you have a choice of quality for printing. A high-quality print is nice but takes forever to print. Also considering that you are going to turn away 75% or more of the mold, you don't need to print the walls and floor at a high resolution. Remove any fibers or filament threads from inside the mold. Anything left inside the mold will be embedded into your cast finished blank. I use an Xacto knife to carefully cut any threads along the walls and corners. You can also use the backside of the blade to rough up the walls for better resin adhesion. For an extra level of care and protecting my benchtop, I put a layer of blue Scotch Masking tape on the bottom of the mold before casting that will catch any small overflows you may cause and also catch a drip from an invisible hole that may be in the wall. I have never had this happen yet but it is possible and others have told me that it has happened to them with some other molds made from plans on the web. It's not necessary, but you can round off the long corners on your band saw if you like. The outermost layer of the mold will be completely turned away anyway, but some people have asked me if it's okay and sure it's fine. Make sure to use sharp tools and take light cuts as you would with any acrylic or segmented blank. I use Liquid Diamonds resin (from Susan Putman on Facebook or available from other vendors) because it's very clear and easy to use, has a longer working time, and has a high level of adhesion since it's an epoxy-based resin. It bonds the mold to the cells very well and won't separate unless you are too aggressive with your cuts. Drill and turn slowly as with any segmented blank. Custom (kit-less) blanks may be sleeved for extra strength but is not necessarily needed. I have tested the bond strength of the mold to resin, and it's very strong. However, being a segmented blank, it doesn't hurt to sleeve it.
With this file you will be able to print LarryDNJR Segmented Pen Blank Resin Casting Mold 1 with your 3D printer. Click on the button and save the file on your computer to work, edit or customize your design. You can also find more 3D designs for printers on LarryDNJR Segmented Pen Blank Resin Casting Mold 1.