Laser collimation kit - Collimator for newtonian telescope
thingiverse
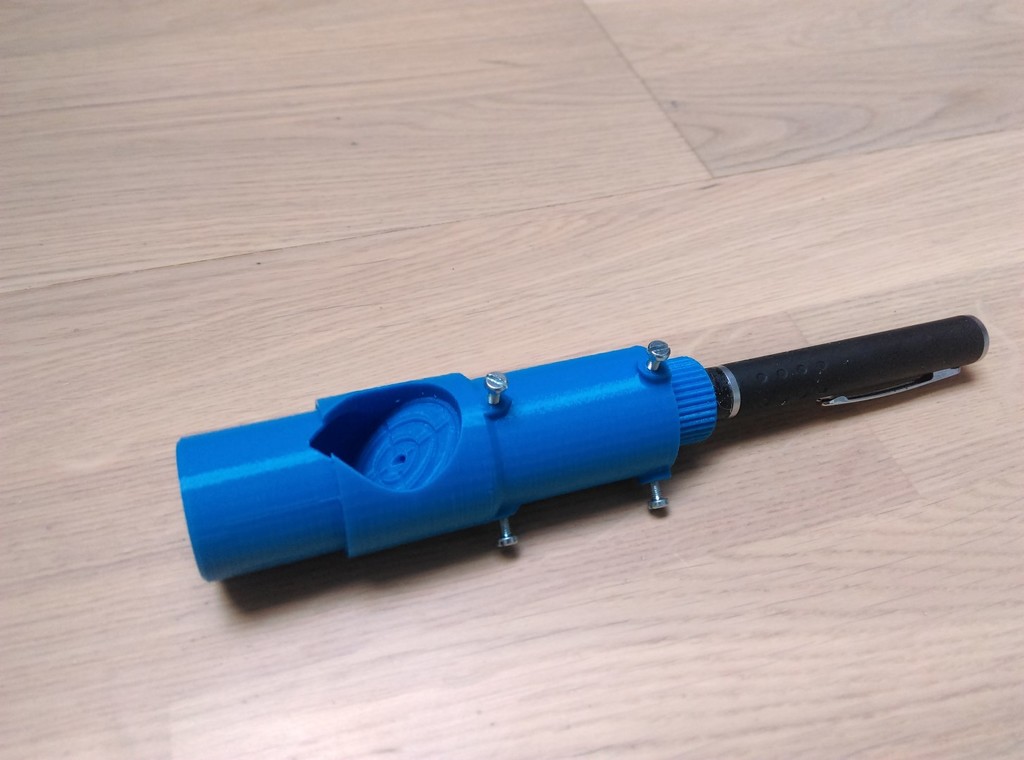
### **English version** #### Introduction Here's my version of the laser collimator for Newtonian telescope. It allows fast and pretty accurate mirrors alignment. It comes with its own calibration stand, to ensure that the collimator is in fact collimated ... What's more, I added a very convenient (and simple) rotary switch to keep the laser on) #### What you need * The three printed parts * A cheap green laser pen like [this one](https://goo.gl/8AaT9K) (others could work the same) * 6 x M3 screws (I use 16mm, I think 12/13mm is great) Cost : less than 5€ .. Not bad ;) #### How to use it 1. Insert the screws in the six holes. The laser pen should be able to move but keep centered. 2. Install the switch as shown on the picture above. 3. Secure the pen with the first three screws. (in the middle of the body) Check if the laser beam go well through the hole. If not, it's not well-centered. 4. Place the collimator onto the calibration stand and switch on the laser. 5. The stand has to be strongly secured on a stable surface, and the beam should hit a 10m far wall (the further the better). Spin the collimator, keeping it right in the V stand. The laser should make kind of a circle on the wall. With the three other screws, try to align correctly the pen to make this circle tiniest as possible. 6. Congratulation ! You can use it now as any other laser collimator. Internet is full of marvelous tutorials .. ;) Keep it mind that laser collimators help a lot to collimate a telescope, but it is very useful to enhance it with a star and the Airy disk ... _____________ ### **Version française** #### Présentation Sur Thingiverse, les collimateurs laser c'est comme les recettes de gâteaux, chacun a la sienne. Voici ma version pour les télescopes Newton. Il permet un alignement des miroirs rapide et assez précis. Je le publie avec son propre support de calibration, pour s'assurer que le collimateur est lui-même collimaté ... J'ai aussi dessiné un bouton rotatif très simple qui permet de garder le laser allumé. #### Ce dont vous aurez besoin * Les trois parties imprimées * Un [stylo-laser vert chinois](https://goo.gl/8AaT9K) (d'autres modèles doivent être compatibles aussi) * 6 vis M3 (J'utilise des 16mm, car c'est ce que j'ai. Prévoir au moins 12/13mm) Prix : moins de 5€ ... Pas mal ;) #### Mode d'emploi 1. Insérer les vis dans les six trous prévus à cet effet. Le laser doit pouvoir coulisser mais aussi être maintenu au centre. 2. Mettre en place le bouton comme montré sur la photo. 3. Serrer le laser avec les trois vis du centre. Vérifier que le faisceau laser passe bien dans le trou. Sinon c'est qu'il n'est pas bien centré. 4. Placer le collimateur sur son support de calibration. 5. Le support doit être solidement fixé à une surface stable, et le laser doit taper dans un mur à environ 10m. (le plus loin sera le mieux) Tourner le collimateur en le gardant bien dans son socle. Le laser devrait dessiner un rond sur le mur. Avec les trois autres vis, orienter le laser pour essayer de rendre le rond le plus petit possible (l'idéal serait un point fixe) 6. Bravo ! Il peut maintenant être utilisé comme n'importe quel collimateur laser, internet regorge de tutoriels merveilleux ;) Le collimateur laser permet de dégrossir beaucoup le travail, et ce rapidement. Mais n'oubliez pas que la meilleure collimation possible sera obtenue en affinant le travail avec une étoile et son disque d'Airy.
With this file you will be able to print Laser collimation kit - Collimator for newtonian telescope with your 3D printer. Click on the button and save the file on your computer to work, edit or customize your design. You can also find more 3D designs for printers on Laser collimation kit - Collimator for newtonian telescope.