Laser-Cut Acrylic Hair Dryer Mount
thingiverse
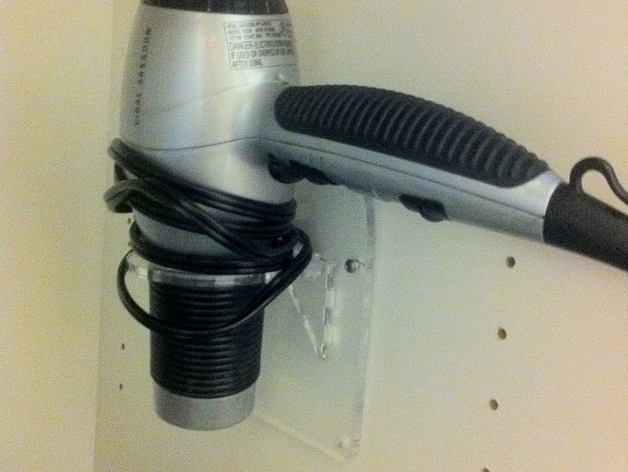
My wife has been wanting a better way to store her hair dryer under her sink so that it doesn't just add to all the clutter. She was open to any solution, so this is what I came up with yesterday: a 1/4-inch acrylic mount for it that attaches under the sink. Wrap the cord around the barrel and it all stashes away neatly and conveniently. Instructions Some Useful Information I measured the actual thickness of the acrylic to be around 5.8 mm. I made the slots 5.8 mm wide and found that it works very well since the kerf of the cut gives a bit of play. Easy to fit together, tight enough that a little acrylic cement allows you to make a solid permanent connection. I created the model in Google SketchUp and have included both the Sketchup file and the SVG file for cutting the parts. You can download SketchUp for free from Google. I exported the faces from the model to SVG via the SVG export plugin available from Flight of Ideas. I then rearranged the parts in Inkscape to optimize the layout to use as little acrylic as reasonably possible. Cutting time on my laser was a bit under 20 minutes. Acrylic Cement I make my own acrylic cement by dissolving acrylic scraps in acetone. Just add some scraps to a PETE water bottle containing an inch or so of acetone (acetone doesn't dissolve PETE: http://en.wikipedia.org/wiki/Polyethylene_Terephthalate ). Slosh it about occasionally until it completely dissolves. Keep adding scraps until you get viscous liquid. This can take several days, so be patient. However, the result is far, far superior to the commercial products I've used and is also much, much cheaper. It's worth making your own. What you're really doing is "welding" the acrylic together -- the acetone dissolves the surface a bit, the dissolved acrylic adds a bit more binding and the acetone then evaporates quickly to leave a mostly-clear bond that is strong and attractive. Assembly Hints Add the support triangles to the part with the circular hole and THEN put that assembled grouping into the backplane. Use wall anchors if placing into drywall. Do NOT over tighten mounting screws: acrylic is a binary fail (i.e.: it is either in one piece or BROKEN: no in-between).
With this file you will be able to print Laser-Cut Acrylic Hair Dryer Mount with your 3D printer. Click on the button and save the file on your computer to work, edit or customize your design. You can also find more 3D designs for printers on Laser-Cut Acrylic Hair Dryer Mount.