Laser Cut Custom Sign
thingiverse
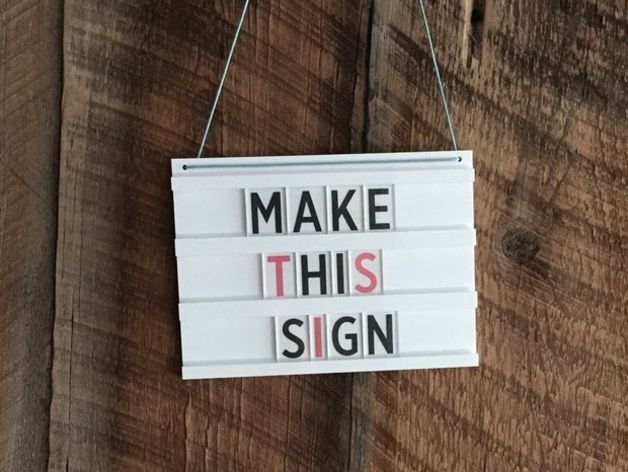
Today we're making a custom sign that you can hang on your door at home or in business location. We've compiled a step by step guide to make a custom sign using the Trotec Speedy 300 laser cutting machine. For this project you will need: • 1/8" Clear acrylic • 1/8" white acrylic • Spray paint • Methylene Chloride Cord or chain Print Settings Printer: Trotec Speedy 300 How I Designed This Step 1: Laying out the letters To produce a high quality design, you will need to choose a clean sans sarif font and lay out each individual rectangular tile. You must first layout the letters in the centre of each individual tile. The spacing between the edge of the letters and the edge of the tiles should all be the same for letters and symbols (Punctuation should be reduced slightly ex. apostrophes). Keep in mind that you will be sliding these letters into rails (they must fit). Account for these in the spaces you leave for the letters top and bottom. *Hint: Using all caps for the letters will make it much easier when making the layout. Finally, the orientation of the letters must be flipped as the etching will be done on the back of the tiles. Step 1: Laying out the letters Step 2: Setting the letter tiles We used 1/8" clear acrylic as our chosen material. The paper backing must be on the acrylic when cutting to allow only the letters to be exposed. Once cut, all edges must be taped to ensure paint will run along the letters. Step 2: Setting the letter tiles Step 3: Spray Painting Spray paint your tiles in any given colour or your choice. Then, remove the taped edges and paper backing (front and back). Step 3: Spray Painting Step 3: Spray Painting Step 4: Lay out the sign Use the size of your letter tiles to measure the overall size of the sign (or vice versa if a particular sized sign is preferred). We laid ours to involve 3 rows of letters, including room for two holes (to hold the sign). Step 4: Lay out the sign Step 5: Creating the rails Our letters are 1.5" tall with .18” spacers. Top and bottom rails are .25” while the rails in the center of the sign are .32" To ensure that the letters are capable of sliding in and out easily, we applied an etch to edges of the rails that cover the letters. Step 5: Creating the rails Step 6: Constructing the sign To assemble the product, methylene chloride was used (while it doesn't achieve as clean of a finish, crazy glue is an accessible alternative) . Disclaimer Methylene chloride must be applied using a sable or real hair brush Methylene chloride runs along seams similarly to water. Brushing a wet brush along the edge while holding it tight for a minute will create a tight fix. Once this task is complete, you may begin sticking the parts together (from the bottom up). This will give you the opportunity to check the spacing as you go. Step 6: Constructing the sign Step 7: Applying the top rails The rails can be applied once the spacers have been inserted. Make sure to keep the edges as flush as possible. Step 7: Applying the top rails Step 8: Add chain or cord and Voilà! The finished piece (after the protective plastic was removed). Step 8: Add chain or cord and Voilà! Step 9: Etching letter method As an alternative, you may save yourself some tape and paint by etching your text into lasercore. This is an effective way of using a two tone material to bring bright, clear text onto a simple white background in one step. Step 9: Etching letter method Step 10: Take it a step further! Instead of a solid white acrylic, feel free to change it up and put your own spin to it. In this example we used a wooden box with some LEDS. Be creative! Step 10: Take it a step further!
With this file you will be able to print Laser Cut Custom Sign with your 3D printer. Click on the button and save the file on your computer to work, edit or customize your design. You can also find more 3D designs for printers on Laser Cut Custom Sign.