Laser Engraver - Simple DIY GRBL XY Plotter
prusaprinters
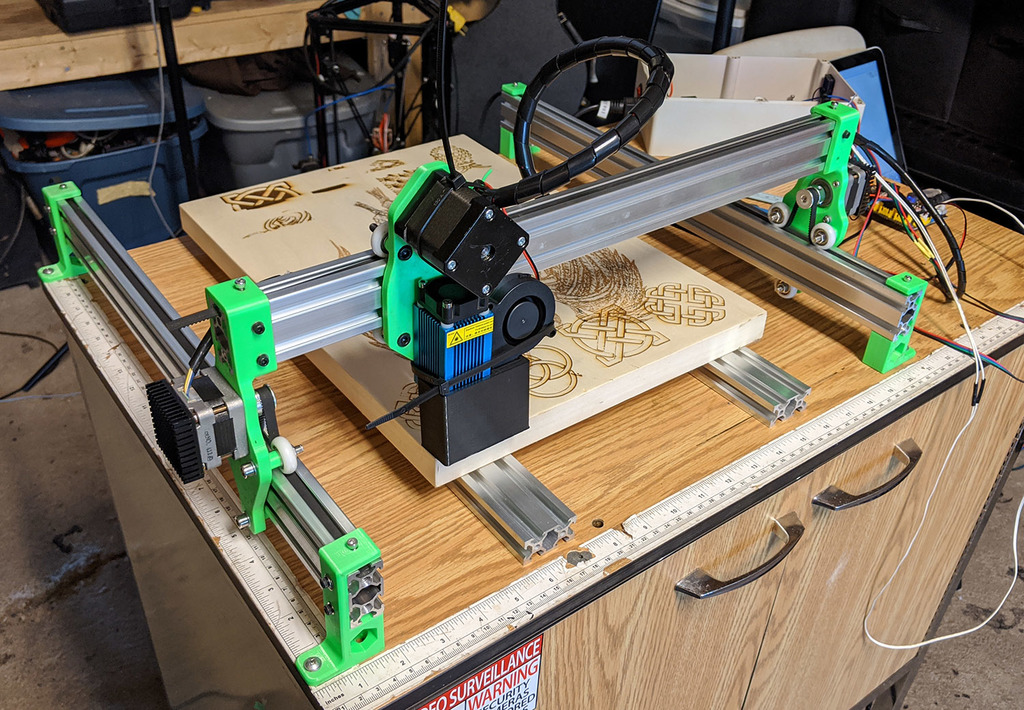
<p>Always make sure you are using high quality eye protection and ventilation while working with lasers. Eye protection is very important!</p> <p><a href="https://github.com/Adamslab/SimpleEngraver">https://github.com/Adamslab/SimpleEngraver</a></p> <p> <figure class="media"> <oembed url="https://www.youtube.com/watch?v=ll7KeXLQTyo"></oembed> </figure> </p> <p>This is a 3D printable frame for a simple 2-axis laser engraver assembly. It is a basic X/Y plotter that runs on GRBL, and it uses 3x 2040 aluminum extrusions for linear motion. Everything prints without support material and uses simple fasteners. You are free to use/remix the models if you find them helpful for your own project. I built this with spare parts to make artwork and crafts, mark fabric, etch PCBs and to practice my modeling skills before I start my CNC router project.</p> <p>Example engravings:</p> <ul> <li><a href="https://www.instagram.com/p/B_o2uqJDyem/">https://www.instagram.com/p/B_o2uqJDyem/</a></li> <li><a href="https://www.instagram.com/p/B_JM_1tjG7Q/">https://www.instagram.com/p/B_JM_1tjG7Q/</a></li> </ul> <p>The .f3d and .step files for the assembly are included so that you can easily modify them to suit your own needs, or to use the designs in your own assemblies. This project is a work in progress, so there's some differences between the models and pictures.</p> <p>Printed parts:</p> <ul> <li>2x Y-Axis Carriage</li> <li>1x X-Axis Carriage</li> <li>4x Feet</li> <li>1x Fan Shroud (Optional, for 50mm blower fan)</li> </ul> <p>BoM:</p> <ul> <li>1x Pair of Good Laser Goggles</li> <li>10x 21.5mm OD - 5mm ID roller wheels</li> <li>10x M5x30mm Bolts</li> <li>10x M5 Nuts</li> <li>34x M3x10mm Bolts</li> <li>28x M3 T-Nuts</li> <li>6x M3 Nuts</li> <li>34x M3 Washers</li> <li>3x 2040 T-Slot Extrusion</li> <li>1x GRBL Control board*</li> <li>1x PWM Laser Diode with Heatsink</li> <li>3x A4988 Stepper Drivers</li> <li>3x Nema-17 Stepper Motors (Low power motors are fine)</li> <li>1x Stepper motor splitter (To drive 2x Y-Axis motors)</li> <li>3x 20-tooth GT2 5mm ID Motor Pulley</li> <li>1x 5m GT2 Belt (Length required will depend on your 2040 extrusions)</li> </ul> <p>You can use washers to help protect your printed parts, it's optional.</p> <p>For the 2040 extrusion, the longer the extrusions the bigger your engraving area will be. You can mix/match pieces or use two pieces of 2020 extrusion together to get 2040. I used 3x 500mm 2040 for my build.</p> <p>There are lots of options for the control board. You can find Arduino UNO and Arduino Nano CNC shields for a very low cost. For my build, I used a Keyestudio KS0288. If your control board doesn't have two Y-Axis outputs, you will need a splitter.</p> <p>For stepper motor drivers, I chose A4988 because I have a lot of them. You could opt for something like DRV8255 or a TMC driver if that is more readily available.</p> <p>I use software endstops, so I haven't bothered to add physical limit switches yet. You could always just stick some endstops on with epoxy.</p> <p>I use a 12V PWM switchable, adjustable focus laser. There is not a Z axis yet so adjustments are done manually. Make sure the wavelength of your laser is protected by your safety glasses!</p> <p>You can fasten the feet to a sheet of plywood or a table to increase rigidity of the assembly. Tension the belts by pulling the belt tight and tensioning the M3 bolt on top so that it bites into the belt.</p> <p>Adam's Lab</p> <p>www.adamslab.ca</p> <p>@adamsprints on Instagram</p> <h3>Print Settings</h3> <p><strong>Printer Brand:</strong></p> <p>Prusa</p> <p class="detail-setting printer"><strong>Printer: </strong> <div><p>i3 MK2.5</p></div> <p><strong>Rafts:</strong></p> <p>No</p> <p class="detail-setting supports"><strong>Supports: </strong> <div><p>No</p></div> <p><strong>Resolution:</strong></p> <p>0.2</p> <p class="detail-setting infill"><strong>Infill: </strong> <div><p>25%</p></div> <p><strong>Filament:</strong> 3D Printing Canada PETG Any Color</p> <p><br/> <p class="detail-setting notes"><strong>Notes: </strong></p> </p><div><p>4 perimeters, 25% infill, 0.2mm layer height</p> Print everything flat, no support material needed. <p>You can use PLA, but I recommend PETG or ABS.</p> <p>Holes are oversized by 0.2mm.</p> </div></p></p></p> Category: DIY
With this file you will be able to print Laser Engraver - Simple DIY GRBL XY Plotter with your 3D printer. Click on the button and save the file on your computer to work, edit or customize your design. You can also find more 3D designs for printers on Laser Engraver - Simple DIY GRBL XY Plotter.