Laser Module for Maker Select V2
thingiverse
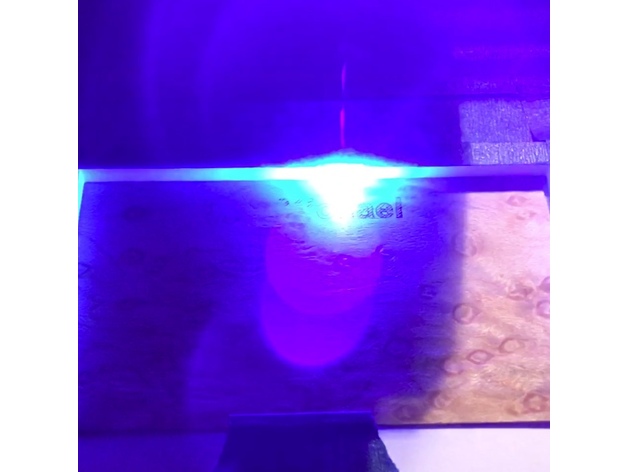
I wanted to use my 3D printer as a laser engraver to make some of the Christmas presents this year, after I found a 500mW laser module at Amazon for $39 which includes driver, fan and safety glasses. I have now upgraded to a 2.5W laser. The mount bracket was designed to install, use and remove the laser module without having to make significant changes to the printer. Used the two M3 socket screws that secure the front fan as alignment "pins" and used a rare earth magnet to hold the laser module while in use. Tested printing the mount in both PLA and ABS. Use two M3x8mm socket screws to secure the laser module to the mount. The power cable plugs directly to the front fan cable (PWM controlled fan). Align the cables so that black connects to black and red connects to red. Only make connections while the printer is off to avoid possible damage to the control board or laser module. Use a couple of wire ties to bundle the excess power cable from the laser. The mount has holes to secure the cable bundle. Make sure there is clearance with the filament release lever on the extruder and the cable bundle. The laser module is Amazon item B01H6XN1TA. NOTE - the laser module includes safety glasses. Be safe and use them. I had the neodymium magnet (15.7mmx5.15mm DxH) from a previous project. A similar magnet at Amazon is item B01K9S09TO. Set the Z-axis to the minimum possible (Z=0 best case) to maximize the laser power. To adjust the laser's focal point, set the fan speed control until you see a dim dot (speed 9-10). Then adjust the focus until you can see the sharpest dot. Adjust the Z-position to compensate for the height of the item to be engraved. For example, if using 3mm wood, set Z to Z-minimum + 3mm. I used Inkscape and the J Tech Photonics Laser Tool plugin to generate the gcode — both of which are free. To control the fan speed on the Maker Select, use M106. To be safe, I default the "Laser Power" to 10 (S10). That way I can check the laser path to align the item and make sure nothing will be damaged by accident. I then use a text editor to search/replace all instances of "M106 S10" to "M106 S255" in the gcode file created by the plugin. Save the file and upload to printer. See attached picture of complete plugin settings. BE EXTREMELY CAREFUL at this point since the laser will be at full power. I placed a piece of white plastic to protect the bed surface (the black BuildTak) of the printer. Be safe and have fun engraving... 2017-10-01 Update I have now installed the Inkscape eggbot hatch extension to be able to engrave filled areas. The latest version (v2.7.1) is located here. Thanks to Evil Mad Scientist for a great extension. 2018-04-04 Update I did a sign for a wedding on wood veneer. To limit the smoke, I placed a glass on top of the wood veneer and burned the wood through the glass. To my surprise, the glass was etched as well. See pictures 2 and 3. 2018-05-13 Update I have upgraded to 2.5W Laser. Adjusted the focal length to the minimum in the current configuration to focus as much of the beam as possible. It is now able to cut through 1/8 (3mm) soft/hard wood. It does take 6-10 passes, but the cut is very clean. See pictures 4 and 5. NOTE: I have noticed that the laser turns on briefly while the controller is on. Either add a switch or disconnect the laser until you are ready to use it.
With this file you will be able to print Laser Module for Maker Select V2 with your 3D printer. Click on the button and save the file on your computer to work, edit or customize your design. You can also find more 3D designs for printers on Laser Module for Maker Select V2.