Laser Pointer Robot CNC Shield V4 Mount
prusaprinters
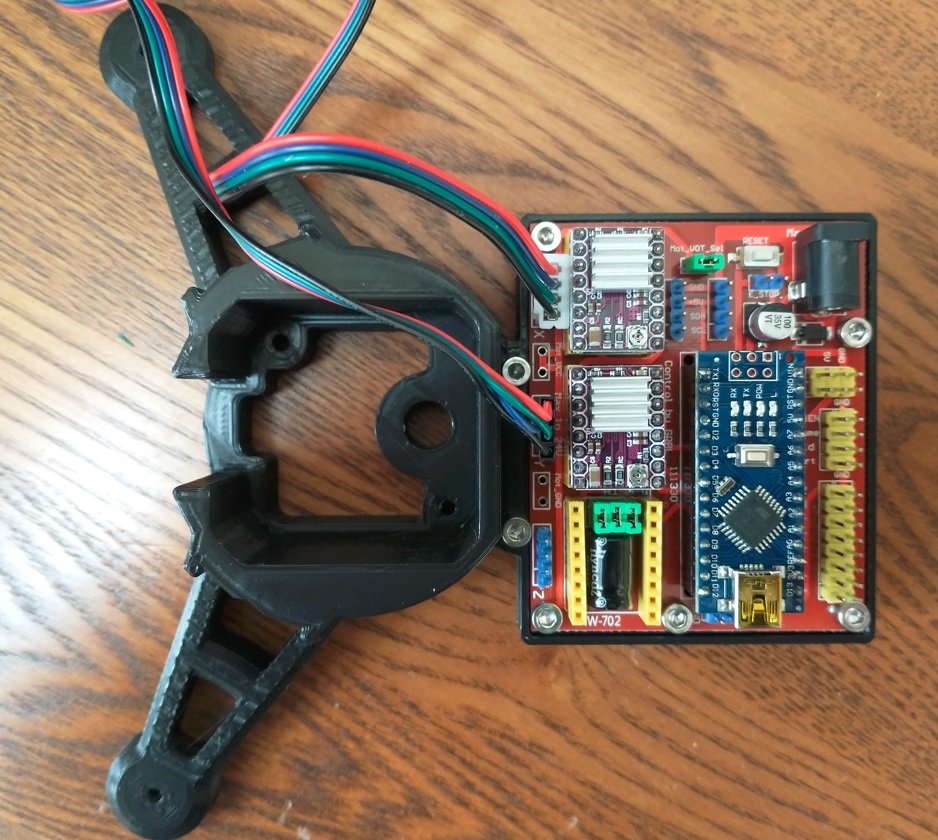
<p>Update 10/26/2021: I ordered a CNC Shield V4 by KEYESTUDIO (which is a black PCB with yellow connectors. It appears to have corrected circuit traces on the PCB unlike the red CNC Shield V4 clone boards to make the microstepping jumpers pull up to 5V instead of ground. I ordered my black and yellow CNC Shield v4 on ebay (item# 133011912656) from seller keyes-robot for $7.99. Don't forget the motor drivers also. I examined further and did a continuity test to see the relevant microstepping jumper pins are now getting pulled up instead of pulled to ground on the KEYESTUDIO board. The traces are a little different and there are a few vias in different places. I believe this ought to now make micro stepping work correctly on the KEYESTUDIO board without hacking it like I did with the red cloned CNC Shield V4. I added side-by-side pics.</p> <p>--</p> <p>I made a mounting plate for the base of the Laser pointer robot for a "CNC Shield V4" designed for an Arduino Nano. Be aware that the "CNC Shield V4" has some circuit board errors that prevent microstepping from working without making PCB modifications. There is a nice article on how to fix the microstepping problems with the "CNC Shield V4" PCB here that I followed to get microstepping to work correctly on the "CNC Shield v4": <a href="https://www.instructables.com/Fix-Cloned-Arduino-NANO-CNC-Shield/">https://www.instructables.com/Fix-Cloned-Arduino-NANO-CNC-Shield/</a></p> <p>Unlike the article, my CNC Shield V4 did have the silkscreen for D9 and D10 correctly labelled and the word "Control" was spelled correctly in the silkscreen but the circuit errors remain the same as far as I saw and needed the same modifications to enable microstepping.</p> <p>This link may also be interesting to read: <a href="https://www.instructables.com/How-to-Use-the-CNC-V4-Board-despite-Its-quirks/">https://www.instructables.com/How-to-Use-the-CNC-V4-Board-despite-Its-quirks/</a></p> <p>The modifications for microstepping that I made to the "CNC Shield V4" PCB involve cutting eight traces, two traces on the top of the board (I scraped them away with an exacto knife) and cutting six more traces on the bottom of the PCB, and then soldering in 5 jumper wires. I managed to get microstepping functionality working. I used a couple DRV8825 drivers which allow up to 32 microsteps. I don't think you would need to modify the "CNC Shield V4" at all if you do not wish to enable microstepping functionality.</p> <p>I programmed GRBL 1.1h ( <a href="https://github.com/gnea/grbl/releases">https://github.com/gnea/grbl/releases</a> ) on the Arduino Nano in order to test the motors on the Laser pointer Robot to verify that with these electronics the motors are able to move.</p> <p>Example commands entered via a terminal program from a PC connected to the Nano at 115,200 baud running GRBL 1.1h to make each of the motors move is:</p> <p>g91 g0 x10</p> <p>g91 g0 y20</p> <p>if you want to make both the motors move backwards and at the same time you could type something like:</p> <p>g91 g0 x-10 y-20</p> <p>Another way to do this is to connect to the robot with a GUI application such as "Universal GCODE Sender" to jog the motors manually. I did this. I found that one full revolution of the altitude (Y) had a step size of 82 whereas the azimuth was approximately around 102 for a complete azumith (X) revolution using the default GRBL 1.1h settings. This is due to the different number of teeth in the printed gears for each axis. Feed rate changes the speed of the motors.</p> <p>Be careful to not move the azimuth axis too far so the stepper motor wire connected to the motor for the altitude axis doesn't get wrapped up and pull.</p> <p>I found the following information about GRBL informative: <a href="https://courses.ideate.cmu.edu/16-375/f2017/text/ex/steppers.html">https://courses.ideate.cmu.edu/16-375/f2017/text/ex/steppers.html</a></p> <p>The "CNC Shield V4" case was based on the following: <a href="https://www.thingiverse.com/thing:2252470">https://www.thingiverse.com/thing:2252470</a></p> <p>I am supplying the barrel jack on the "CNC Shield V4" with 12V using the following power supply: https://www.amazon.com/Kastar-Adapter-5-52-5mm-Wireless-Security/dp/B003TUMDWG</p> <p>and I installed one of these Nano devices: https://www.amazon.com/ELEGOO-Arduino-ATmega328P-Without-Compatible/dp/B0713XK923</p> <p>As well as two DRV8825 stepper motor drivers on the X and Y axes for azimuth and altitude respectively.</p> <p>I used (2) m3x16mm screws and (2) m3x10mm screws to mount the controller plate to the robot base (be aware that one of the holes under the circuit board is fairly close to solder on the the bottom of the PCB board so may want to either use a panhead screw there because it is lower profile than the screws I used, make the controller base a little taller, or simply leave that one m3x10mm screw out and secure the motor controller base to the robot base with three screws which is adequate.</p> <p>I mounted the PCB to the controller base with (5) m3x6mm screws. All the holes lined up very well for me.</p> <p>Also, I think this might be true with any controller board but don't spin the motors by hand with the controller connected to them as it will generate electricity and back feed the electronics on the controller which is not good and could cause damage to the electronics.</p> <p>Enjoy!</p> <p>Note that if you do run GRBL with the CNC Shield V4, you must switch around six pound defines for six pin assignments in cpu_map.h (the article covers this also):</p> <p>X_STEP_BIT 5 // Was Uno Digital Pin 2</p> <p>Y_STEP_BIT 6 // Was Uno Digital Pin 3</p> <p>Z_STEP_BIT 7 // Was Uno Digital Pin 4</p> <p>X_DIRECTION_BIT 2 // Was Uno Digital Pin 5</p> <p>Y_DIRECTION_BIT 3 // Was Uno Digital Pin 6</p> <p>Z_DIRECTION_BIT 4 // Was Uno Digital Pin 7</p> Category: Electronics
With this file you will be able to print Laser Pointer Robot CNC Shield V4 Mount with your 3D printer. Click on the button and save the file on your computer to work, edit or customize your design. You can also find more 3D designs for printers on Laser Pointer Robot CNC Shield V4 Mount.