Laser Pointer Rocking Mount for ZWobble Compensation
thingiverse
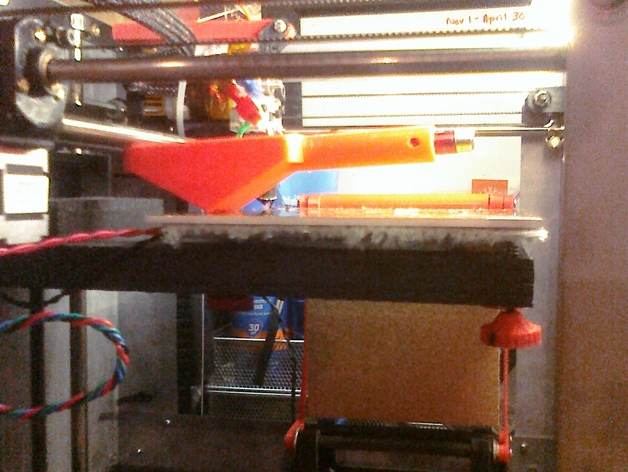
Use this rocking laser pointer mount in place of a dial gauge in conjunction with the z-wobble calibration feature in the latest firmware to measure and eliminate ZWobble (periodic banding) in prints on the Solidoodle 2. Instructions The primary cause of periodic "wobble" in prints on the Solidoodle 2--particular at high resolution--is due to periodic non-linear movement of the print bed when moving in the Z-direction. The latest Solidoodle firmware ( at https://github.com/mlaws/solidoodle2-marlin ) adds a new "Z-Wobble" compensation feature that allows you to define a custom compensation curve. The firmware applies the inverse of this curve when moving the bed, leading to virtually wobble-free prints when properly calibrated. Since the firmware automatically scales the input values when defining the custom compensation curve, one can use a rocking laser pointer to hugely amplify the bed movement, easily measure the position with a ruler or tape measure, then directly enter these enlarged values to define a compensation curve. Instructions (from http://www.soliwiki.com/Calibration_of_the_Z_wobble) If necessary, install a version of the firmware with z-wobble compensation Print the laser rocker, making any modifications necessary to fit your laser pointer Home the print head and fit the rocker on the bed with a laser pointer aimed at a sheet of paper taped to a wall about 10-20 ft away. Rest the point of the rocker near the end of the bed and hook the far end underneath the near x-axis rod. Send the following codes to home the print head and clear any previous compensation, and move the bed down one full rotation of the z-axis threaded rod (1.411mm): M97 A0 G28 G1 Z1.411 To avoid any backlash, start measurements from this location (one revolution away from home) instead of at zero. Undo any backlash by manually stepping the bed up (head down) a few .1mm steps and then back down (head up) the same number of steps. Mark the laser point (base point), then make an additional 14 marks, continuing to move the bed down (head up) .1mm between each mark. Measure the distance (in mm or any unit) of each of the 14 marks from the initial point. For convenience, copy the following gcode into a text file entering the 14 numbers into the indicated spaces (or edit the attached example gcode file): M97 A0 ; turn off any previous wobble compensation M96 ; print settings M97 W1.411 P0 ; set period to 1/18th inch M97 Z0.0 L0 ; enter deflection measurements in last column M97 Z0.1 L[distance between 1st and base point] M97 Z0.2 L[distance between 2nd and base point] M97 Z0.3 L[distance between 3rd and base point] M97 Z0.4 L[distance between 4th and base point] M97 Z0.5 L[distance between 5th and base point] M97 Z0.6 L[distance between 6th and base point] M97 Z0.7 L[distance between 7th and base point] M97 Z0.8 L[distance between 8th and base point] M97 Z0.9 L[distance between 9th and base point] M97 Z1.0 L[distance between 10th and base point] M97 Z1.1 L[distance between 11th and base point] M97 Z1.2 L[distance between 12th and base point] M97 Z1.3 L[distance between 13th and base point] M97 Z1.4 L[distance between 14th and base point] M96 ; print compensation curve To send the compensation values to the printer, just load the gcode file above and "print" it. The M96 command at the bottom should print the defined curve, which will typically take the form of a sinusoidal-like wave. As these settings are not persistent (i.e. will be lost when the Solidoodle USB cable is unplugged) you should do this at the start of each session or may wish to add it to your slicing app's starting gcode. (optional) use the laser rocker again with compensation enabled to verify that bed movements are now equally spaced. If recalibration is ever necessary in the future (if printer is jostled or the stop screw changed), restart at step 3.
With this file you will be able to print Laser Pointer Rocking Mount for ZWobble Compensation with your 3D printer. Click on the button and save the file on your computer to work, edit or customize your design. You can also find more 3D designs for printers on Laser Pointer Rocking Mount for ZWobble Compensation.