Laser Tag Bow
thingiverse
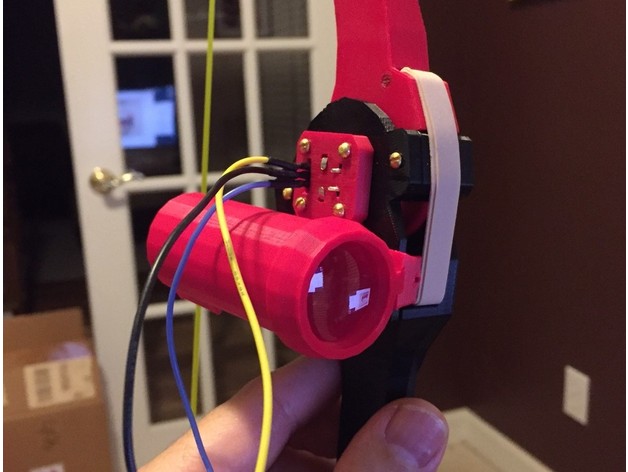
This is part of a laser tag LARP style system I worked on. The entire system is open source so if you want to contribute check out.. https://github.com/moonbeaminteractive The bow uses a rotary encoder in the arm axis to trigger a fire event with an arduino pro mini, an infrared led and a laser for targeting. The infrared tube has a internal ring set at 45mm which allows the IR LED to be pushed into place without having to worry about focus. I also printed the LED holder with a small aperture in order to keep the spread down. the Normal width of the LED gets magnified to about 6 feet over 20 meters without the aperture. Here is a video of the bow firing. You'll need.. 1 google cardboard lens 45mm focal length 1 arduino pro mini or similar small controller board 1 IR LED 1 laser pointer module (optional) some small guage weed eater cord for the bow string some #2 1/2" and 3/8" wood screws for securing parts if they are loose 2 104 ceramic capacitors for hardware debouncing the rotary encoder (very much needed) 1 50R - 150R resistor (depending on fire time for LED. Lower means brighter and a longer projection for the IR signal but could burn out the LED if left on to long) Print Settings Printer Brand: MakerBot Printer: MakerBot Replicator 2 Resolution: 0.35mm Infill: varies by part Notes: Bigger parts can use infill. The bow handle can be 35 to 50 percent infill. The Arms I printed at 50-75 percent infill and the rest of the parts I printed solid with no shells for fit. Every thing should snap together with a little sanding on the edges for heat bed flattening. Post-Printing Code for Arduino Pro Mini sketch /Interrupt-based Rotary Encoder Sketch by Simon Merrett, based on insight from Oleg Mazurov, Nick Gammon, rt, Steve Spence */ static int pinA = 3; // Our first hardware interrupt pin is digital pin 2 static int pinB = 2; // Our second hardware interrupt pin is digital pin 3 volatile byte aFlag = 0; // let's us know when we're expecting a rising edge on pinA to signal that the encoder has arrived at a detent volatile byte bFlag = 0; // let's us know when we're expecting a rising edge on pinB to signal that the encoder has arrived at a detent (opposite direction to when aFlag is set) volatile byte encoderPos = 0; //this variable stores our current value of encoder position. Change to int or uin16_t instead of byte if you want to record a larger range than 0-255 volatile byte oldEncPos = 0; //stores the last encoder position value so we can compare to the current reading and see if it has changed (so we know when to print to the serial monitor) volatile byte reading = 0; //somewhere to store the direct values we read from our interrupt pins before checking to see if we have moved a whole detent static int infraLED = 9; static int laserSite = 10; boolean arrowKnocked = false; void setup() { pinMode(pinA, INPUT_PULLUP); // set pinA as an input, pulled HIGH to the logic voltage (5V or 3.3V for most cases) pinMode(pinB, INPUT_PULLUP); // set pinB as an input, pulled HIGH to the logic voltage (5V or 3.3V for most cases) pinMode(infraLED, OUTPUT); pinMode(laserSite, OUTPUT); attachInterrupt(0,PinA,RISING); // set an interrupt on PinA, looking for a rising edge signal and executing the "PinA" Interrupt Service Routine (below) attachInterrupt(1,PinB,RISING); // set an interrupt on PinB, looking for a rising edge signal and executing the "PinB" Interrupt Service Routine (below) Serial.begin(115200); // start the serial monitor link } void PinA(){ cli(); //stop interrupts happening before we read pin values reading = PIND & 0xC; // read all eight pin values then strip away all but pinA and pinB's values if(reading == B00001100 && aFlag) { //check that we have both pins at detent (HIGH) and that we are expecting detent on this pin's rising edge encoderPos --; //decrement the encoder's position count bFlag = 0; //reset flags for the next turn aFlag = 0; //reset flags for the next turn } else if (reading == B00000100) bFlag = 1; //signal that we're expecting pinB to signal the transition to detent from free rotation encoderPos = 0; Serial.println("Pin A interrupt"); sei(); //restart interrupts } void PinB(){ cli(); //stop interrupts happening before we read pin values reading = PIND & 0xC; //read all eight pin values then strip away all but pinA and pinB's values if (reading == B00001100 && bFlag) { //check that we have both pins at detent (HIGH) and that we are expecting detent on this pin's rising edge if(encoderPos < 1){ encoderPos ++; //increment the encoder's position count }else{ encoderPos = 1; } bFlag = 0; //reset flags for the next turn aFlag = 0; //reset flags for the next turn } else if (reading == B00001000) aFlag = 1; //signal that we're expecting pinA to signal the transition to detent from free rotation Serial.println("Pin B interrupt"); sei(); //restart interrupts } void loop(){ if(encoderPos > 1){ encoderPos = 1; } if(encoderPos > 0){ arrowKnocked = true; } if(arrowKnocked == true && encoderPos < 1){ arrowKnocked = false; digitalWrite(infraLED, HIGH); delay(100); digitalWrite(infraLED, LOW); digitalWrite(laserSite, LOW); }else if(arrowKnocked == true && encoderPos > 0){ digitalWrite(laserSite, HIGH); delay(100); digitalWrite(laserSite, LOW); } if(oldEncPos != encoderPos) { Serial.println(encoderPos); if(encoderPos > 1){ encoderPos = 1; } oldEncPos = encoderPos; } //delay(200); }
With this file you will be able to print Laser Tag Bow with your 3D printer. Click on the button and save the file on your computer to work, edit or customize your design. You can also find more 3D designs for printers on Laser Tag Bow.