Layer Stool
thingiverse
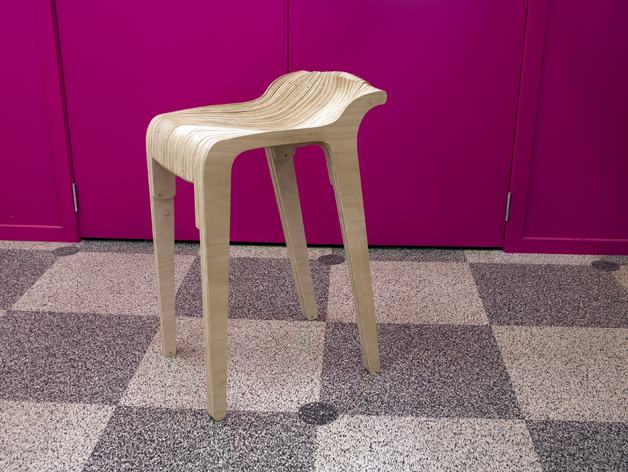
This stool was created after Fab8 in the Wellington Fablab. After being introduced to Grasshopper and the Layer Chair by Jens Dyvik. I started playing around with the open source Grasshopper file to see what I could create. At the time I was after a stool. This is the outcome. Made using 18mm ply, PVA glue, some 25mm wood screws and a Shopbot. Original Layer Chair files available here: (http://www.dyvikdesign.com/site/portfolio-jens/the-layer-chair-amsterdam-edition.html) Instructions This stool fits on a single sheet of ply-wood 2400 x 1200 x 18. Make sure you use 18mm ply as the profiles have been designed for that. Anything else will result in a thinner or wider stool. The .dxf has been organized so that all the different cuts required are on different layers. Note: The "hole down" is the cut I ran to plot out where I could screw the sheet down to the bed of the cnc. I would suggest that the first cut you run is the "screw holes outer". I used a 6mm end mill (for the entire job) and cut only 10mm deep. This allows you to use wooden pegs and glue on the two outside profiles so that you don't see any screws. I then cut the "screw holes". The cut just went all the way through. I set the Shopbot to peck drilling to just make it a little easier for the end mill to get through. Then I cut "trim 1". I cut on the line for this cut. At a depth of 6mm. This was done in 2 passes. "trim 2" was cut in the exactly the same way, only at a depth of 12mm. This was done in 3 passes. I pocket cut the my "text". You can skip this cut if you don't want it on your sheet. I knew I was using the negative for something else so I felt it was a nice detail to put on. Finally I cut the "cutting lines". This was a profile cut on the outside of the lines. It went all the way through. I did add tabs in partworks just to keep the bits in place and stop anything moving about while it was finishing of the cutting. Once you have all your parts cut, you can start to assemble. I gave the edges a light sand nothing to major. Then did a dummy build with no glue or screws so I could check the profiles were in the right order. Once I had them right I worked backwards and glued and screwed each profile to the one below. Dont jump on it straight away. I would highly recommend clamping it up to make sure the profiles are together nice and tightly. I also added a dowl between the two front legs about 200mm off the ground as a foot rest. This can be done post build or during.
With this file you will be able to print Layer Stool with your 3D printer. Click on the button and save the file on your computer to work, edit or customize your design. You can also find more 3D designs for printers on Layer Stool.