Lead_Screw_Bracket (Self-Adjusting)
thingiverse
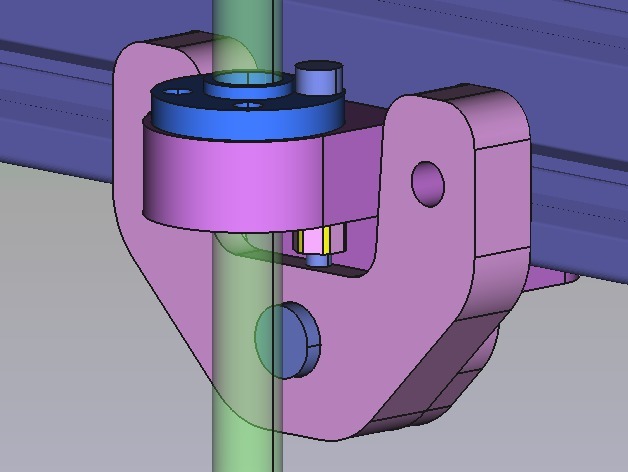
I feel that a fixed Lead Screw Bracket, as in the D-Box, invites trouble. It presupposes that the bed supports will be horizontal. They are never. Close, but not quite. The lead screw nuts can take a little bit of an angle against the lead screws but not much, they are not meant to. And before you know it the torque results in more friction then the stepper wants to handle. These self adjusting lead screw brackets can take that angle without bothering the lead screw nuts with it. There are 2 versions, 1 full plastic, called simple, and 1 with ball bearings. Because, after I made the full plastic one, I began to wonder what the pressure between the 2 parts would do to the friction between them over time, plastic being plastic. It worked completely according to plan and I think that after mounting very little, if any, adjusting is needed until such time that there is a change somewhere that would influence the position of the bed supports. And I am not sure whether at that time the parts would have set more fixed on each other, thus preventing self adjusting, or not. I just don't know enough about plastics to be certain one way or the other. So I made also a version where the pressure is left to a ball bearing. It is a little more complicated then the straightforward all-plastic version so I thought to offer you both versions and you can decide for yourself which one to pick. I printed everything without support: TLC remains necessary with support too. For the first version I used 4 M5x16 bolts + washers + hammer heads and 4 M3x18-20 bolts + washers + lock nuts. Not more then 20mm because of the room needed for rotating. The distance between bed support and lead screw remains the same as before, so you can exchange the parts without moving the stepper motor mounts. For the version with a ball bearing I used for the ball bearing assembly: - 1 Ball Bearing MR105ZZ (ø5xø10x4) (the same as one uses for the wheels) - 2 brass shims ø8xø5x1 - 1 M5x16 bolt + washer + lock nut. Check the images: the shims are not symmetrical with respect to part 1, for the purpose of easier printing. And again 4 M3x18-20 bolts + washers + lock nuts for the lead screw nut. As you can see there is just room for longer bolts. I am sure you will need some TLC to fit the ball bearing into part 1, because I made the hole ø10mm, same as the ball bearing, although I believe that there is always pressure downward and extra room would be taken care of without causing problems. But perhaps I'm wrong, so now you can make it fit nicely. For part 2 I used 2 M5x16 bolts + washers + hammer heads Check that the bolt-head from the ball bearing assy goes easily into the lower hole of part 2. For part 3 I used, apart from the ball bearing stuff, 2 M5x10 bolts + washers + hammer heads. In this version there is 1mm more distance from the bed support to the lead screw compared to the original, so you want to check the stepper motor mount places. It was necessary to have some room for the ball bearing bolt and I did want to use the usual variety of bolts, not the ones with flat heads. In both versions you need to check after mounting whether there is enough play for part 1 to move easily between part 2 and the rail. I would appreciate your comments, especially whether you agree that adjusting is wanted and on the plastic-setting point. ;-) Edit (10/01/18): Things looked so bad for a moment that I thought this thing was seriously flawed, because all of a sudden the lead screw went very much askew when I lowered the bed completely, but now I had time to look at it again, I think that shit happened because I let this thing crash into the flexible motor coupling. I don't think it is a good idea to make the thing thinner, to make room for the coupling, so I leave it as it is, with the warning that you should check your lower z-endstop to prevent it from happening to you. Looking at the thing more closely I saw that it just worked better than I thought in the sense that you could see the angle change just a little bit when the bed travels from high up to completely down, as it should, of course, because the angle between the bed supports and the lead screw changes a bit when moving up and down, but I hadn't thought of it. ;-) The more reason to feel that this thing is necessary. And again, this movement diminishes the chance that the complete plastic thing gets fixated, when one uses that. At the same time I think that I prefer the ball bearings even more, because I feel that those can follow these small changes easier.
With this file you will be able to print Lead_Screw_Bracket (Self-Adjusting) with your 3D printer. Click on the button and save the file on your computer to work, edit or customize your design. You can also find more 3D designs for printers on Lead_Screw_Bracket (Self-Adjusting).