Learning Blade 3D Maker Quest - Wind Turbine Model
thingiverse
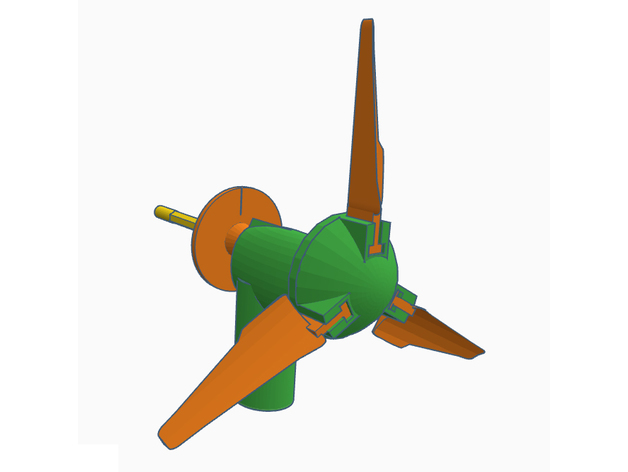
These are the supporting files for the Learning Blade Wind Turbine Model. This Maker Quest gives students practice designing new blades for a wind turbine. The model files in this lesson can be assembled into a simple wind turbine. However, the main purpose of the exercise is to design new turbine blade models. Once the students have designed and printed their turbine blades, they will measure and compare their blades’ efficiency. Overview and Background Have you ever considered how exciting the future of energy production will be? As renewable energy becomes more common, it’s important to keep exploring ways to make energy production more efficient. This exercise gives students practice designing new blades for a wind turbine. The model files in this lesson can be assembled into a simple wind turbine. However, the main purpose of the exercise is to design new turbine blade models. Once the students have designed and printed their turbine blades, they will measure and compare their blades’ efficiency. Lesson Plan and Activity Students should identify and download the files for this exercise to their computer. After downloading, the model file for the turbine blades will need to be customized. There is a file for a sample turbine blade (Turbine Blade.stl) so students can see an example of how the blade will look and connect to the turbine nosecone. Students may either modify that file, or start from the blank blade base file (Turbine Blade base.stl) included in the project files collection. Students may use any 3D modeling software they’re comfortable with to make their own turbine blades. TinkerCad.com is a popular, free 3D modeling application that most students will find easy to use. Regardless of which 3D modeling software the students use, they should be sure to connect their blade design to the blade base provided. This will ensure the students’ designs connect easily to the rest of the wind turbine components. Once the files are ready to print, students should import them into the 3D slicing software. The individual components of the wind turbine are designed to print within a 100 mm x 100 mm x 100 mm print volume. The components could be scaled, but the turbine tower is designed to work with a standard #2 pencil and 2-liter bottle, so any changes in scale could affect the fit of the components. Once the slicing software has prepared the printing instructions, all of the turbine components should be printed and carefully removed from the printing surface. Make sure to print three copies of each student’s turbine blades. Begin the turbine assembly by filling the bottom 4 inches of the 2-liter bottle with the rocks, sand, or water. Then, screw the turbine tower onto the 2-liter bottle. Use the permanent marker to fil in the groove in the round speed indicator disc. Slide the disc onto the #2 pencil, then slide the turbine bushing onto the pencil as shown. Insert the pencil into the hole atop the turbine tower so the bushing is completely inside the tower hole. The pencil should be able to spin freely within the hole. Next, push the turbine nosecone onto the end of the pencil as shown. Now you may insert the students’ turbine blades into the slots in the front of the turbine nosecone. The blades should slide into the nosecone slots and fit snugly. Testing the Efficiency of a Blade Design Each set of turbine blades will be tested to see how quickly they can cause the turbine’s speed indicator disc travel through four complete rotations. Begin a test by making sure all of the turbine blades are firmly seated. Next, place the electric fan 6 inches from the wind turbine. Rotate the pencil until the mark on the speed indicator disc is pointing straight up. Hold the pencil in place until the test begins. Have someone prepare the stopwatch and switch on the electric fan. You should still be holding the pencil and keeping it from spinning. Once the electric fan has spun up to speed, start the stopwatch and release the pencil at the same time. Watch the speed indicator disc and stop the stopwatch once the disc completes four rotations. Turn off the fan and record the time it took the turbine to spin 4 rotations. Each student’s set of turbine blades should be tested in the same manner, making sure the conditions of the tests are as precisely the same as possible. To reduce the effect of testing inconsistencies, and if time permits, each set of blades could be tested multiple times and an average time to four rotations used to represent each students’ blade design. Students should also calculate the Revolutions Per Minute (RPM) their turbine blades achieved. RPM is a good standard for comparing rotational speed. Additional Ideas Once all of the blade designs have been tested, students could be allowed to redesign their blades. They should consider which blade designs performed the best and worst, and use that evaluation to help redesign their blades. Once the second round of blades have been tested, ask the students to discuss why they made the changes they made. Also, have them discuss how the overall blade performance changed in the second round of testing. Materials Needed A 3D printer with PLA, or another printer-compatible filament The 3D model files for this Maker Quest 3D modeling application 3D slicing software An empty 2-liter bottle Rocks, sand, or water (to weight down the bottle) An unsharpened #2 pencil A stopwatch A permanent marker An electric fan
With this file you will be able to print Learning Blade 3D Maker Quest - Wind Turbine Model with your 3D printer. Click on the button and save the file on your computer to work, edit or customize your design. You can also find more 3D designs for printers on Learning Blade 3D Maker Quest - Wind Turbine Model.