LED clock 7 segments
thingiverse
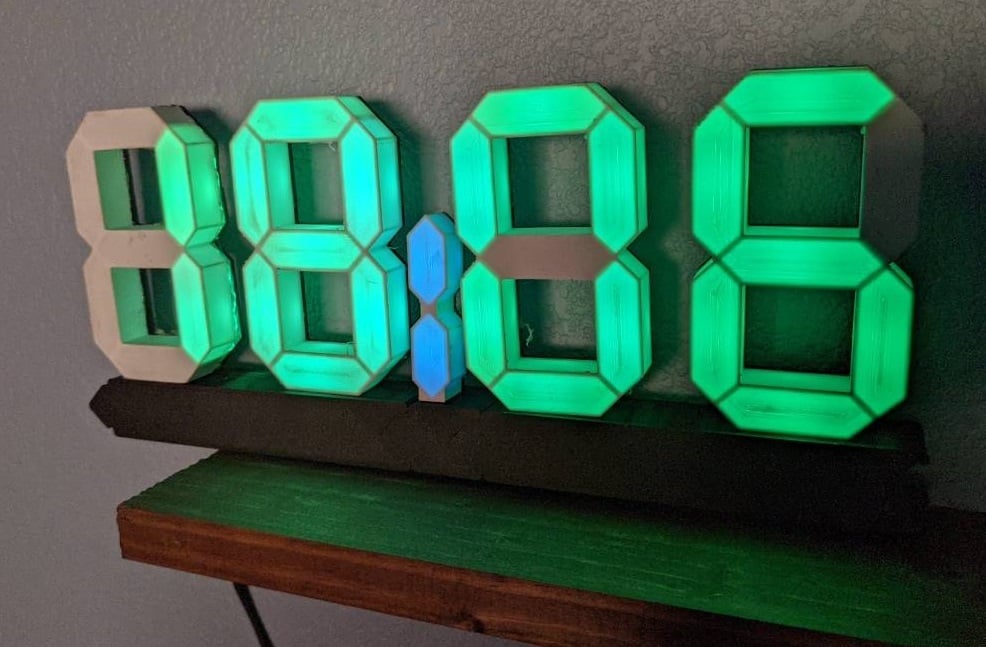
#5 volt WS2812 LED, 7 segment clock programed with ESPHOME and home assistant. This a a remix using STL files for clock of random1101 https://www.thingiverse.com/thing:3437127 Used and modified ESPHOME CODE for D1 mini from Alex18881 https://www.thingiverse.com/thing:4689116 Please read info they provide about 3d printing files. there are added files for 6 numbers if you want to use seconds. (esp code will need to be changed.) I used 2 base for 4 digit ( front and back base_hh and base_ss) and base for dot front and back Used white PLA+ for number face and PLA black for back cover, base and back base cover. #ESPHOME CODE: ( edit your passwords and network info and esphome generated fallback info for your esphome setup device. what GPIO pin you want to use. I used D2) code below. <pre><code> # Enable Home Assistant API api: # edit your generated password, fallback info and wifi info below ota: password: "ESPHOME GENERATED " wifi: ssid: "smarthome1" password: "wireless" # Enable fallback hotspot (captive portal) in case wifi connection fails ap: ssid: "Led-Clock Fallback Hotspot" password: "esphome generated " # below use your device-name in substitutions and name of ESPHOME name. # substitutions: device_name: led-clock esphome: name: led-clock platform: ESP8266 board: d1_mini #### only changes from hear down needed is # your timezone in the TIME section # GPIO pin and LED type in the #--------- LED strip ---------------- section towards the bottom #### on_boot: - light.turn_on: id: led_strip brightness: 100% red: 0 green: 0 blue: 0 effect: "${device_name} Time effect" logger: level: DEBUG globals: - id: hours_red_value type: int restore_value: yes initial_value: '0' - id: hours_green_value type: int restore_value: yes initial_value: '0' - id: hours_blue_value type: int restore_value: yes initial_value: '0' - id: minutes_red_value type: int restore_value: yes initial_value: '0' - id: minutes_green_value type: int restore_value: yes initial_value: '0' - id: minutes_blue_value type: int restore_value: yes initial_value: '0' - id: dots_red_value type: int restore_value: yes initial_value: '0' - id: dots_green_value type: int restore_value: yes initial_value: '0' - id: dots_blue_value type: int restore_value: yes initial_value: '0' output: #======== Hours ============ - platform: template id: hours_red_output type: float write_action: lambda: |- id(hours_red_value) = 255.0 * state; - platform: template id: hours_green_output type: float write_action: - lambda: |- id(hours_green_value) = 255.0 * state; - platform: template id: hours_blue_output type: float write_action: lambda: |- id(hours_blue_value) = 255.0 * state; #========= Minutes =========== - platform: template id: minutes_red_output type: float write_action: lambda: |- id(minutes_red_value) = 255.0 * state; - platform: template id: minutes_green_output type: float write_action: lambda: |- id(minutes_green_value) = 255.0 * state; - platform: template id: minutes_blue_output type: float write_action: lambda: |- id(minutes_blue_value) = 255.0 * state; #========= dots =========== - platform: template id: dots_red_output type: float write_action: lambda: |- id(dots_red_value) = 255.0 * state; - platform: template id: dots_green_output type: float write_action: lambda: |- id(dots_green_value) = 255.0 * state; - platform: template id: dots_blue_output type: float write_action: lambda: |- id(dots_blue_value) = 255.0 * state; ##### edit your time zone ### time: - platform: sntp id: sntp_time timezone: "US/Pacific" servers: - 0.pool.ntp.org - 1.pool.ntp.org - 2.pool.ntp.org light: - platform: rgb name: "${device_name} hours lights" id: 'hours_lights' red: hours_red_output green: hours_green_output blue: hours_blue_output - platform: rgb name: "${device_name} minutes lights" id: 'minutes_lights' red: minutes_red_output green: minutes_green_output blue: minutes_blue_output - platform: rgb name: "${device_name} dots lights" id: 'dots_lights' red: dots_red_output green: dots_green_output blue: dots_blue_output ####### edit your pin a and chipset below ################## #--------- LED strip ---------------- - platform: fastled_clockless id: led_strip name: "Led strip" internal: True pin: D2 num_leds: 30 chipset: WS2812B rgb_order: GRB effects: - addressable_lambda: name: "${device_name} Time effect" update_interval: 200ms lambda: |- const int ledsInDigitCount = 7; const int digitsCount = 4; int digitsLeds[10][ledsInDigitCount] = { {1,1,0,1,1,1,1}, {0,0,0,1,0,0,1}, {1,1,1,1,1,0,0}, {1,0,1,1,1,0,1}, {0,0,1,1,0,1,1}, {1,0,1,0,1,1,1}, {1,1,1,0,1,1,1}, {0,0,0,1,1,0,1}, {1,1,1,1,1,1,1}, {1,0,1,1,1,1,1} }; int ledOffsets[digitsCount] = {23 , 16, 7, 0}; auto time = id(sntp_time).now(); int colors[4][3] = { {id(hours_red_value), id(hours_green_value), id(hours_blue_value)}, {id(hours_red_value), id(hours_green_value), id(hours_blue_value)}, {id(minutes_red_value), id(minutes_green_value), id(minutes_blue_value)}, {id(minutes_red_value), id(minutes_green_value), id(minutes_blue_value)} }; int values[digitsCount] = {}; values[0] = time.hour / 10; values[1] = time.hour % 10; values[2] = time.minute / 10; values[3] = time.minute % 10; it.all() = Color(0,0,0); if ((time.second % 2) > 0) { it[14] = Color(id(dots_red_value), id(dots_green_value), id(dots_blue_value)); it[15] = Color(id(dots_red_value), id(dots_green_value), id(dots_blue_value)); } for (int valueI = 0; valueI < digitsCount; valueI++) { int ledsOffset = ledOffsets[valueI]; int timeValue = values[valueI]; int *color = colors[valueI]; int *leds = digitsLeds[timeValue]; for (int ledI = 0; ledI < ledsInDigitCount; ledI++) { if(leds[ledI] > 0) { int ledIndex = ledI + ledsOffset; it[ledIndex] = Color(color[0], color[1], color[2]); } } } </code></pre> End of code. I'm a beginner at ESPHOME and ESP code so I don't know much about it. when I ran my bench test with my bench d1mi using WLED program code to check my lights and wires everything works great full brightness and lower brightness. BUT... with the ESPHOME code you have to turn on the clock with homeassistant when powering up. and then when playing with it and setting up DIMMING and color automations for the clock brightness if i set the brightness level to less that 60% the lights flicker and less than 50% no lights at all. I believe its the way the clock program makes the numbers by reducing the brightness to make numbers and when you mess with the brightness for all the numbers is causes issues. Stuff a epsphome programed D1 mini and wires in base. connected to just a usb and power brick draws under 1amp. LED data is daisy chained from each number and dot flows from the last minute to first hour from your right to left. Wires between each numbers LED nodes 1 to 6 are about 32mm long and node 6 to 7 are about 84mm long. 5 volt, ground, data IN then data OUT to next number or dot. Low amp so recycled cat5 24g wire works great keep data lines as short as possible. Glue the front of numbers to back. I used hot glue to make it easy to take apart if needed. short 5mm M3 bolts or equivalent to secure the back cover of base.
With this file you will be able to print LED clock 7 segments with your 3D printer. Click on the button and save the file on your computer to work, edit or customize your design. You can also find more 3D designs for printers on LED clock 7 segments .