LED lit acrylic w/ bluetooth speakers
thingiverse
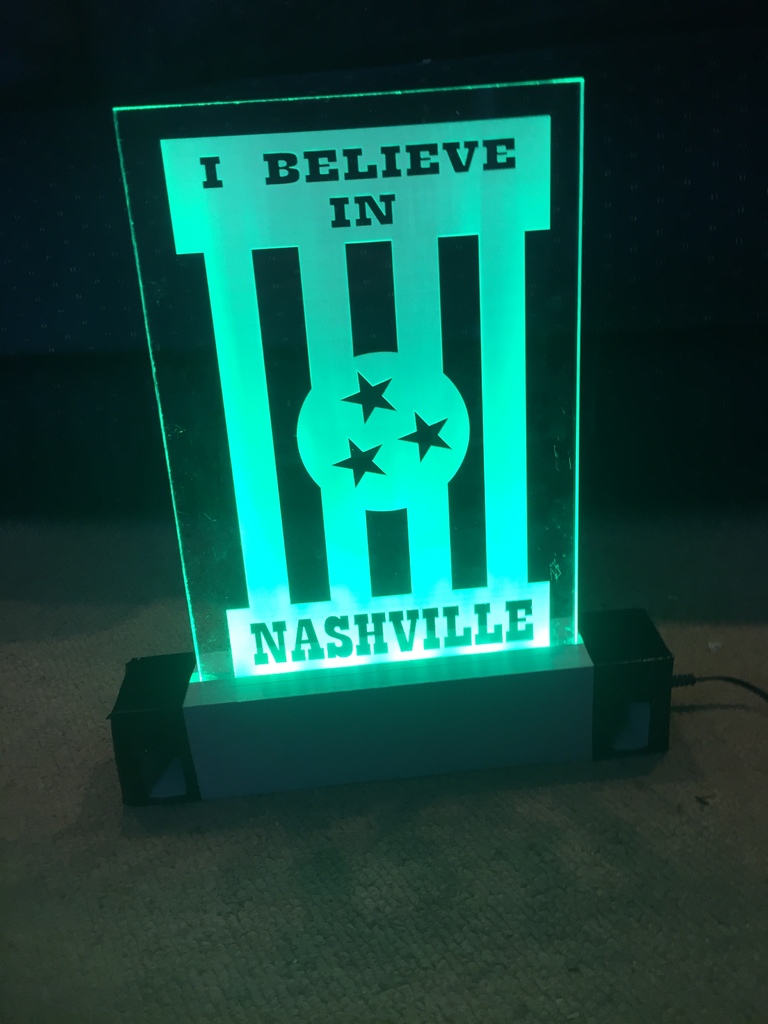
Quick sidenote, if you recreate or make this at all, I would LOVE to see it!! Please post makes or remixes either here or tag stovie_steam on insta!! Happy creating everyone For this project, the 3D printed parts were the base to hold the clear plexiglass/acrylic piece as well as house all of the electronics. Both parts "click" together in a sense (there is a slight rib on one piece and indentation on the other where they go together. The other materials for this project (as well as links to where I got parts) are: 1. mini speakers 2. bluetooth controller 3. LED wifi light controller 4. LED lights 5. 12v to 5v converter (I used the chip from a usb car charger) 6. acrylic/plexiglass 7. accesss to a laser engraver (I went to the makerspace at a local college for my project) Links: 1. https://www.digikey.com/product-detail/en/cui-inc/GC0351M-3/GC0351M-3-ND/383533?WT.srch=1&gclid=Cj0KCQiA37HhBRC8ARIsAPWoO0xkKdGaGmbidq26QKyK-QmSb89EHsW8wzNldfFzSSTJEEdyX-PE8-kaAn2IEALw_wcB 2. https://www.amazon.com/KNACRO-Wireless-Bluetooth-Receiver-Amplifier/dp/B01EW6IJ1Y/ref=sr_1_10?ie=UTF8&qid=1546461476&sr=8-10&keywords=bluetooth+audio+board 3. https://www.amazon.com/SUPERNIGHT-Wireless-Controller-Working-Compatible/dp/B01JS0KEBW/ref=sr_1_2_sspa?ie=UTF8&qid=1547148576&sr=8-2-spons&keywords=led+wifi+controller&psc=1 4. you can just search LED light strips on amazon and find a cheaper version without a remote or you can use this link: https://www.amazon.com/Lighting-Flexible-Changing-Controller-Not-Waterproof/dp/B06XT86B67/ref=sr_1_2_sspa?ie=UTF8&qid=1547148691&sr=8-2-spons&keywords=led+light+strip&psc=1 5. just find a converter on amazon or buy a usb car charger at your local store 6. bought mine at a local plastic scrap place, you may find it cheap on amazon or another site STEPS TO MAKING IT 1. Gather all the parts 2. Use a laser engraver to engrave and cut the acrylic. Engrave your design and make sure the length of the acrylic is 7 inches or less (or if you are capable, edit the dimensions of the base) 3. Solder the speakers to the wires on the bluetooth controller 4. Attach a micro-usb to the 12v to 5v converter 5. Solder together wires from the LED controller to the other side of the 12v convertor (you will need to cut and strip the wire on the LED controller so that you can solder wires together. 6. Plug everything in 7. Put it all in the 3D printed enclosure and glue it together (all pictures shown display electrical tape as a temporary adhesive) FOR MORE VISUALS, I POSTED MOST OF THE PROCESS ON MY INSTAGRAM @ stovie_steam https://www.instagram.com/stovie_steam/ Feel free to ask questions and if you recreate this - PLEASE POST PICS!! I'd love to see everyone's renditions!! Either post here under the make/remix tab or tag me in it on insta!! Happy building and creating everyone!!
With this file you will be able to print LED lit acrylic w/ bluetooth speakers with your 3D printer. Click on the button and save the file on your computer to work, edit or customize your design. You can also find more 3D designs for printers on LED lit acrylic w/ bluetooth speakers.